Versionen im Vergleich

Schlüssel

  • Diese Zeile wurde hinzugefügt.
  • Diese Zeile wurde entfernt.
  • Formatierung wurde geändert.

...

Deutsch


Panel
borderColor#d0d1d4
borderStylesolid

Zusammenfassung

Einrichtung eines IMAP-Kontos in Outlook.

Panel
borderColor#d0d1d4
borderStylesolid

Diese Anleitung richtet sich besonders an folgende Zielgruppen:

Studierende

  • Zweit- und Gasthörende
  • Lehrende
  • Mitarbeitende
  • Einrichtungen und Gremien (z.B. Fachschaftsräte)
  • Arbeitsbereiche / Gruppen (z.B. Projekte)
  • Gäste der Friedrich-Schiller-Universität
  • alle sonstigen Zwecke
  • Voraussetzungen


    Einbinden eines IMAP-Kontos in Outlook unter Windows

    1. Schritt: Überprüfen des eigenen Mail-Kontos (optional)

    Bitte prüfen Sie, auf welcher Technik Ihr Postfach basiert. Hier wird die Einrichtung für IMAP/SMTP (Webmail - Horde Groupware) beschrieben.

    2. Schritt: Öffnen von Outlook

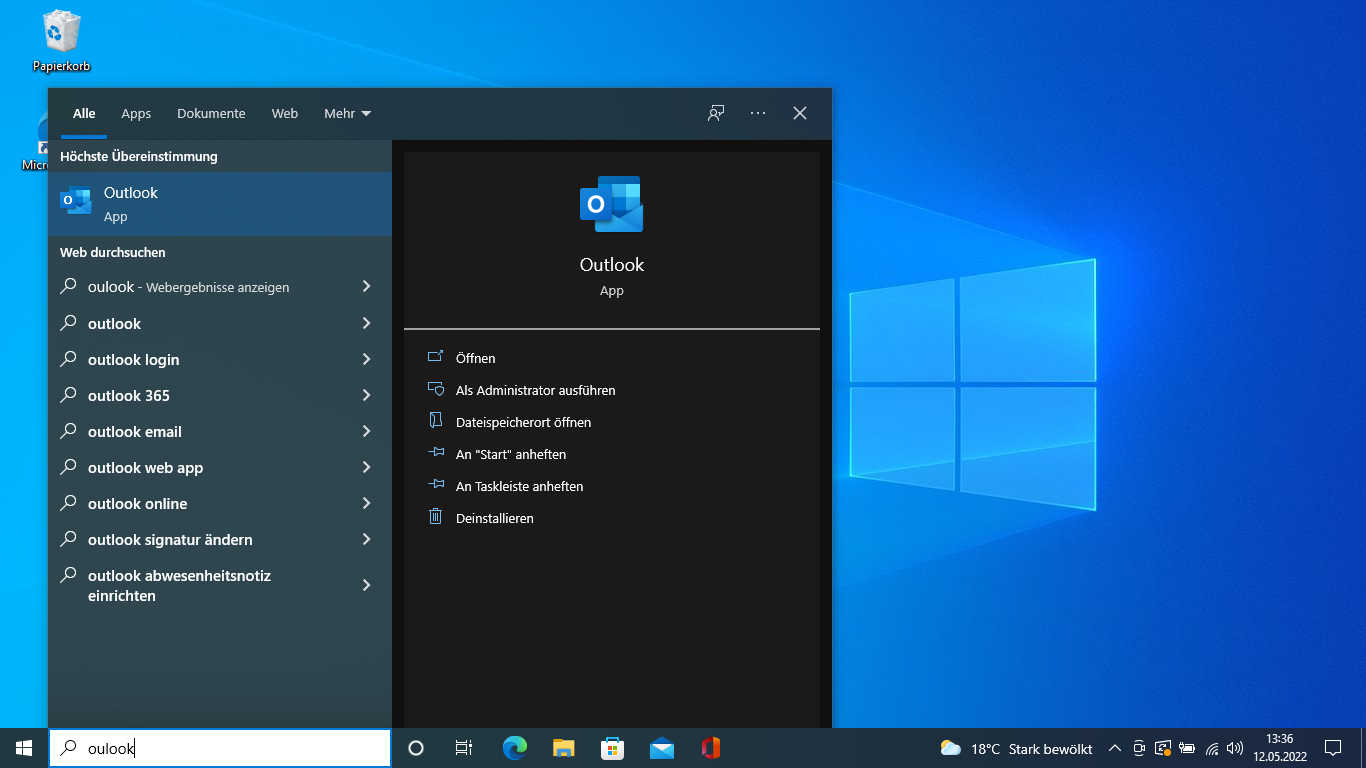
    Öffnen Sie die Suchleiste mit der Windowstaste

    Win

    Suchen Sie nach Outlook und öffnen Sie das programm. Falls Sie noch kein Outlook installiert haben sollten, finden Sie hier eine Anleitung zur Installation von Microsoft 365 Apps.


    (zum Vergrößern auf das Bild klicken)

    3. Schritt: Anmelden mit Mailadresse der Uni Jena

    Melden Sie sich mit Ihrem Uni Jena Konto an.

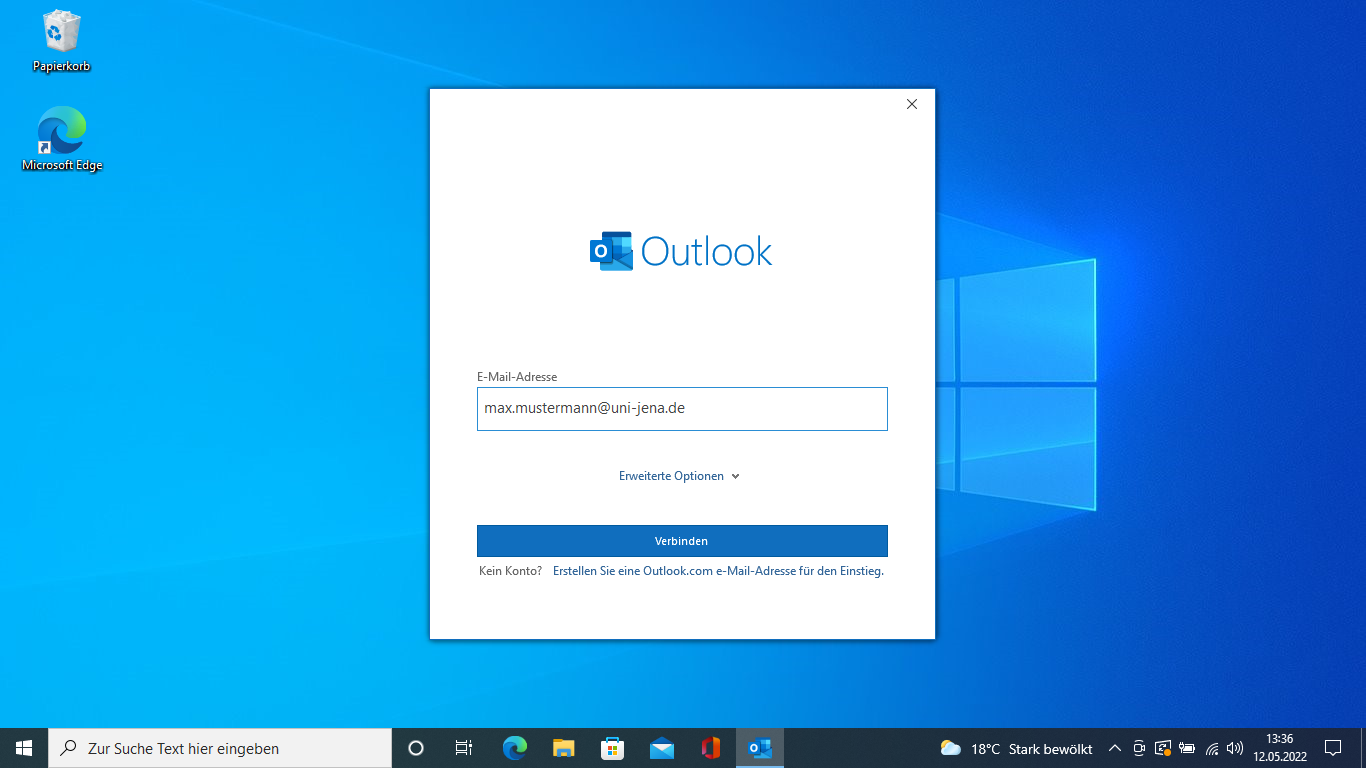
    Geben Sie Ihre Mailadresse vorname.nachname@uni-jena.de als Login ein. Bspw.

    Erweitern
    title1. Option: Bisher kein Outlook eingerichtet

    Sollten Sie bisher keine E-Mail-Adresse bei Outlook eingerichtet haben, geben Sie Ihre Mailadresse ein bspw. max.mustermann@uni-jena.de nicht Ihr

    Login

    Anmelde-Kürzel.

    Image Modified

    (zum Vergrößern auf das Bild klicken)

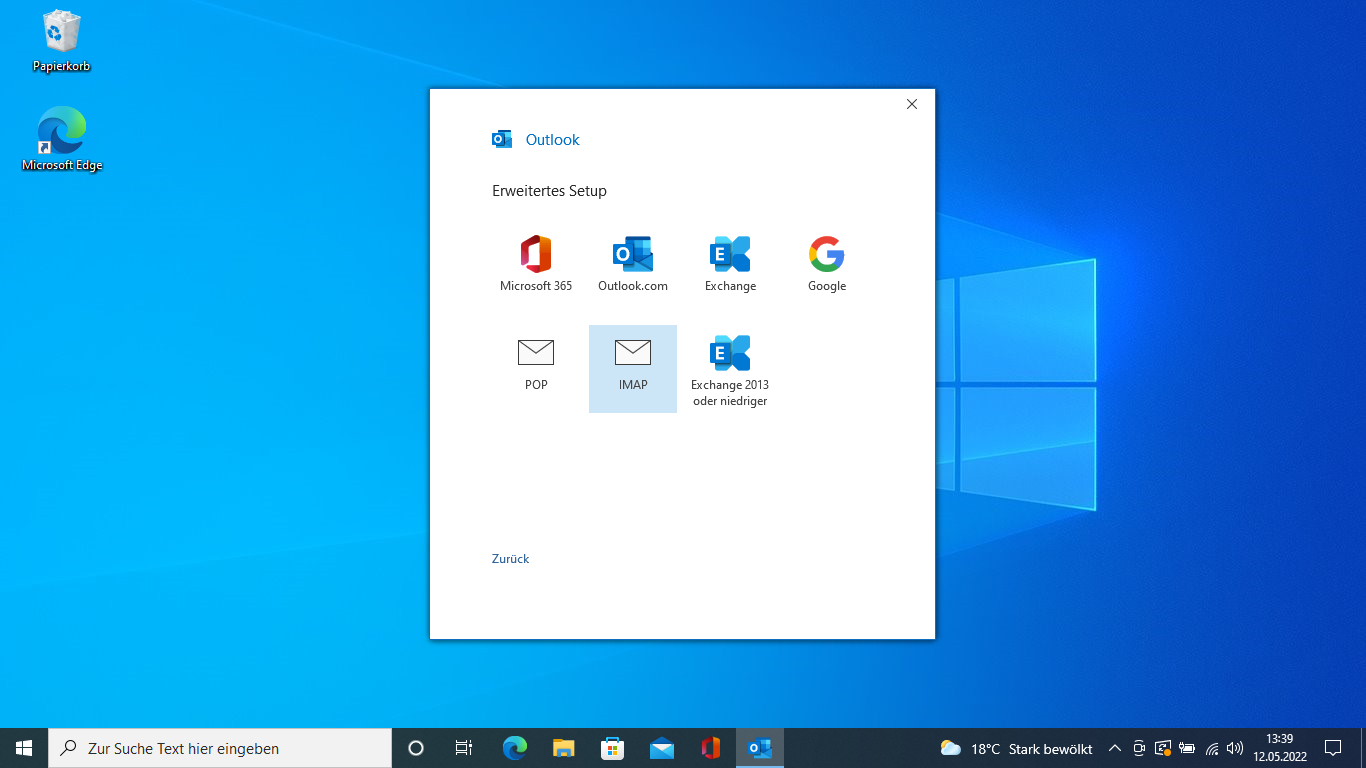
    Wählen Sie im folgenden Menü als Kontooption IMAP aus

    Image Removed

    Image Added
    (zum Vergrößern auf das Bild klicken)

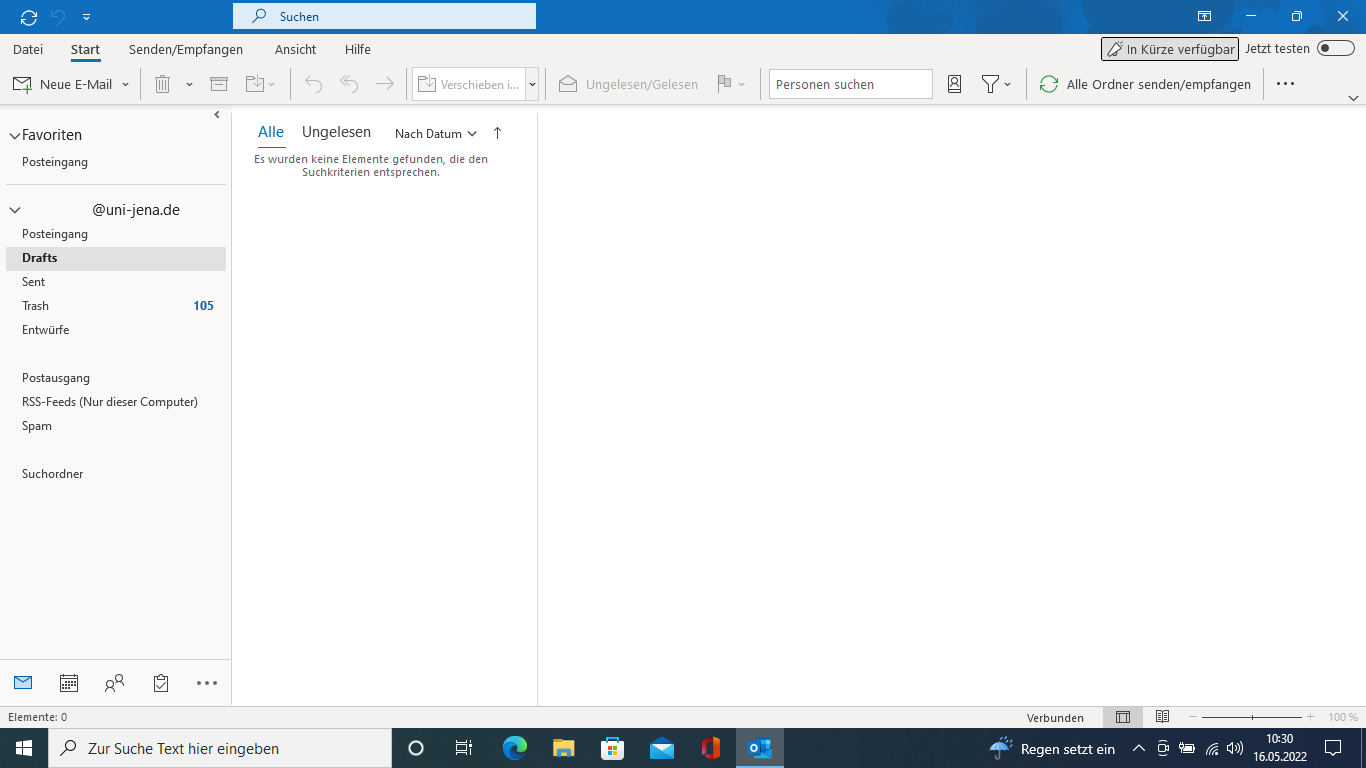
    Jetzt wird Ihr Postfach heruntergeladen, das kann einige Minuten dauern.

    Image Modified
    (zum Vergrößern auf das Bild klicken)

    Erweitern
    title2. Option: Outlook bereits eingerichtet

    Sollten Sie bereits Outlook mit einer Mail-Adresse nutzen, klicken Sie auf "Datei"

    Image Added
    (zum Vergrößern auf das Bild klicken)

    Klicken Sie jetzt auf "Konto hinzufügen".

    Image Added
    (zum Vergrößern auf das Bild klicken)

    Geben Sie Ihre neu einzurichtende Mailadresse ein bspw. max.mustermann@uni-jena.de nicht Ihr Anmelde-Kürzel.

    Image Added
    (zum Vergrößern auf das Bild klicken)

    Nach einer kurzen Wartezeit müssen Sie im neuen Fenster die Option "IMAP" auswählen.

    Image Added
    (zum Vergrößern auf das Bild klicken)

    Im nächsten Schritt müssen Sie die Server für eingehende E-Mails (imap.uni-jena.de) und ausgehende E-Mails (smtp.uni-jena.de) eingeben, so wie im unteren Bild gezeigt. Klicken Sie anschließend auf "Weiter".

    Image Added
    (zum Vergrößern auf das Bild klicken)

    Nun müssen Sie noch Ihr Passwort für das Mail-Konto, welches Sie hinzufügen wollen, angeben.

    Image Added
    (zum Vergrößern auf das Bild klicken)

    Jetzt haben Sie das neue Mail-Konto erfolgreich hinzugeügt. Klicken Sie im Fenster auf "Vorgang abgeschlossen".

    Image Added
    (zum Vergrößern auf das Bild klicken)

    Nun sehen Sie im Fenster auf der linken Seite Ihr zweites Postfach.

    Image Added
    (zum Vergrößern auf das Bild klicken)


    Panel
    borderColor#d0d1d4
    borderStylesolid

    Titel: "Windows— Mail einrichten (IMAP)"

    Stand: 04.07.2022


    ...

    Englisch


    Panel
    borderColor#d0d1d4
    borderStylesolid

    Summary

    Setting up an IMAP account in Outlook.

    Panel
    borderColor#d0d1d4
    borderStylesolid

    This guide is aimed at the following target groups: 

    Students

  • Zweit- und Gasthörende
  • Teachers
  • Employees
  • Institutions and Commitees (e.g. student councils)
  • Working groups (e.g. projects)
  • Guests of the University of Jena
  • All other purposes

  • Requirements


    Including an IMAP account in Outlook on Windows

    1. Step: Checking your own user account (optional)

    To check if your account is an IMAP account, please follow these instructions.

    2. Step: Open Outlook

    Open the search bar with the Windows key

    Win

    Search for Outlook and open the program. If you don't have Outlook installed yet, you can find instructions on how to install Microsoft 365 Apps here.


    (click to enlarge the picture)

    3. Step: Log in with Microsoft account of the University of Jena

    Log in with your Uni Jena account.

    Enter your mail address name.surname@uni-jena.de as user ID. E.g. max.mustermann

    Erweitern
    title1. option: no e-mail adress in Outlook

    If you have not yet set up an e-mail address with Outlook, enter your e-mail address, e.g. max.mustermann@uni

    @uni

    -jena.de, not your

    short Login-Name

    user login.

    Image Modified
    (click to enlarge the picture)

    In the following menu, select IMAP as the account option.

    Image Modified
    (click to enlarge the picture)

    You can now use Outlook as usual for your mail traffic.

    Image Modified
    (click to enlarge the picture)

    Erweitern
    title2. option

    If you already use Outlook with a mail address, click on "File".

    Image Added
    (click to enlarge the picture)

    Now click on "Add account".

    Image Added
    (click to enlarge the picture)

    Enter your new mail address to be set up e.g. max.mustermann@uni-jena.de not your user login.

    Image Added
    (click to enlarge the picture)

    After a short waiting time, select the “IMAP” option in the new window.

    Image Added
    (click to enlarge the picture)

    In the next Step you have to type in the correct Server-Adress for receiving E-Mails (imap.uni-jena.de) and outgoing E-Mails (smtp.uni-jena.de) as shown in the screenshot below. After that click on "Continue".

    Image Added
    (click to enlarge the picture)

    Now you have to type in your password of the Mail-Account you want to add.

    Image Added
    (click to enlarge the picture)

    Now your Mail-Account has been added. Close the window by clicking on "Vorgang abgeschlossen".

    Image Added
    (click to enlarge the picture)

    Now you will see your second mailbox in the table on the left.

    Image Added
    (click to enlarge the picture)


    Panel
    borderColor#d0d1d4
    borderStylesolid

    Titel: "Windows— Set up Outlook (IMAP)"

    Stand: 04.07.2022


    ...