Versionen im Vergleich

Schlüssel

  • Diese Zeile wurde hinzugefügt.
  • Diese Zeile wurde entfernt.
  • Formatierung wurde geändert.

HideElements
commentstrue
breadcrumbfalse

Deutsch


Panel
borderColor#d0d1d4
borderStylesolid

Zusammenfassung

Nachstehend finden Sie Informationen, Hinweise und Anleitungen zum Umgang mit Videos in Moodle.


Panel
borderColor#d0d1d4
borderStylesolid

Diese Anleitung richtet sich an Nutzende der E-Learning-Plattformen der Universität Jena entsprechend ihrer Rollen und Rechte


Englisch


Panel
borderColor#d0d1d4
borderStylesolid

Summary

Below you will find information, hints and manuals for dealing with videos in moodle.


Panel
borderColor#d0d1d4
borderStylesolid

These instructions are intended for users of the e-learning platform of the University of Jena according to their roles and rights.


Deutsch


                             So kommen (Vorlesungs-) Videos in Ihren Moodle-Kursraum                           


Englisch


                            How to get videos (from your lectures) into moodle                          


Deutsch

Aufzeichnungen planen (via Friedolin)


Englisch

Plan your lectures (via Friedolin)


Deutsch

Videos selbst hochladen


Englisch

Upload videos yourself


Deutsch

Videos

aus einem alten/anderen Kurs

wiederverwenden


Englisch

Reuse videos

from another course


Deutsch

Wenn Sie Ihre Lehrveranstaltung aufzeichnen und/oder streamen möchten, dann aktivieren Sie in Friedolin bitte folgende Checkbox:

Im Reiter E-Learning finden Sie die Option Veranstaltung aufzeichnen/streamen – hier setzen Sie bitte den Haken.

Dem MMZ werden damit alle notwendigen Informationen übermittelt, die Veranstaltung kann entsprechend eingeplant werden. Im Anschluss an die Veranstaltung, werden die fertigen Videos in Ihrem Moodle-Raum abgelegt und Sie können diese ihren Studierenden zur Verfügung stellen.


Englisch

If you would like to record and/or stream your course, please activate the following checkbox in Friedolin:

In the e-learning tab you will find the option Record/stream event - please check the box here.

All necessary information is thus sent to the MMZ, and the event can be planned accordingly. After the event, the finished videos will be stored in your Moodle room and you can make them available to your students.


Image RemovedImage Added


Deutsch

Alternativ können Sie natürlich auch selbst aufgenommen/produzierte Videos verwenden.

Hier nutzen Sie bitte den Block Open Cast in Ihrem Moodle-Kursraum, um ein solches Videos hochzuladen – die entsprechende Anleitung finden Sie weiter unten auf dieser Seite.


Englisch

Alternatively, you can of course also use videos you have recorded/produced yourself.

Please use the block Opencast videos in your Moodle course room to upload such a video - the corresponding instructions can be found further down on this page.


Deutsch
Warnung
iconfalse

Es ist leider nicht möglich, Videos aus einem alten/anderen Kurs per Kopierfunktion wiederzuverwenden. Die Videos scheinen zwar im neuen Kurs zu sein, sind für die Teilnehmenden jedoch nicht abspielbar.

Bitten lesen Sie dazu den Abschnitt Videos aus einem andere Kurs wiederverwenden

Englisch
Warnung
iconfalse

Unfortunately, it is not possible to reuse videos from an old/different course using the copy function. Although the videos appear to be in the new course, they are not playable for the participants.

Please read the section Reusing videos from another course.

Erstellen Sie eine Kurssicherung und aktivieren Sie die Checkbox Opencast Videos in diesem Kurs einbeziehen einbeziehen.

oder

Importieren Sie eine Serie.


Beide Varianten werden im Abschnitt Videos aus einem anderen Kurs wiederverwenden genauer beschrieben.


Englisch

Create a course backup and check the Include Opencast videos in this course checkbox.

or

Import a series.


Both variants are described in more detail in the Reusing videos from another course section.


Deutsch

Opencast

Deutsch

Videos im Moodle-Kursraum einbinden


Englisch

Embed Opencast videos in the Moodle course room


In der sich öffnenden Dialogbox geben Sie nun die Serien-ID ein.

Die Serien-ID können Sie im alten Moodle-Kursraum auslesen, wenn Sie auch dort den Block Opencast Videos einblenden und in die Ansicht Serien verwalten gehen.

Wenn Sie die ID eingegeben haben, klicken Sie auf Serie importieren, um den Import zu starten. Sobald dieser abgeschlossen ist, erscheint die Serie in der Liste.

Wechseln Sie im Anschluss wieder zurück zur Video-Übersichtsseite – dort finden Sie die importierte Serie und können diese nun als Ganzes oder einzelne Videos in Ihren Moodle-Kursraum einbinden und zur Verfügung stellen.

Deutsch


Info
iconfalse

Damit Sie Videos mit Opencast in Ihrem Moodle-Kurs einbinden können, benötigen Sie zunächst den Block Opencast Videos, den Sie wie folgt zu Ihrem Kurs hinzufügen:


Erweitern
titleDen Block Opencast Videos zum Kurs hinzufügen


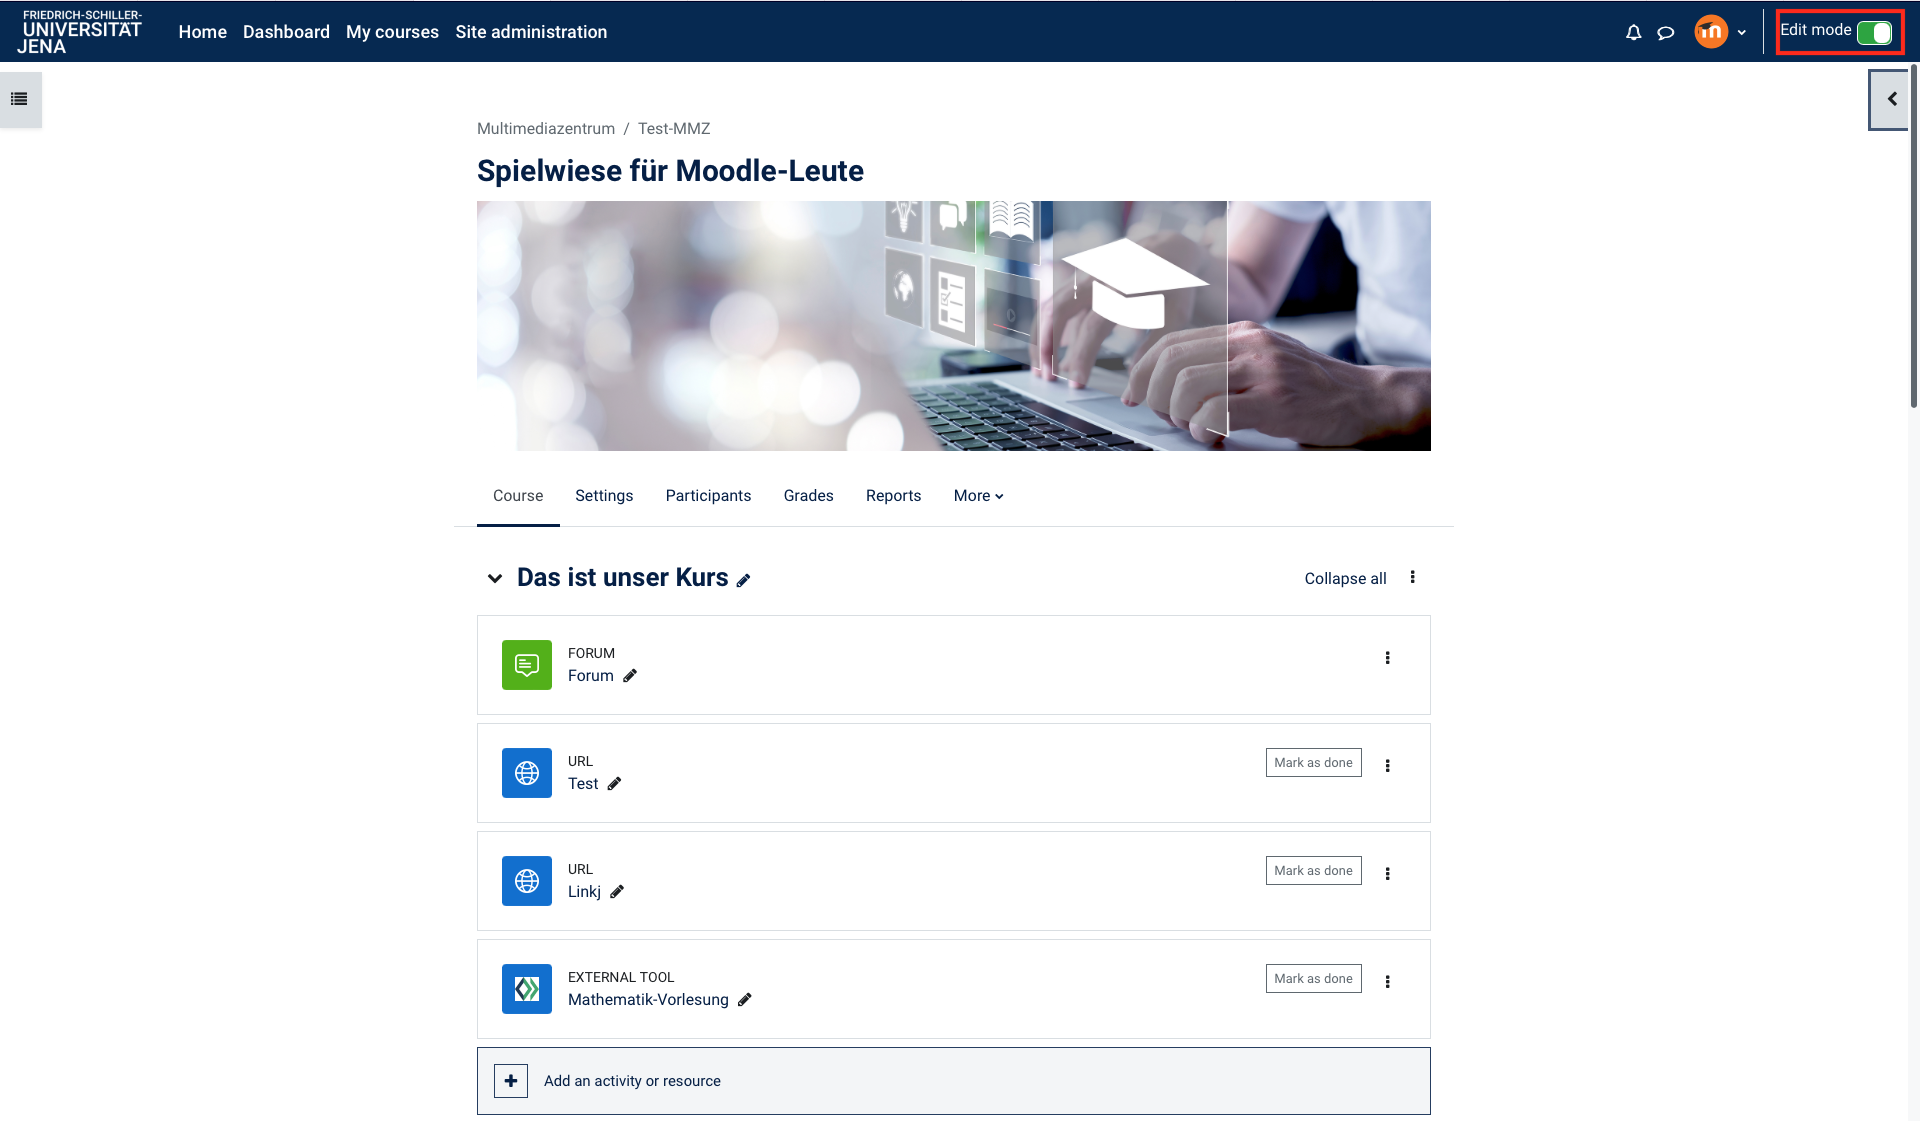
Wechseln Sie im Moodle in einen Ihrer Kurse. Klicken Sie im Anschluss oben rechts auf Bearbeiten einschalten.

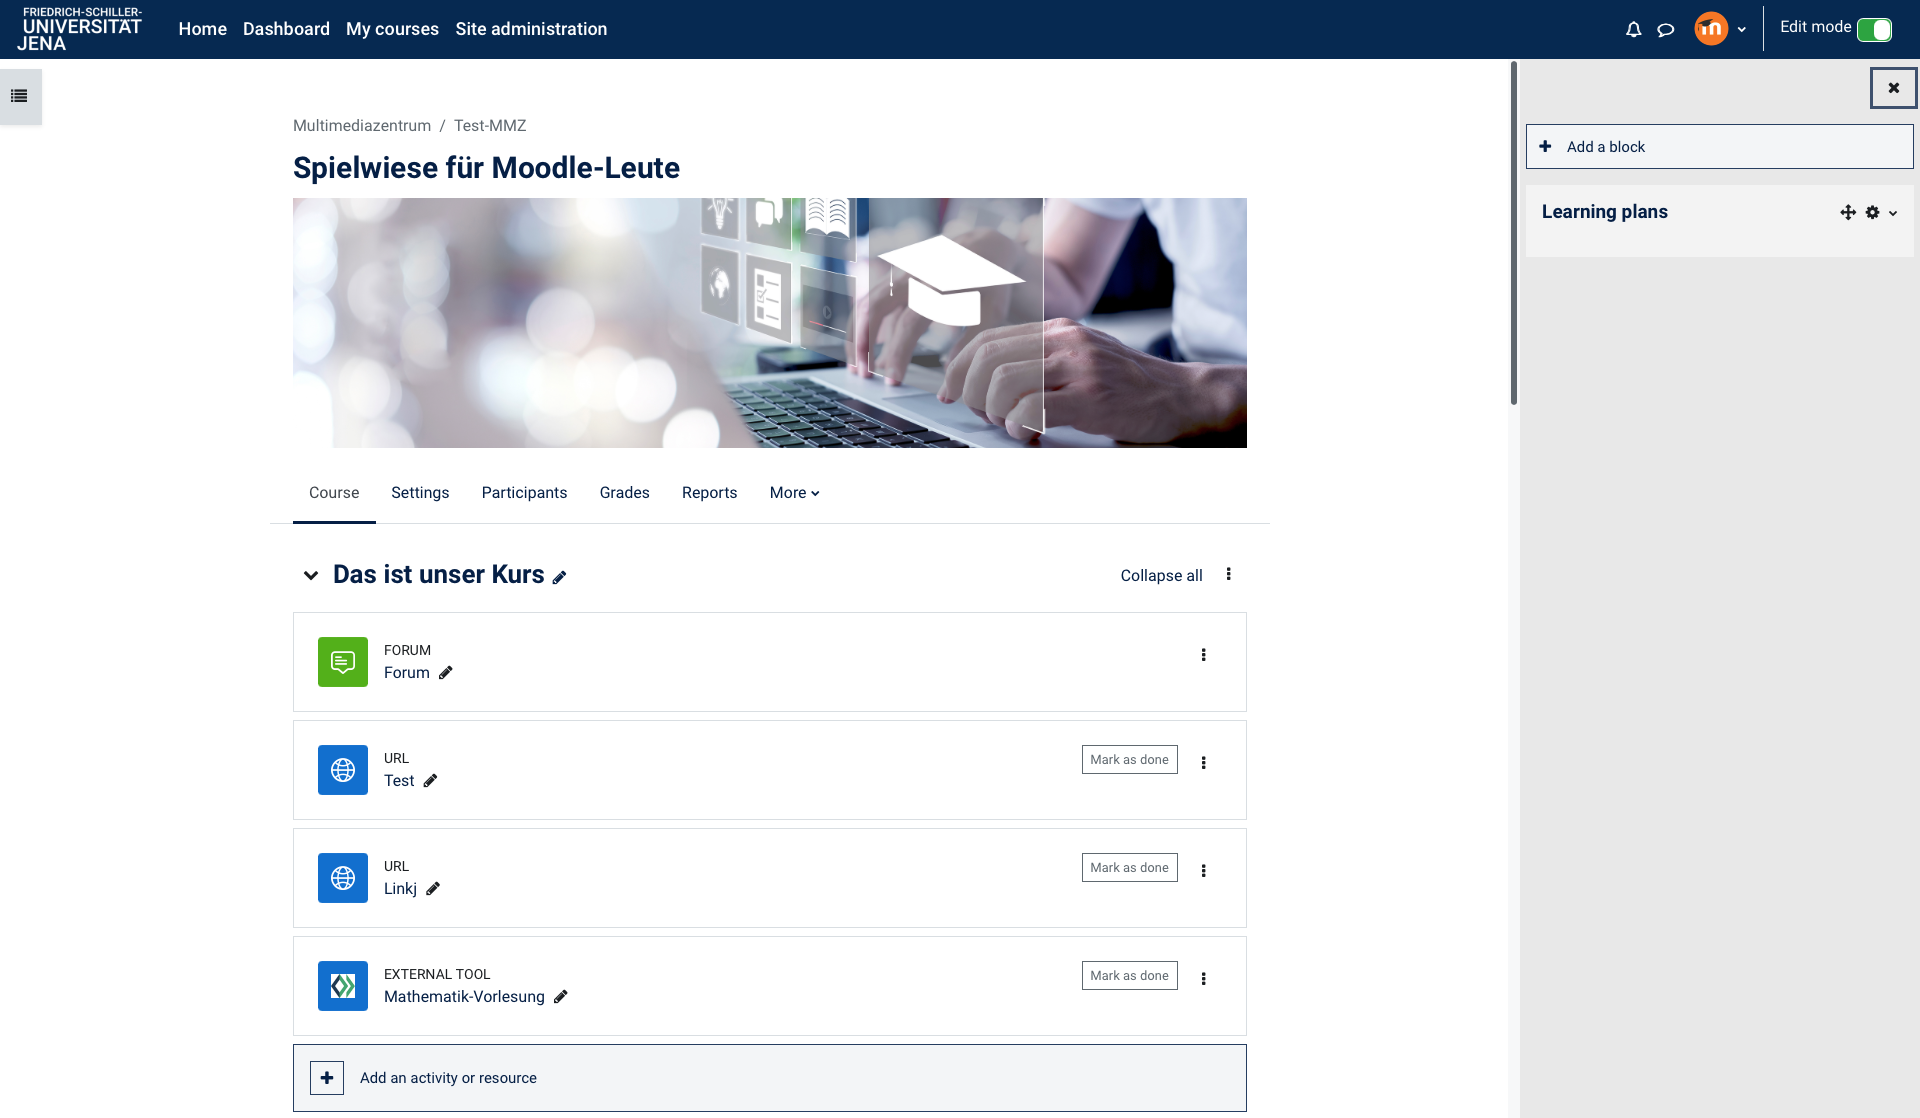
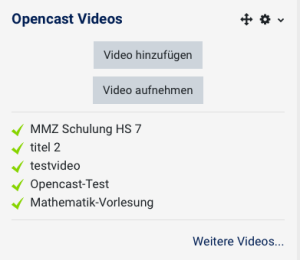
Im rechten Bereich – dort, wo die Seitenleiste ist – erscheint der Button Block hinzufügen


warning

Image Added

Sollten Sie diesen Button nicht gleich sehen, scrollen Sie links in der Ansicht ganz nach unten! Sollten Sie viele Kurse besitzen, kann es sein, dass die Liste links sehr lang ist, der Button erscheint immer ganz unten drunter. Also Scrollen nicht vergessen.

Image Removed

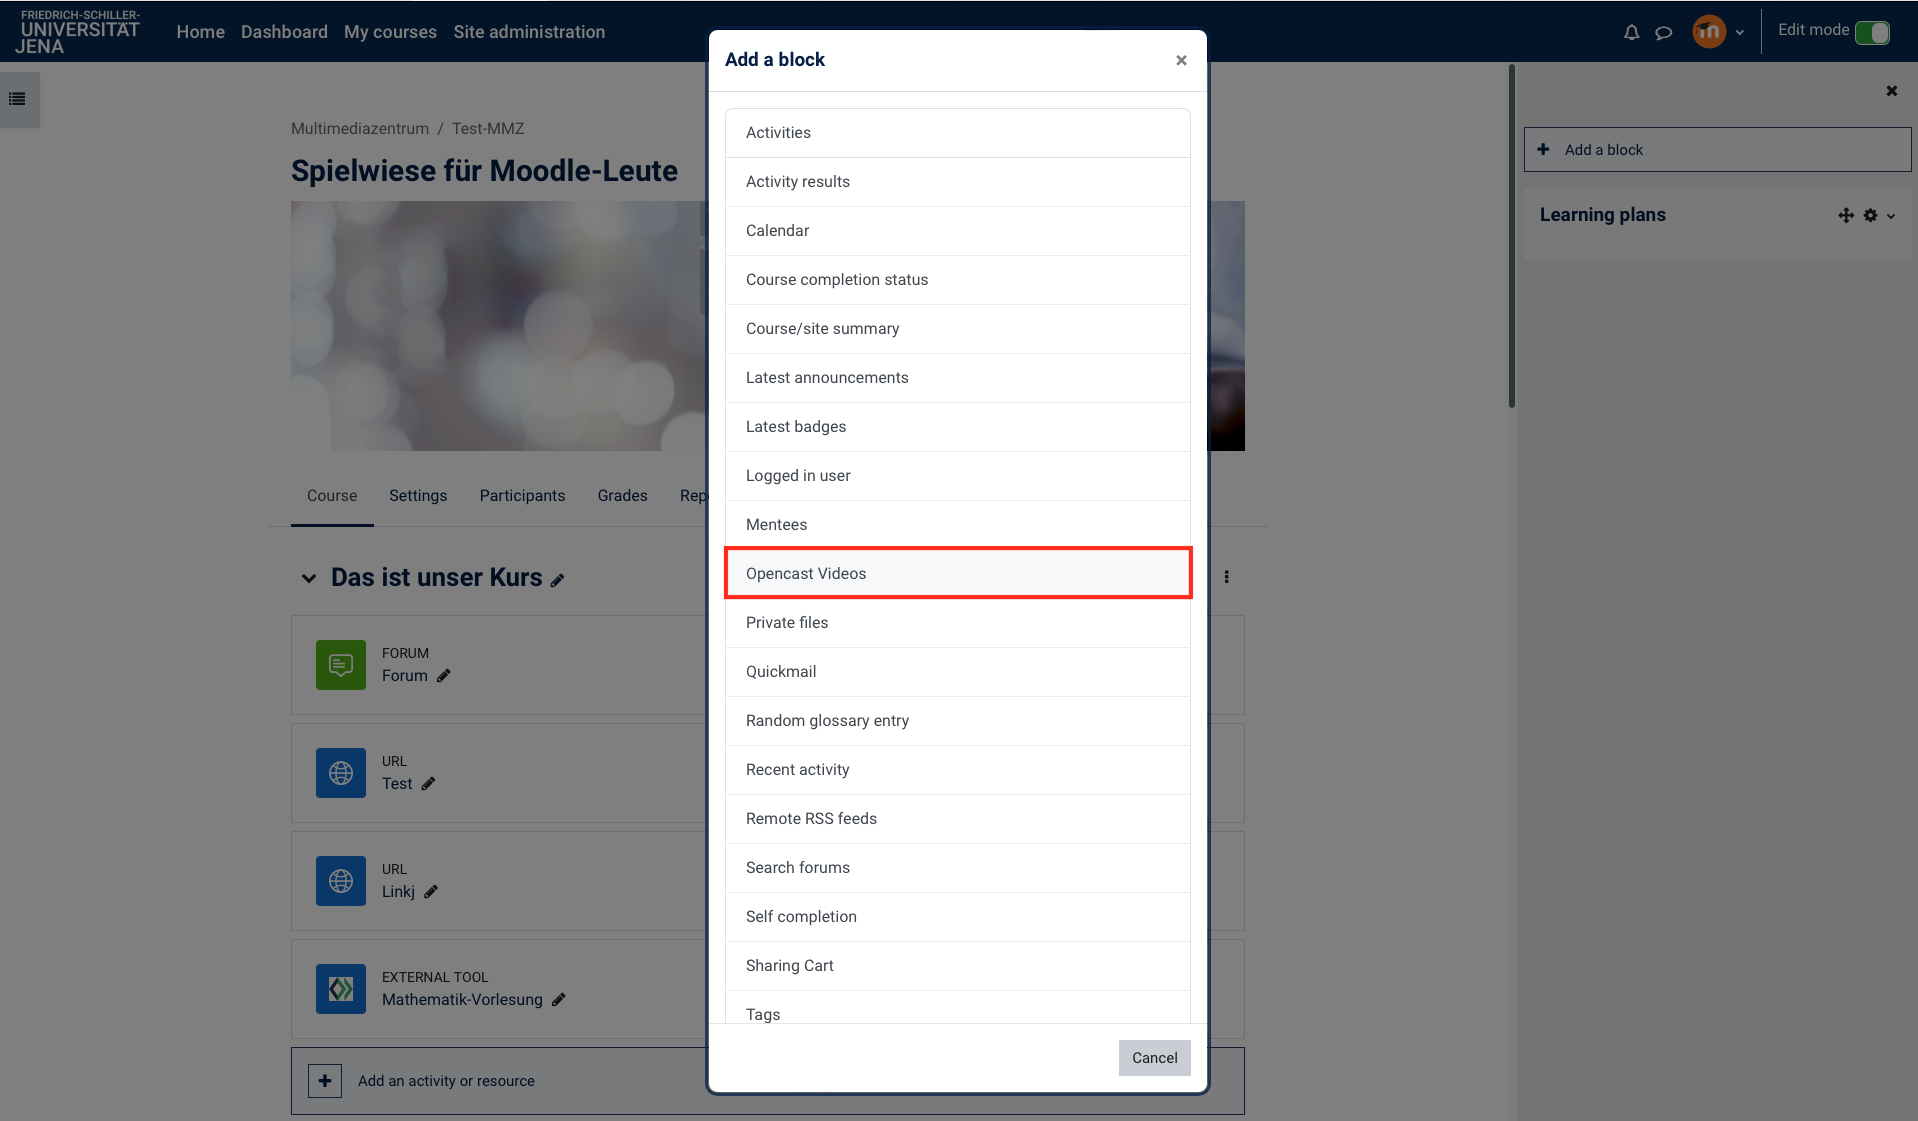
Klicken Sie auf Block hinzufügen und wählen im sich öffnenden Dialog die Option Opencast Videos aus, um diesen Block zu Im Anschluss wählen Sie im sich öffnenden Dialog die Option Opencast Videos aus, um diesen Block zu Ihrer Seite hinzuzufügen.

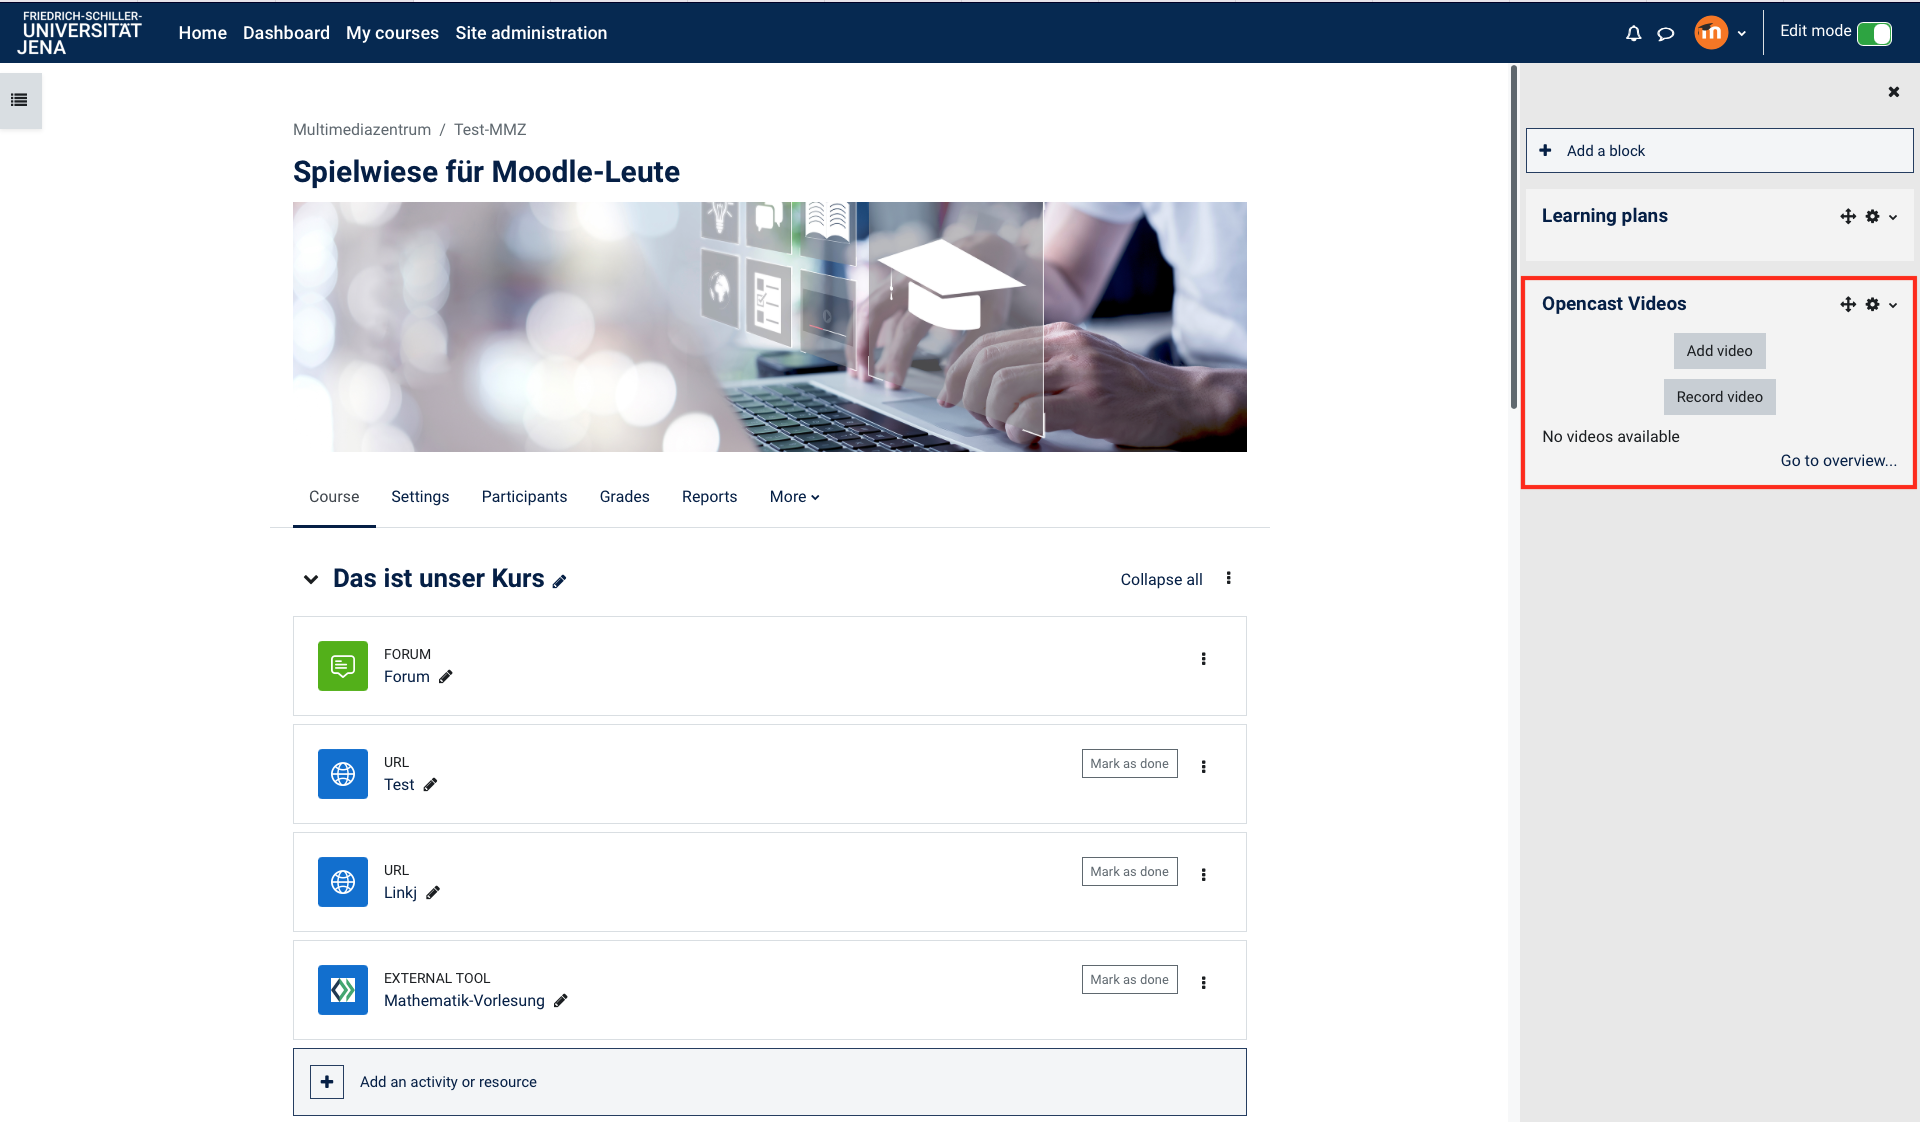
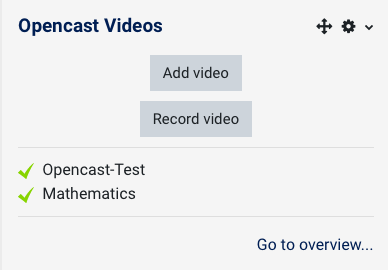
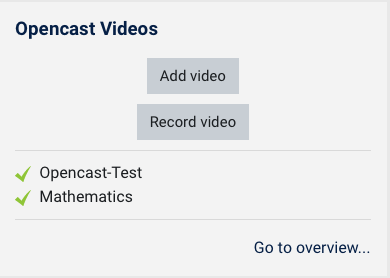
Der neue Block erscheint nun im Fenster oben rechtsin der Blockleiste.

Sie nutzen die Aufzeichnungstechnik in einem der Hörsäle und wünschen die Platzierung dieser Videos in Ihrem Moodle-Kurs?

Damit wir dies für Sie einrichten können, müssen Sie mit Moodle einmalig eine Verbindung zu den Opencast Servern aufbauen. Das erfolgt durch Anlegen einer neuen Serie. Sie gehen im Opencast Block auf Zum Überblick... weitere Videos und anschließend auf Neue Serie anlegen. Serien verwalten. Sie können nun eine neue Serie anlegen. 

Alternativ können Sie auch in Ihrem Kurs heraus über "Video aufnehmen" eine kurze Testsequenz von wenigen Sekunden aufzeichnen.

Bitte teilen Sie dem MMZ (mmz@uni-jena.de) noch die Kurs ID mit. Damit haben wir alle nötigen Infos zu Ihrem Kurs im Opencast-System und können die Videos aus den Hörsälen einmalig verlinken. 


Erweitern
titleEin Video manuell hochladen (Limit pro Video 5GB)

Ein Video manuell hochladen (Limit pro Video 5GB)

Im Moodle haben Sie die Möglichkeit, ein vorhandenes Video hochzuladen, um es dann für Ihren Kurs verfügbar zu machen. Folgen Sie dazu diesen Schritten:


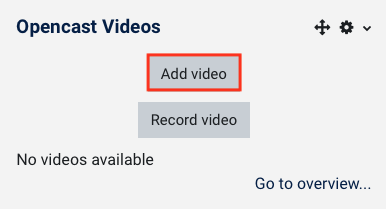
Klicken Sie im Block Opencast Videos auf Video hinzufügen, um den Dialog für das Hochladen des Videos zu öffnen.

Image Modified

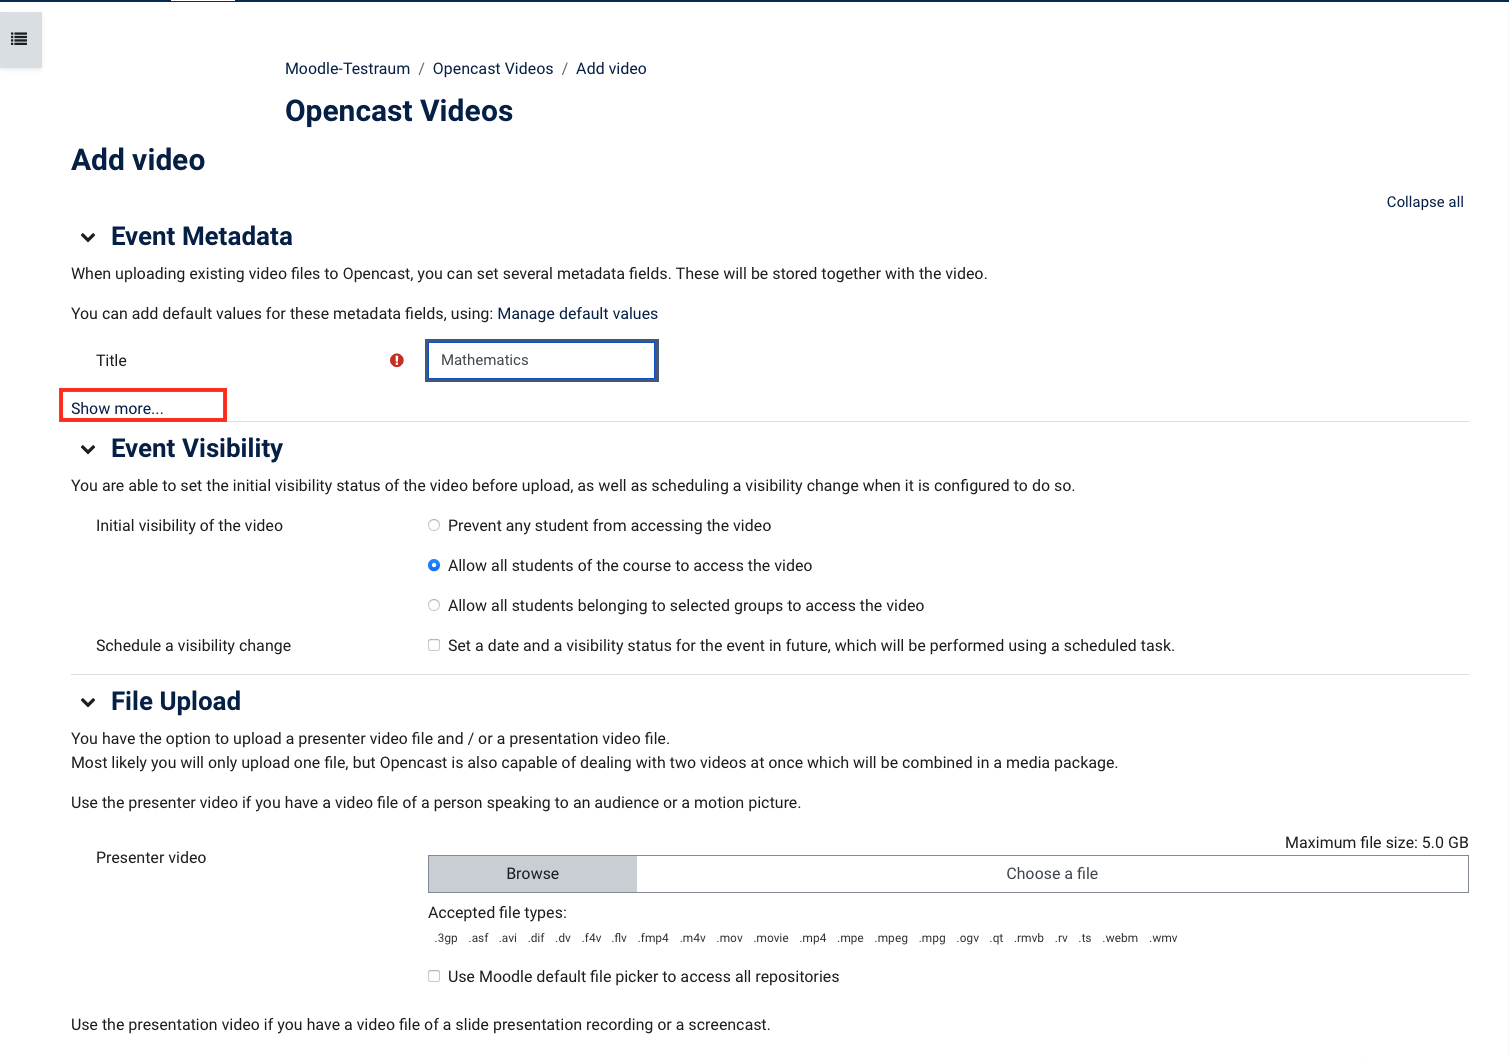
Geben Sie im Bereich Event Metadaten einen aussagekräftigen Titel ein und ergänzen Sie (optional) weitere Metadaten. Klicken Sie dazu auf Mehr anzeigen …  

Im erweiterten Dialog können Sie weitere Informationen eingeben.

Image Modified


Im Abschnitt Sichtbarkeit des Videos legen Sie den anfänglichen Sichtbarkeitsstatus des Videos beim Hochladen fest

Image Added

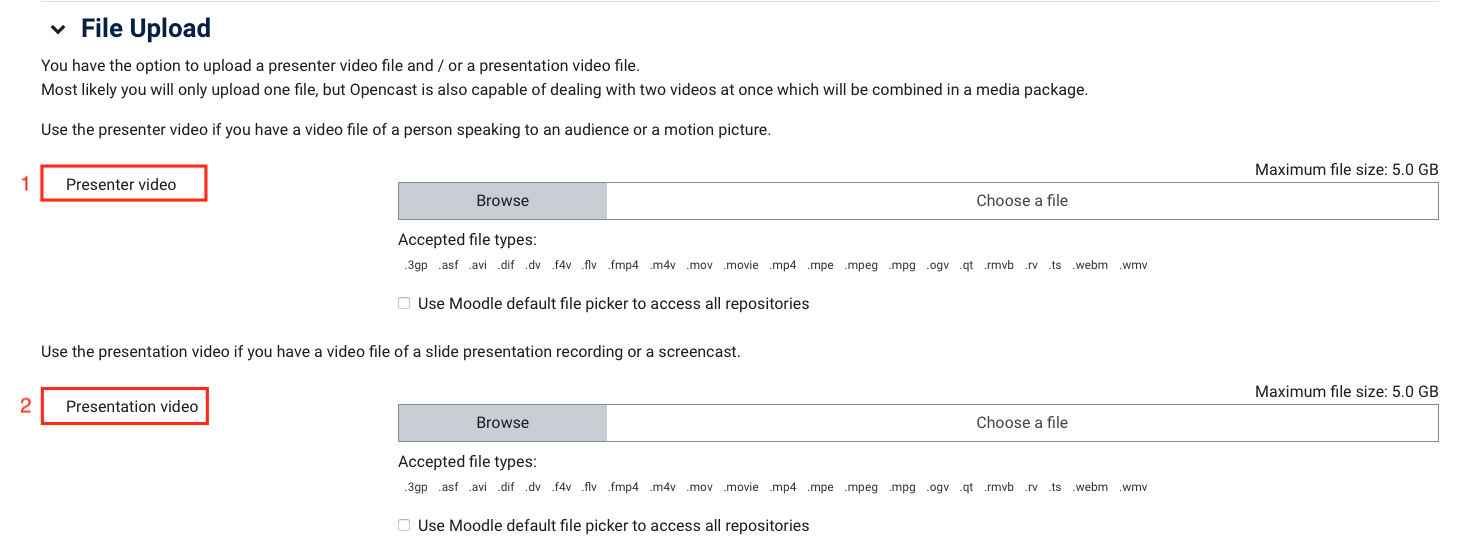
Im Abschnitt Datei hochladen gibt es zwei wesentliche Abschnitte – entscheiden Sie sich für eine Option:

(1) Präsentator-Video
Nutzen Sie das Präsentator-Video falls Sie eine Video Datei mit der Aufzeichnung eines Redners oder einen Film vorliegen haben.

(2) Präsentations-Video
Nutzen Sie das Präsentations-Video falls Sie eine Video Datei mit der Aufzeichnung einer Folienpräsentation oder einem Screencast vorliegen haben.


Info

Der Upload von zwei Videos, kann dann sinnvoll sein, falls ein Opencast Studio Upload fehlgeschlagen ist und Sie ihre gespeicherten zwei Videos über diesen Bereich manuell einreichen möchten. Hierfür wäre dann entsprechend für Ihr Videobild und die Präsentation der zugehörige Dialog zu nutzen.


Image Modified

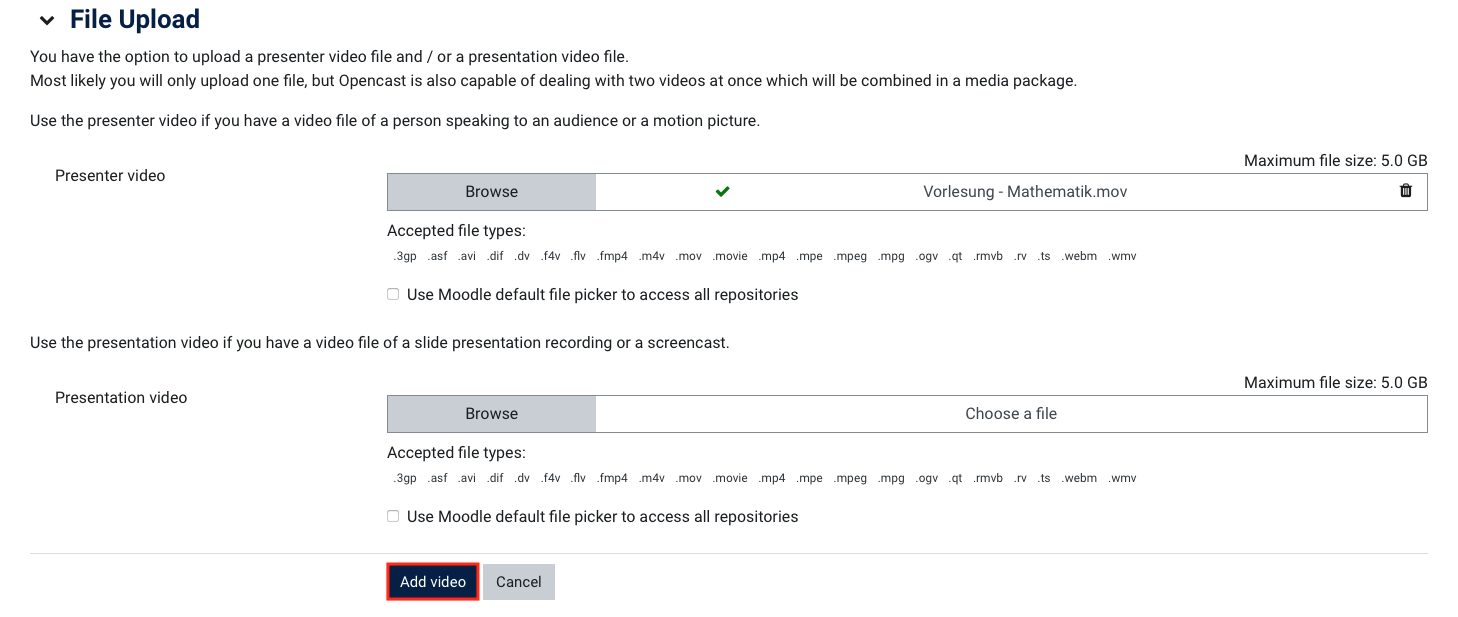
Nach Abschluss
 des
des Upload-Vorganges, schließen Sie
mit Änderungen speichern
mit Video hinzufügen den Vorgang ab. Das Video wird nun von Opencast im Hintergrund verarbeitet. Dieser Vorgang kann einige Minuten dauern.

Image Modified

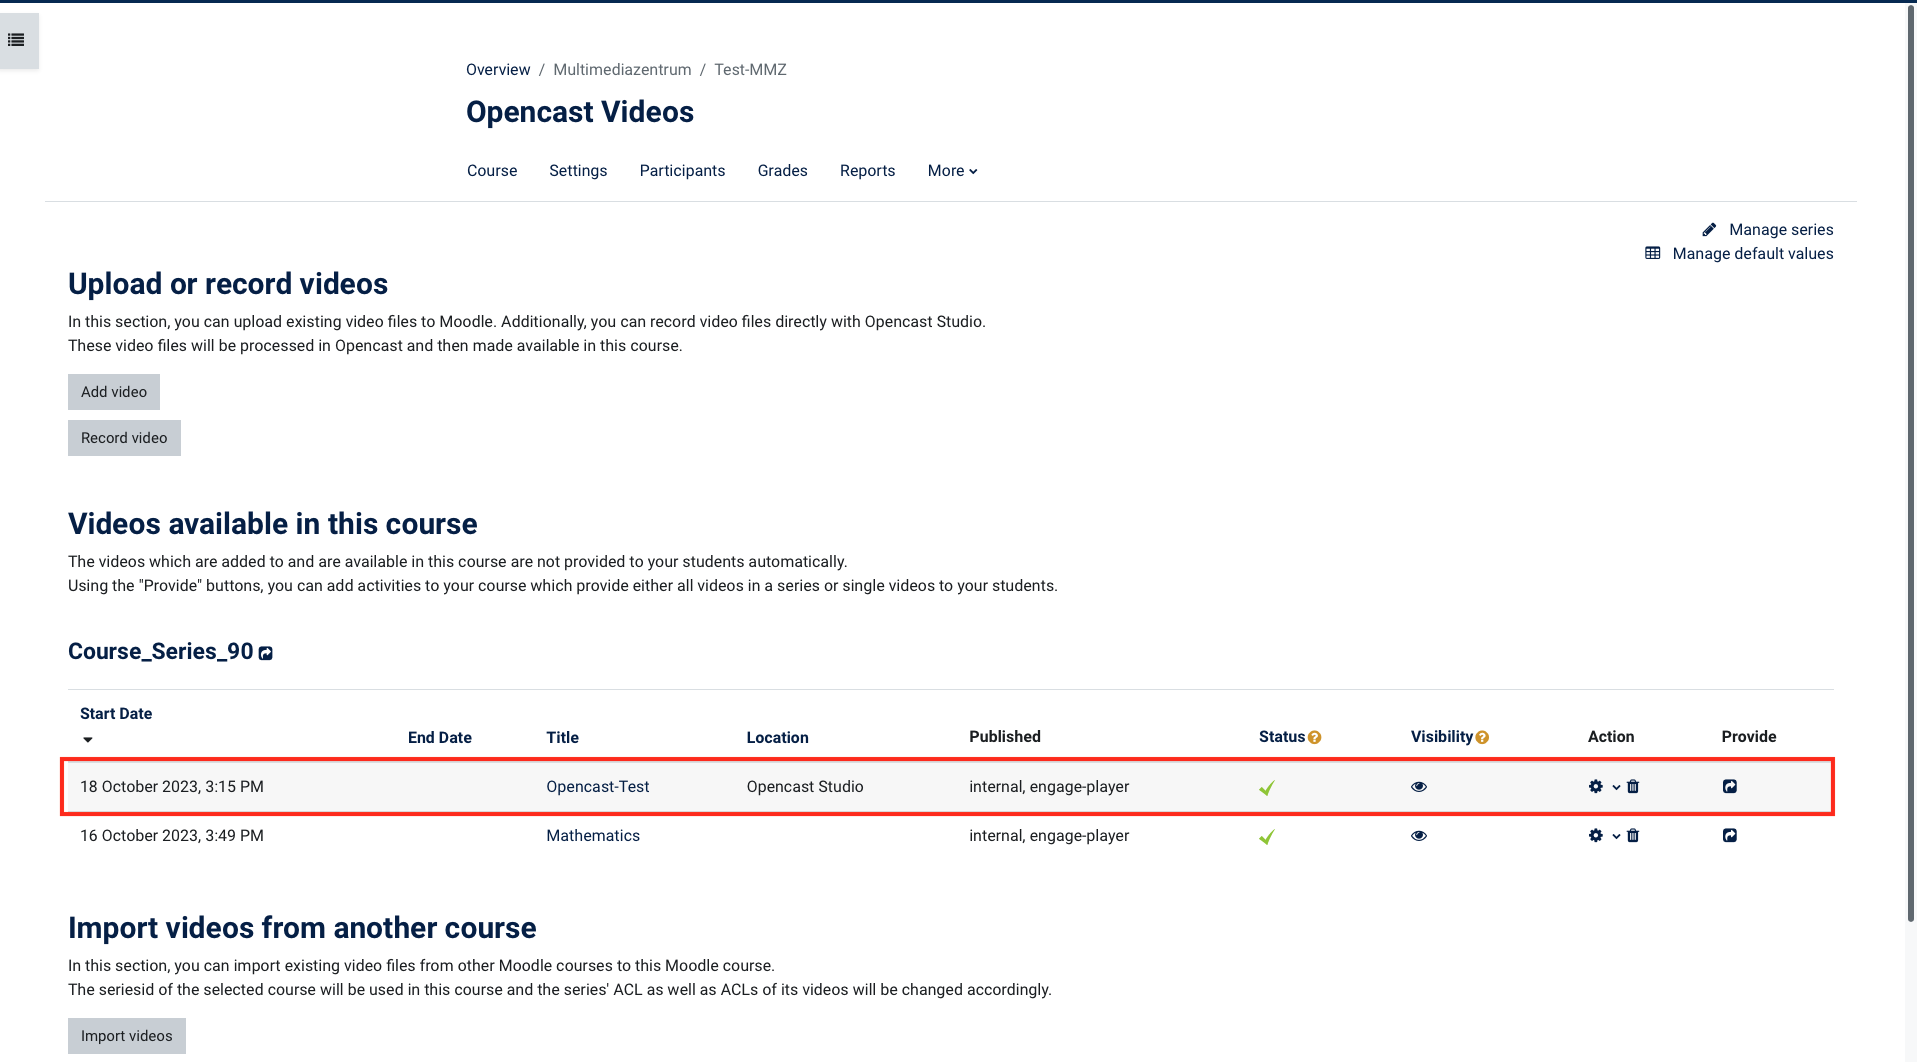
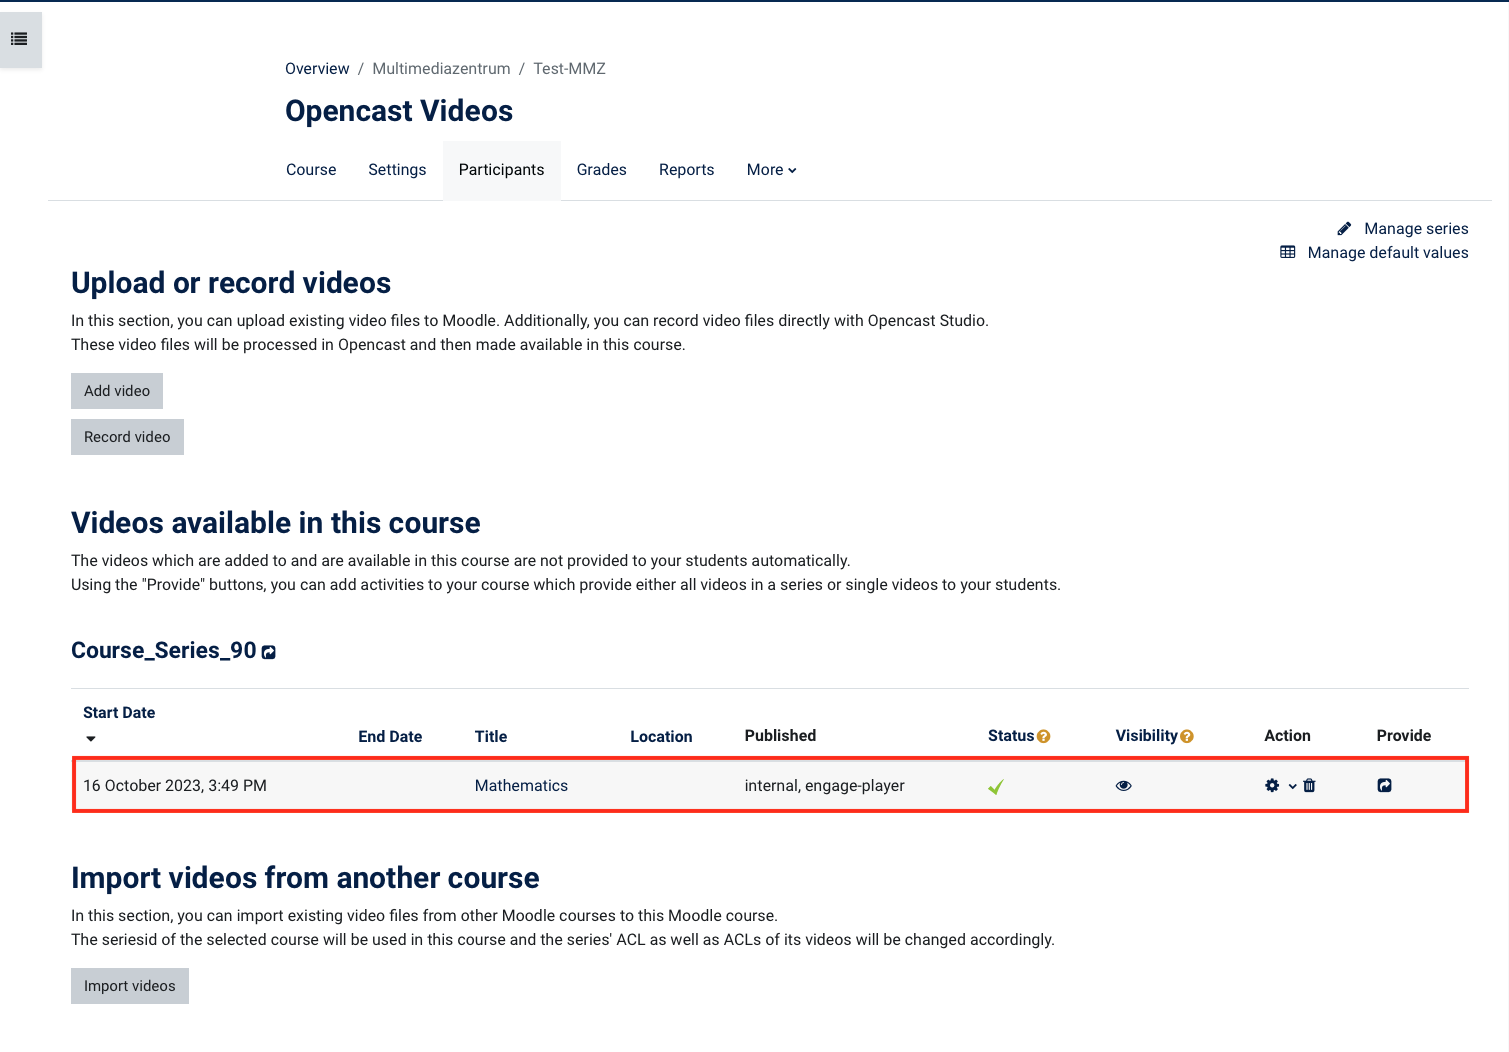
Auf der folgenden Seite sehen Sie die Übersicht Ihrer Videos. Hier können Sie weitere Aktionen steuern – z.B. ein weiteres Video hinzufügen, oder ein Video neu aufnehmen.


Wollen Sie hier keine weiteren Aktionen durchführen, klicken Sie

links

oben in der horizontalen Navigation auf

Ihren

Kurs, um zu diesem zurückzukehren.

Image Modified

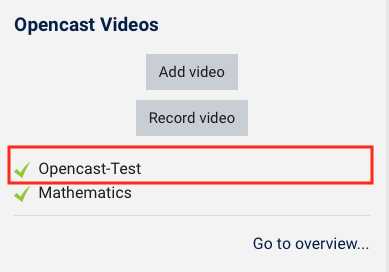
Ihr Video erscheint nun im Block Opencast Videos.

Klicken Sie auf Zum Überblick…, um in Ihre Video-Übersicht zu gelangen und ggf. Änderungen vornehmen zu können – dafür stehen Ihnen rechts verschiedene Optionen zur Verfügung (z.B. Sichtbarkeit; Löschen) 


Warnung

Beachten Sie bitte, dass zu Stoßzeiten die Verarbeitung gegebenenfalls etwas Zeit in Anspruch nehmen kann. 


Image Modified

Image Modified


Erweitern
titleEin Video aufnehmen

Ein Video aufnehmen

Neben der Option, ein bereits vorhandenes Video hochzuladen, können Sie auch direkt aus dem Moodle heraus ein eigenes Video aufnehmen. Folgen Sie dazu diesen Schritten:


Klicken Sie auf im Block Opencast Videos auf Video aufnehmen, um in die Benutzeroberfläche von Opencast Studio zu wechseln.

Die Nutzung von Opencast Studio ist im Abschnitt Anleitung zur Benutzung von Opencast Studio ausführlich beschrieben. 


Info

Das Aufzeichnen eines Videos direkt aus Moodle heraus, hat für Sie den Vorteil, dass das Video im Hintergrund automatisch Ihrem Kurs zugeordnet und dort hinterlegt wird.


Warnung

Bitte laden Sie sich die Videodatei zu Ihrer eigenen Sicherung herunter, bevor Sie diese bei Opencast Studio hochladen. Nur so ist es möglich, im Falle eines fehlgeschlagenen Uploads, im Nachhinein mit einem manuellen Upload (siehe Video manuell hochladen) das Video zu Ihrem Kurs hinzuzufügen.


Nach erfolgreichem Upload wird auch hier im Hintergrund das Video verarbeitet und Ihrem Kurs im Anschluss zur Verfügung gestellt.

Ihr Video erscheint nun im Block Opencast Videos.

Klicken Sie auf Zum Überblick… Weitere Videos…, um in Ihre Video-Übersicht zu gelangen und ggf. Änderungen vornehmen zu können – dafür stehen Ihnen rechts verschiedene Optionen zur Verfügung (z.B. Sichtbarkeit; Löschen)


Erweitern
titleTranskription hochgeladener Videos erstellen

Transkription hochgeladener Videos erstellen

Wenn Sie Ihre hochgeladenen Videos mit Untertiteln versehen wollen, dann folgen Sie diesen Bearbeitungsschritten:


Öffnen Sie im Block Opencast -Block Videos die Übersicht der im Kurs hochgeladenen Videos. Wählen Sie das zu untertitelnde Video aus und klicken Sie in der Spalte Aktionen auf das Dreieck neben den Pfeil neben dem Zahnrad. Im sich öffnenden Menü wählen Sie die Option Start Starte Workflow.

Im sich öffnenden Dialog behalten Sie die aktuelle Einstellung bei und klicken Sie auf Start Starte Workflow, um die Erstellung der Untertitel anzustoßen.

Die Verarbeitung dauert nun einen Moment – das erkennen Sie an der Uhr in der Spalte Status. Nach der abgeschlossenen Verarbeitung des Videos stehen Ihnen die Untertitel zum Video zur Verfügung.


Sie können bereits vorhandene Videos (aus einem anderen Kurs oder anderen Semester) wiederverwenden. Allerdings ist es nicht möglich, Videos per Sharing Cart oder die Kurs-Wiederherstellen-Funktion zu kopieren. 

Stattdessen müssen die Videos neu in den Kurs importiert werden. Folgen Sie diesen Schritten:

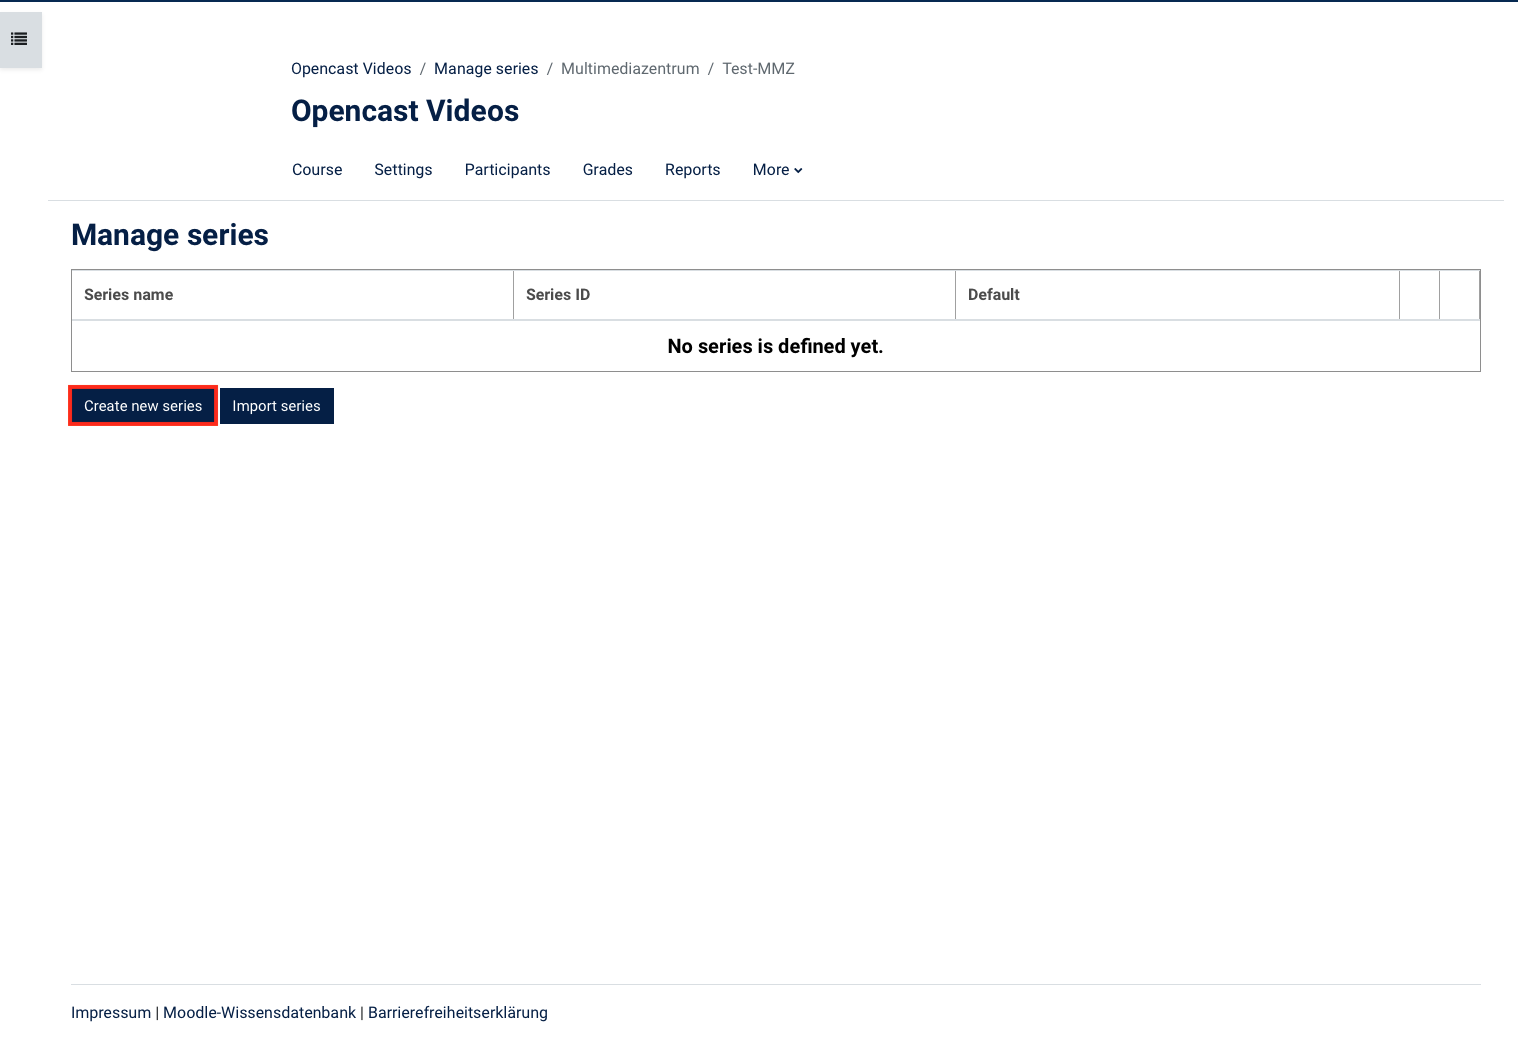
Auf der folgenden Seite klicken Sie nun auf Serie importieren. Auf diese Weise importieren Sie eine Serie aus einem anderen Moodle-Kursraum.

Erweitern
titleVideos im Kurs platzieren und einbettenKursraum zur Verfügung stellen

Videos im Kursraum zur Verfügung stellen

Die Videos, die Sie zu Ihrem Kurs hinzugefügt haben – durch Hochladen oder Aufnehmen – sind für Ihre Kursteilnehmer noch nicht sichtbar.

Damit Ihre Kursteilnehmer die Videos auch sehen können, müssen Sie diese in Ihren Kurs einbetten oder platzieren. Dazu stehen Ihnen die folgenden drei Möglichkeiten zur Verfügung:


Erweitern
titleVariante 1: Ein Video bereitstellen

Variante 1: Ein Video bereitstellen

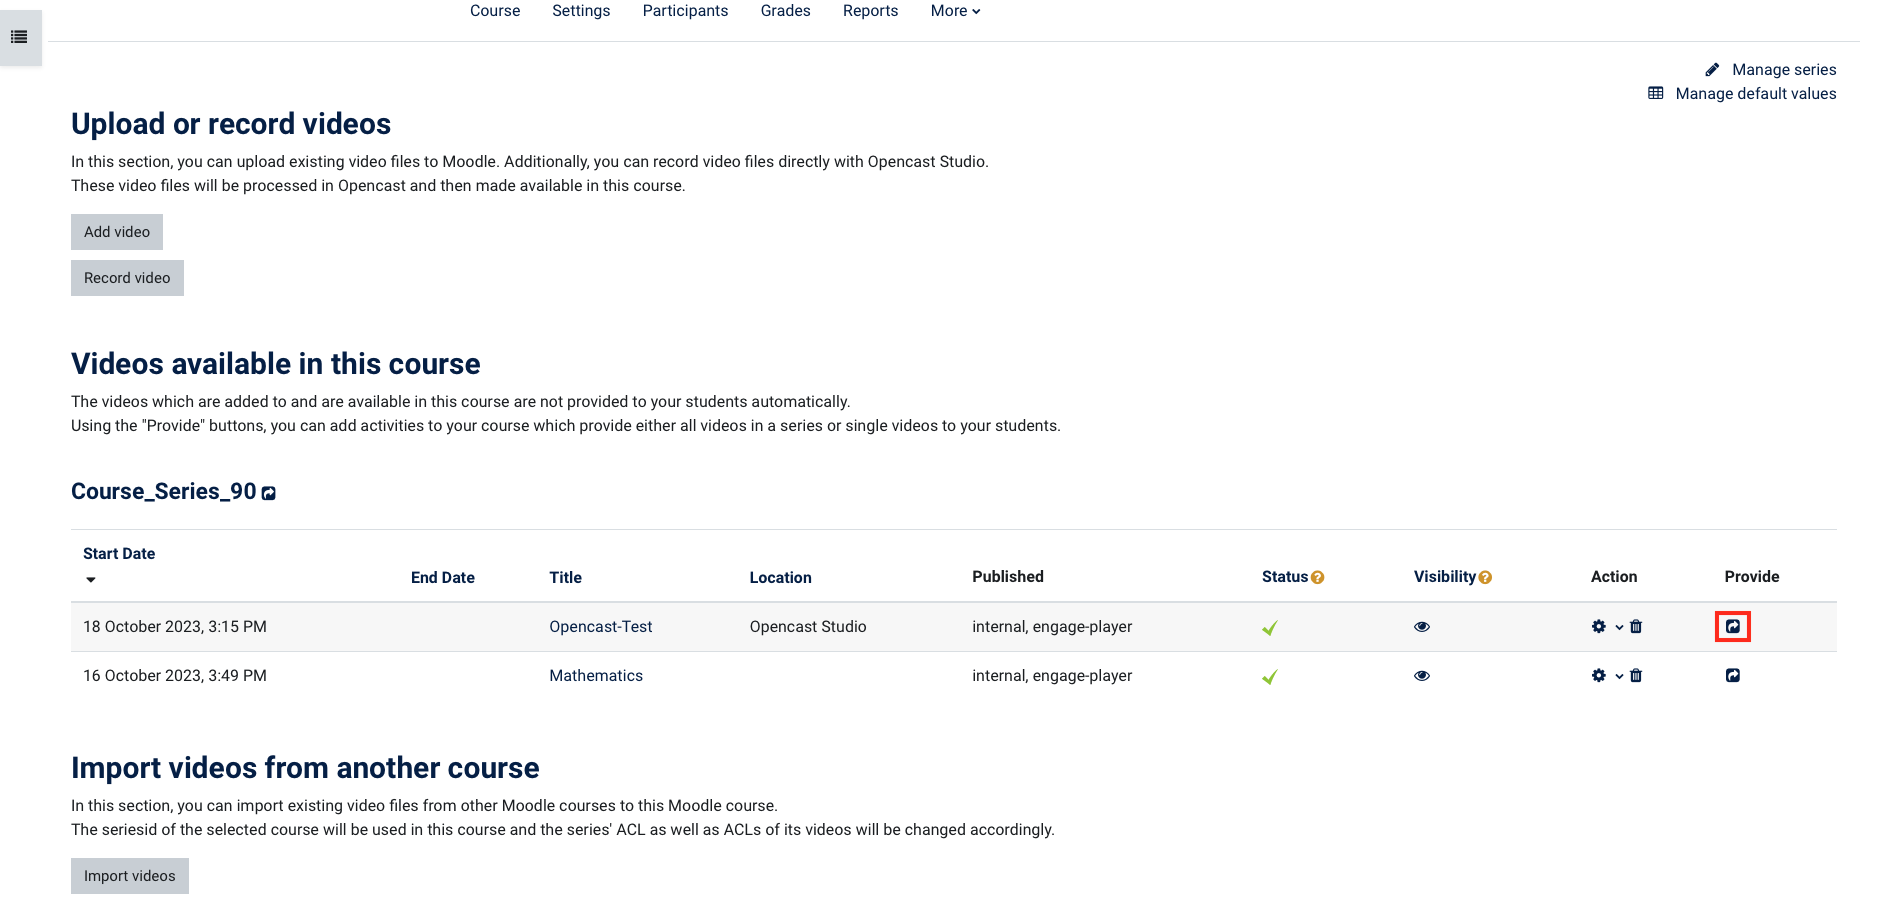
Klicken Sie auf den Button Bereitstellen Bereitstellen (in der Übersicht ganz rechts), um ein einzelnes Video zu einem Thema oder einem Kursabschnitt hinzuzufügen.

Im folgenden Fenster haben Sie die Möglichkeit, den Titel des Videos anzupassen, eine Beschreibung hinzuzufügen oder weitere Einstellungen vorzunehmen.

Sobald Sie die Eingabe beendet haben, klicken Sie auf einen der beiden blauen Buttons:

Aktivität hinzufügen und zurück zur Übersicht

oder

Aktivität hinzufügen und zurück zum Kurs


Tipp

Tragen Sie Details zum Video ein und setzen Sie gegebenenfalls bestimmte Voraussetzungen. Beispielsweise könnten Sie ein Lösungsvideo zu einer Aufgabe erst dann veröffentlichen, wenn von den Teilnehmern eine bestimmte Bedingung erfüllt wurde.


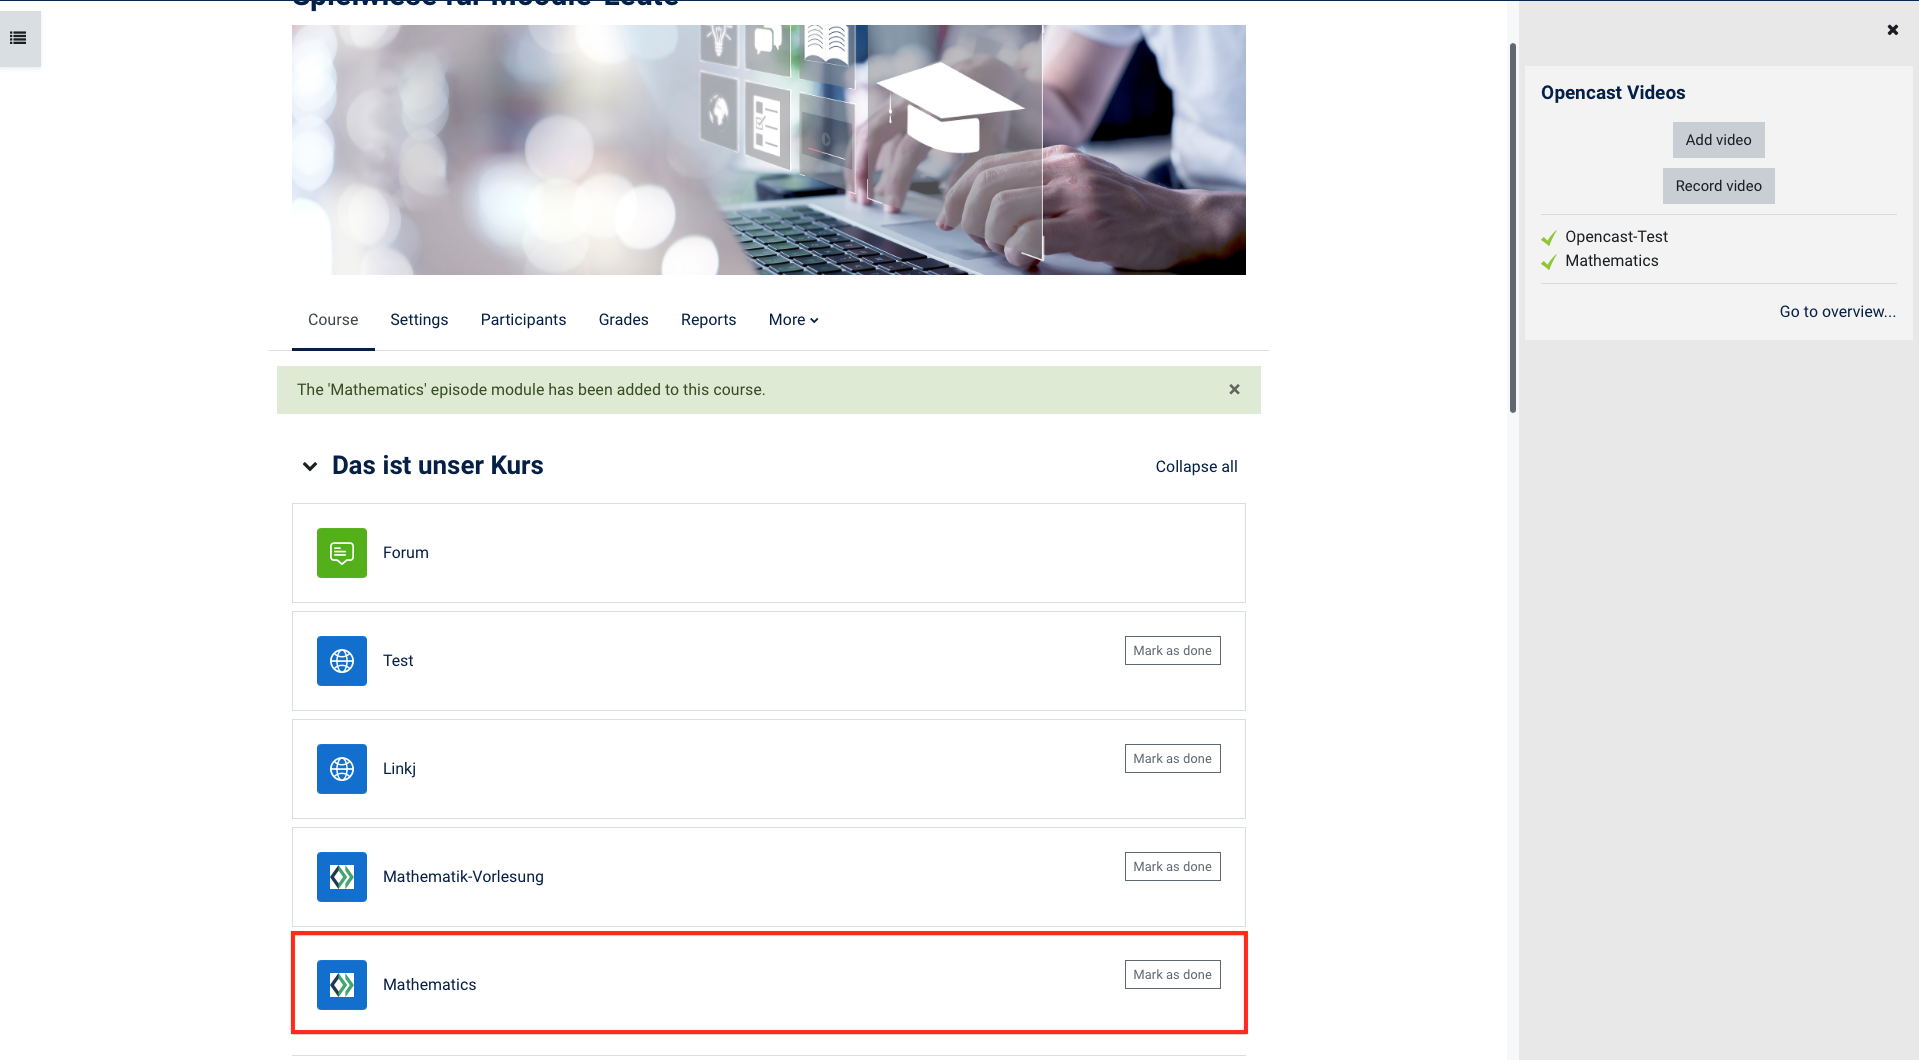
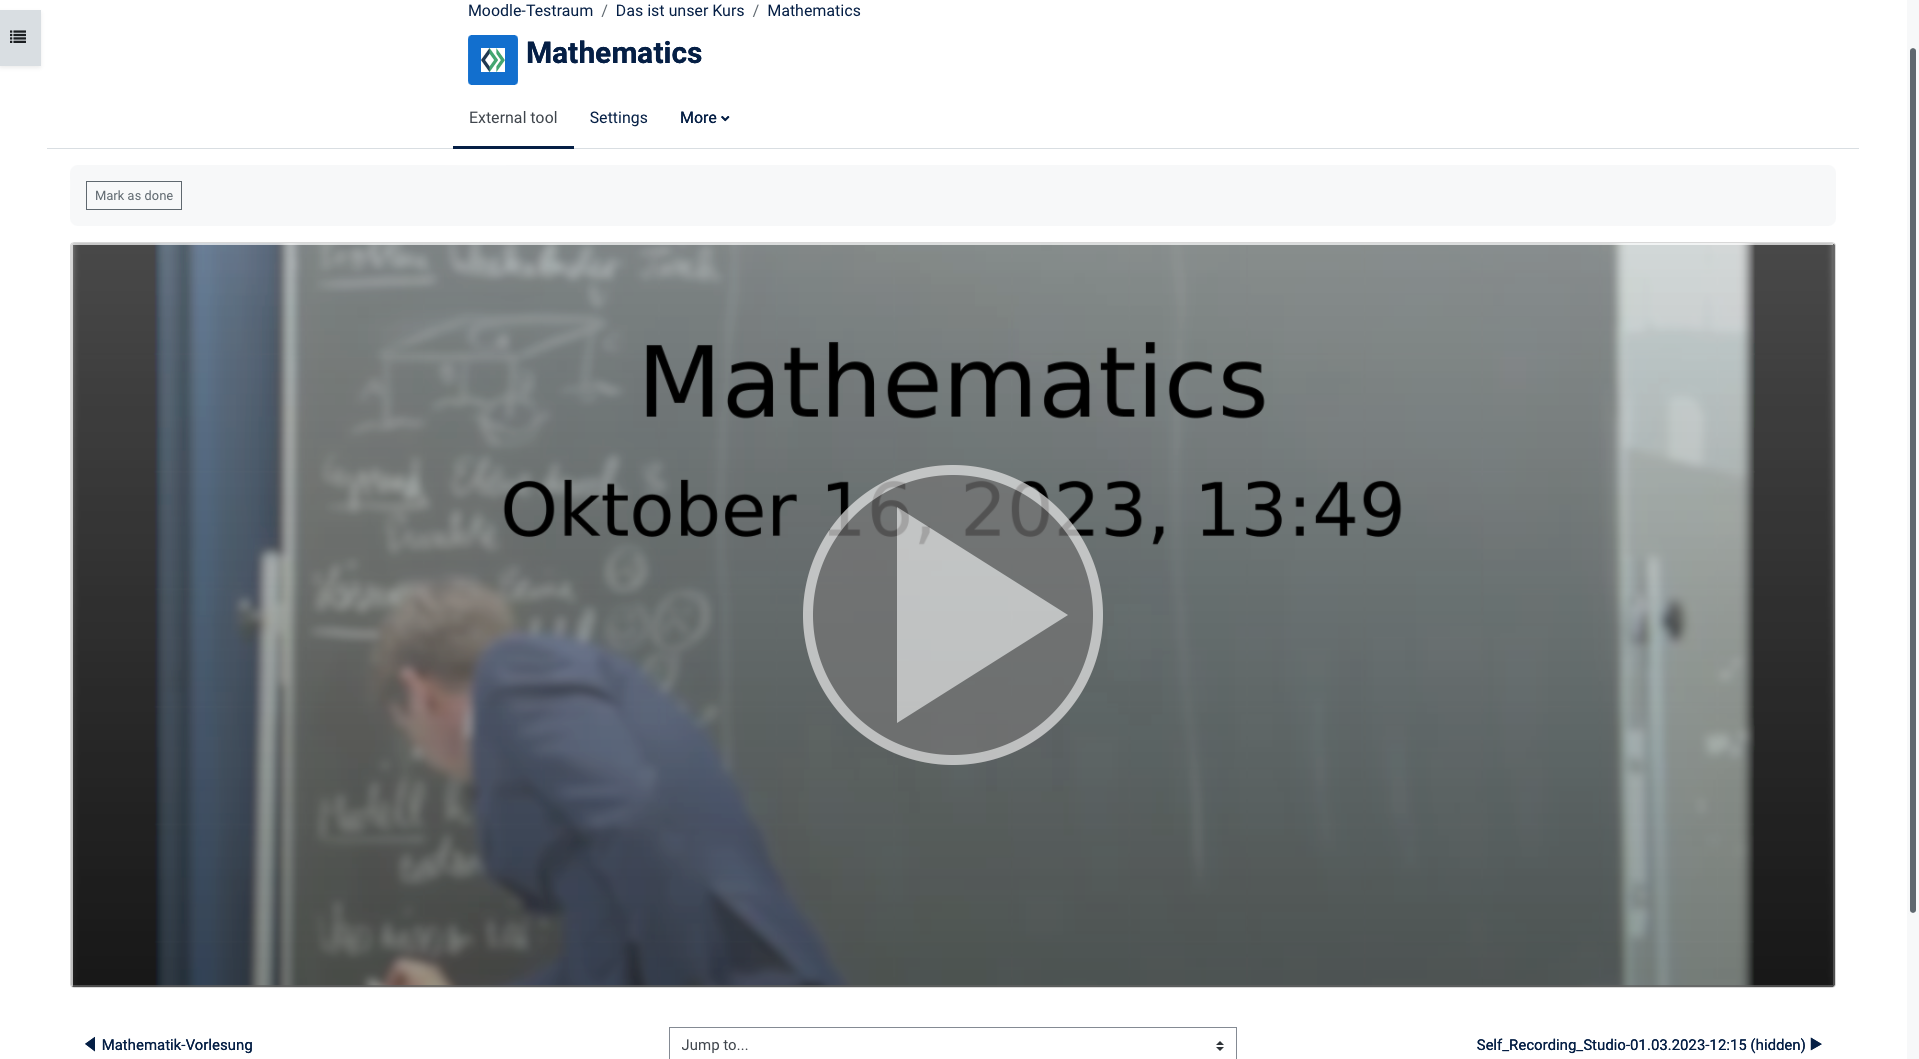
Das Video erscheint nun als Link in Ihrem Kurs. Wenn Sie diesen anklicken, wird ein externer Player zum Abspielen des Videos geöffnet.


Binden Sie bereits existierende Videos oder Serien aus anderen Kursen in einen Kursabschnitt ein, indem Sie auf den Button Videos Importieren klicken. 

info
Erweitern
titleVariante 2

Image Removed

Erweitern
titleVariante 3
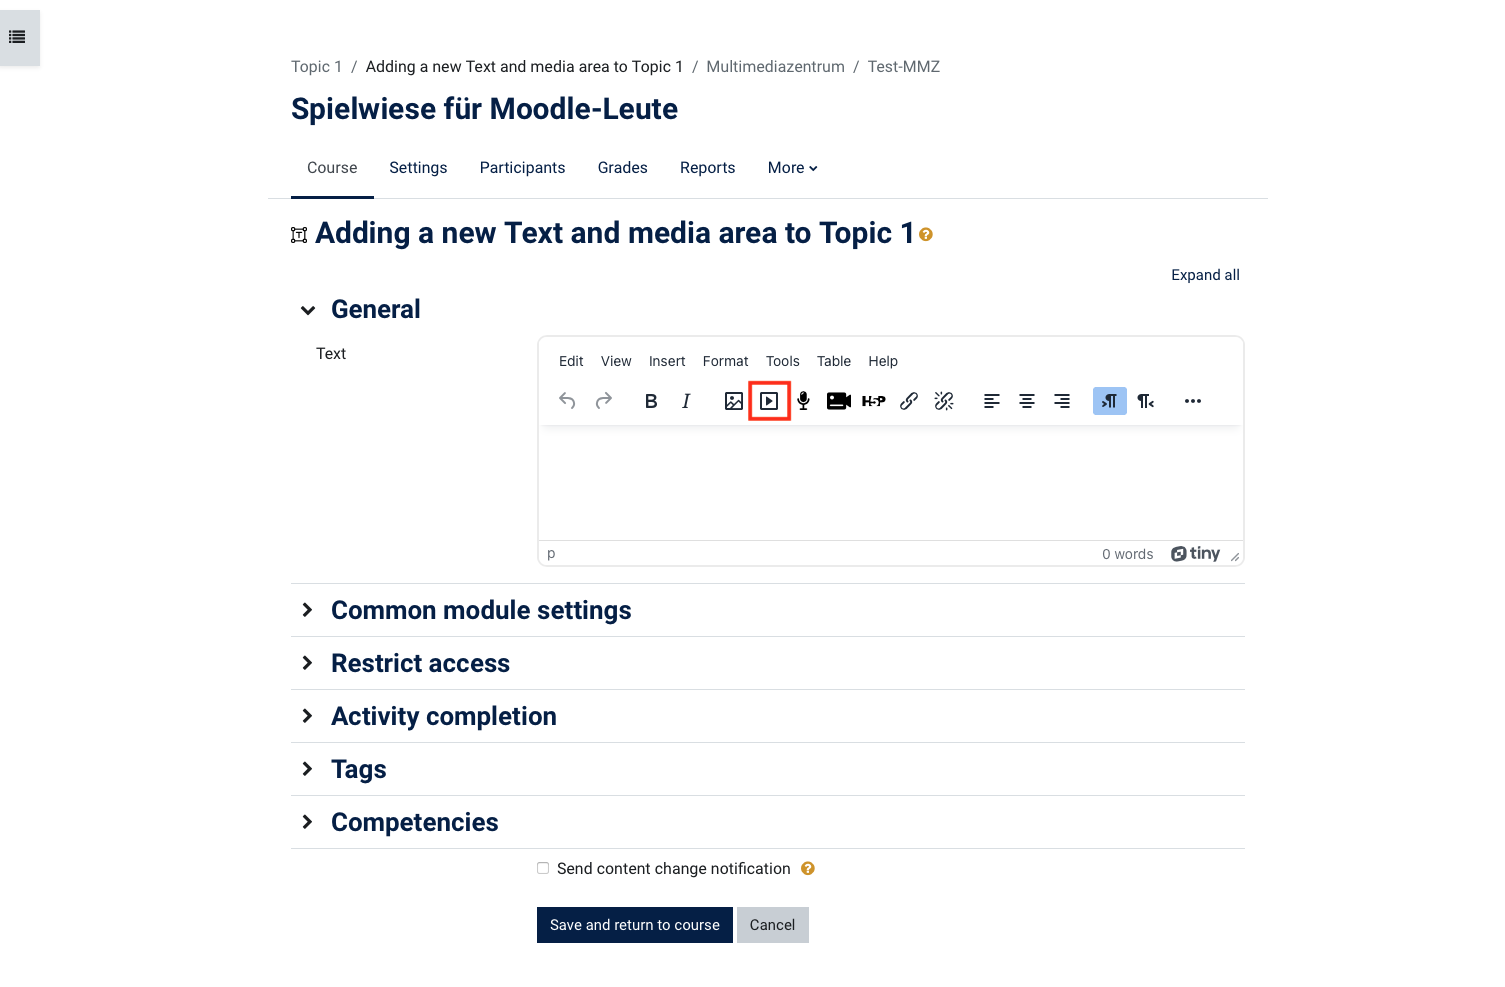
: Ein Video im Textfeld einbinden

Variante 2: Ein Video im Textfeld einbinden

Wenn Sie innerhalb eines Textabschnittes oder einer Beschreibung auf ein Video verlinken wollen, nutzen Sie die Aktivität

Variante 3

Wenn Sie innerhalb eines Textabschnittes oder einer Beschreibung ein Video verlinken wollen, nutzen Sie die Aktivität Textfeld oder Textseite.

Klicken Sie dazu im Thema oder Kursabschnitt auf Aktivität oder Material anlegen, wählen die Option Textfeld Text- und Medienfeld hinzufügen oder Textseite aus.

Im folgenden Fenster können Sie das Textfeld bearbeiten. 

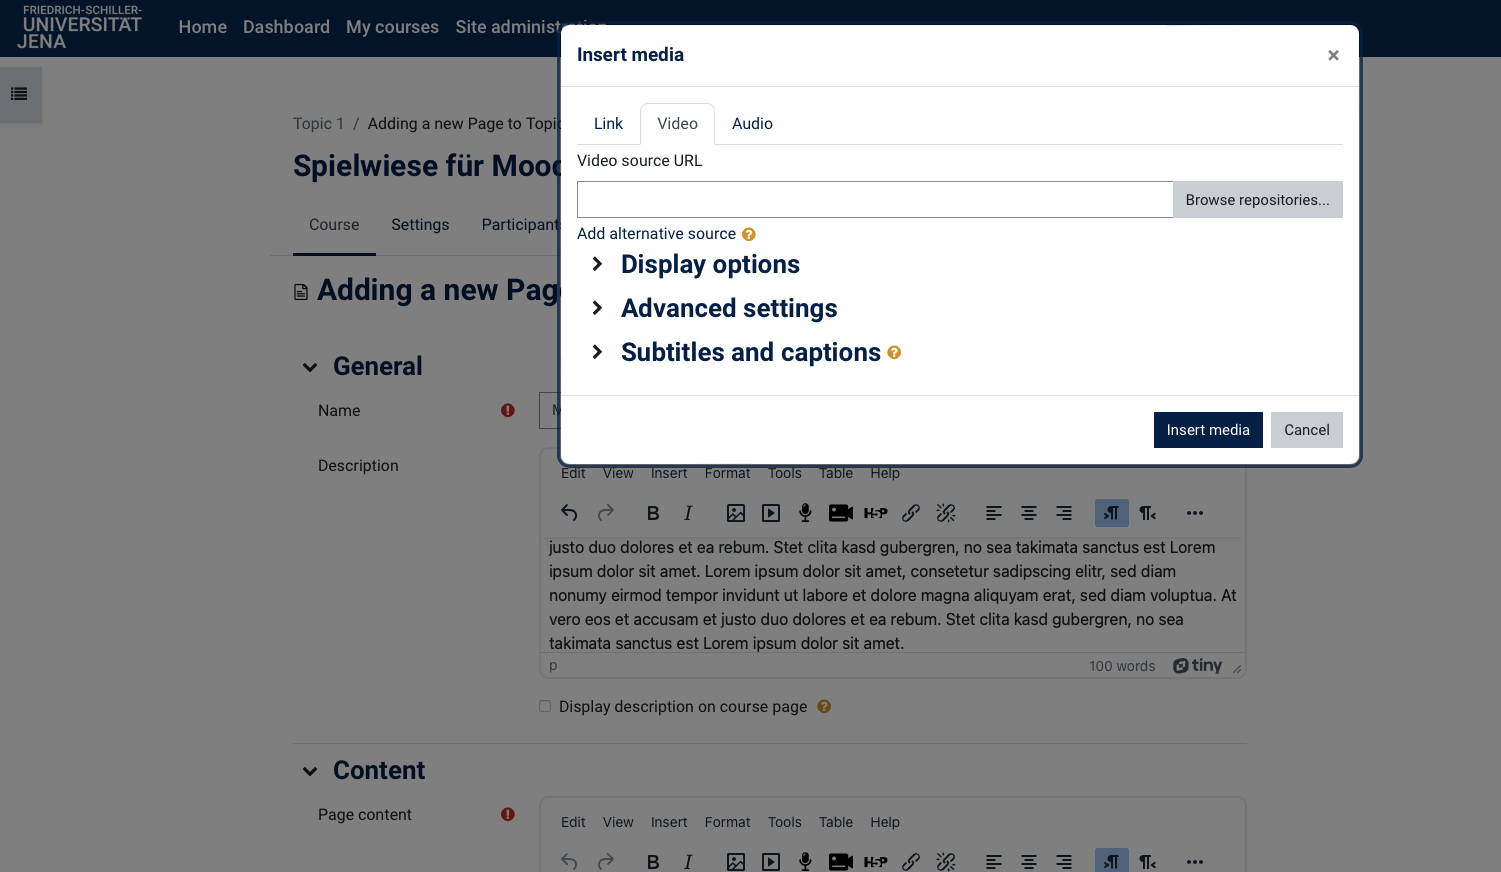
Mit einem Klick auf den Button Audio/Videodatei einfügen oder bearbeiten, Multimedia haben Sie die Möglichkeit, Medien im Textfeld einzufügen. 


Wählen Sie eine Datei aus und fügen diese an gewünschter Stelle im Text hinzu.

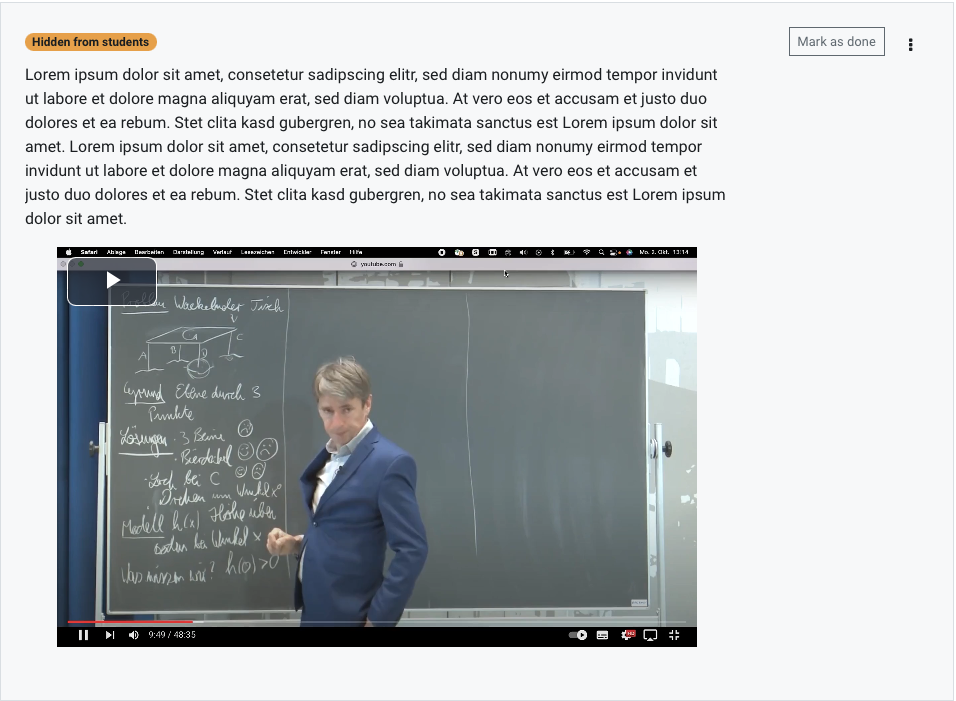
Das Video wird im Anschluss direkt in den Text eingebettet und kann abgespielt werden. 

In der aktuellen Plugin-Version erscheinen während der Konfiguration leider keine Vorschaubilder in der Auswahl der Videos. Später im Kurs wird das Vorschaubild aber angezeigt.


Erweitern
title
Videos aus einem anderen Kurs wiederverwenden

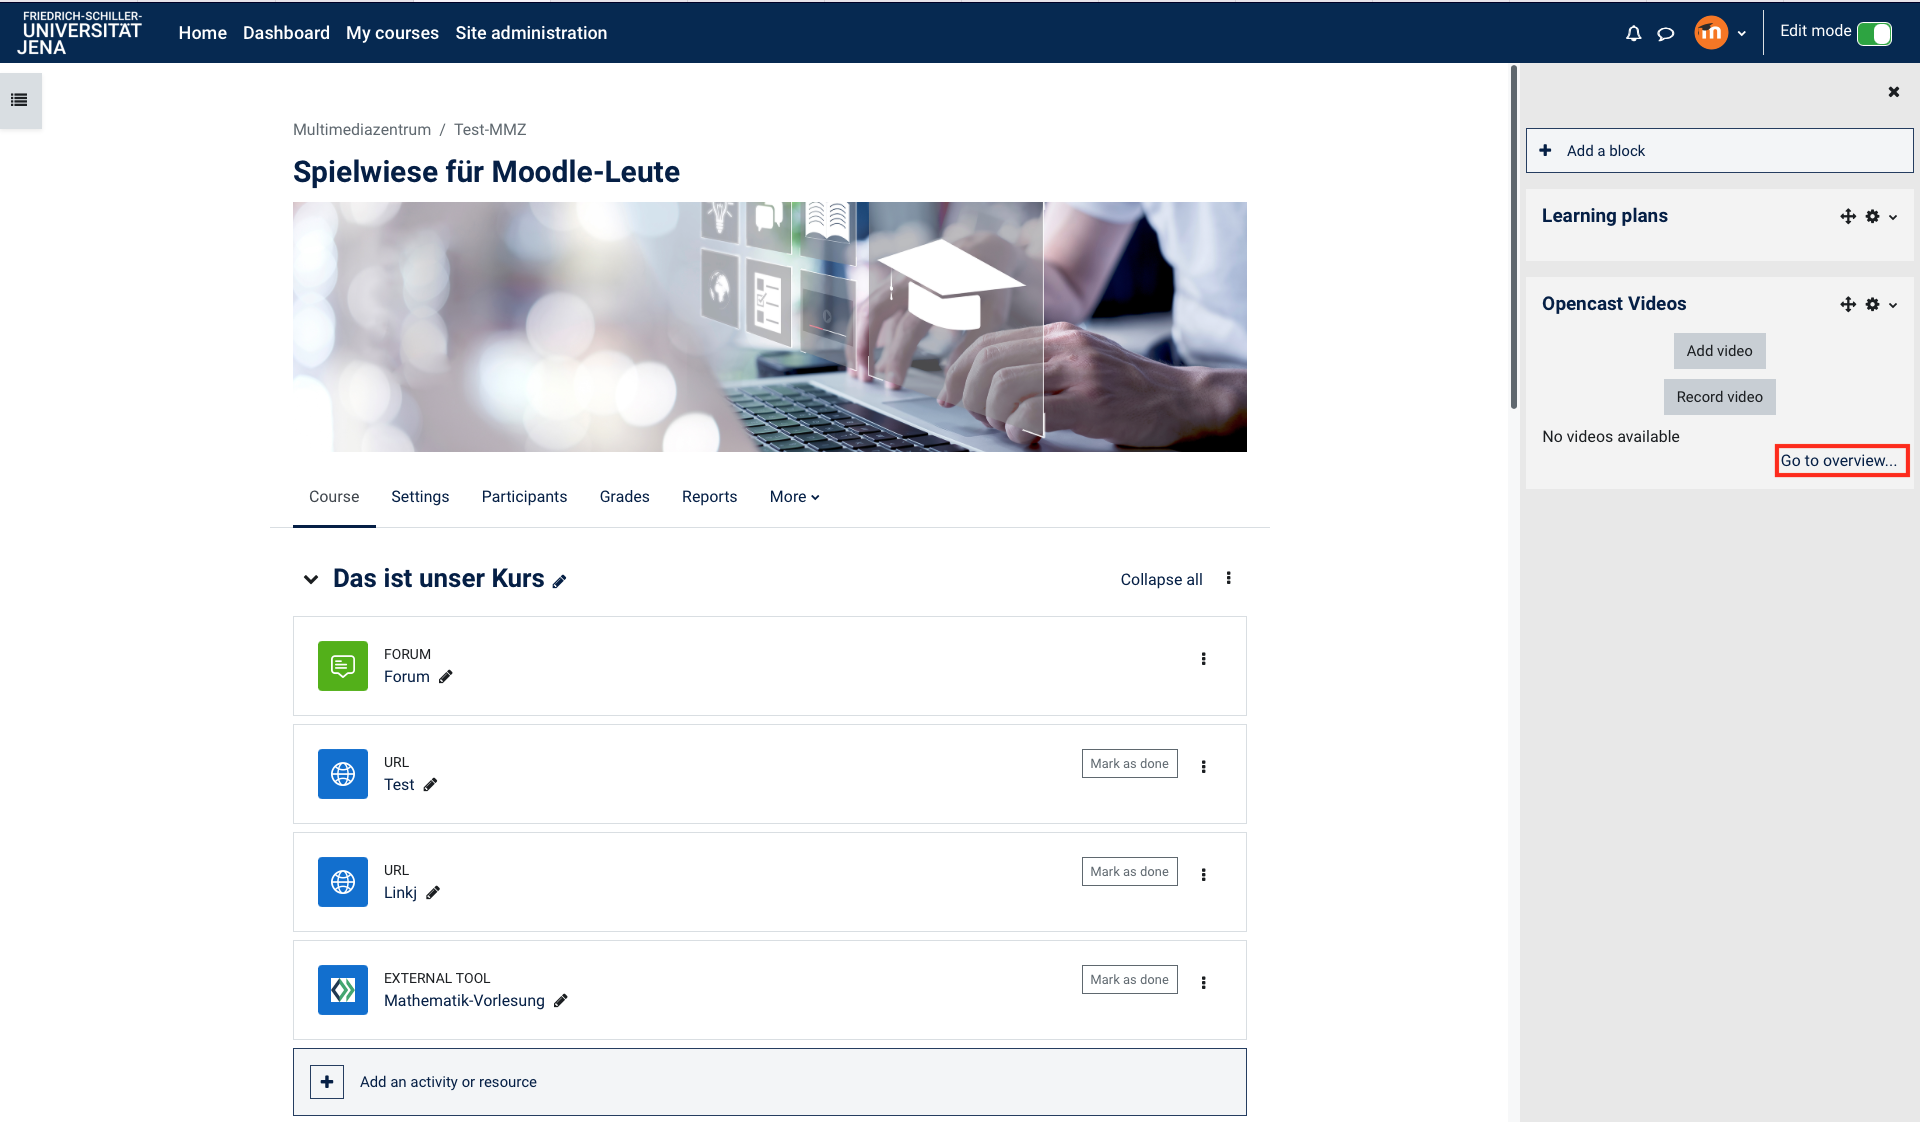
Blenden Sie im Zielkurs – also in dem Kurs, in dem die Videos neu erscheinen sollen – den Block Opencast Videos ein.

Klicken Sie unten rechts auf Weitere Videos… , um auf die Übersichtsseite der Videos für den Kurs zu gelangen.

Image Removed

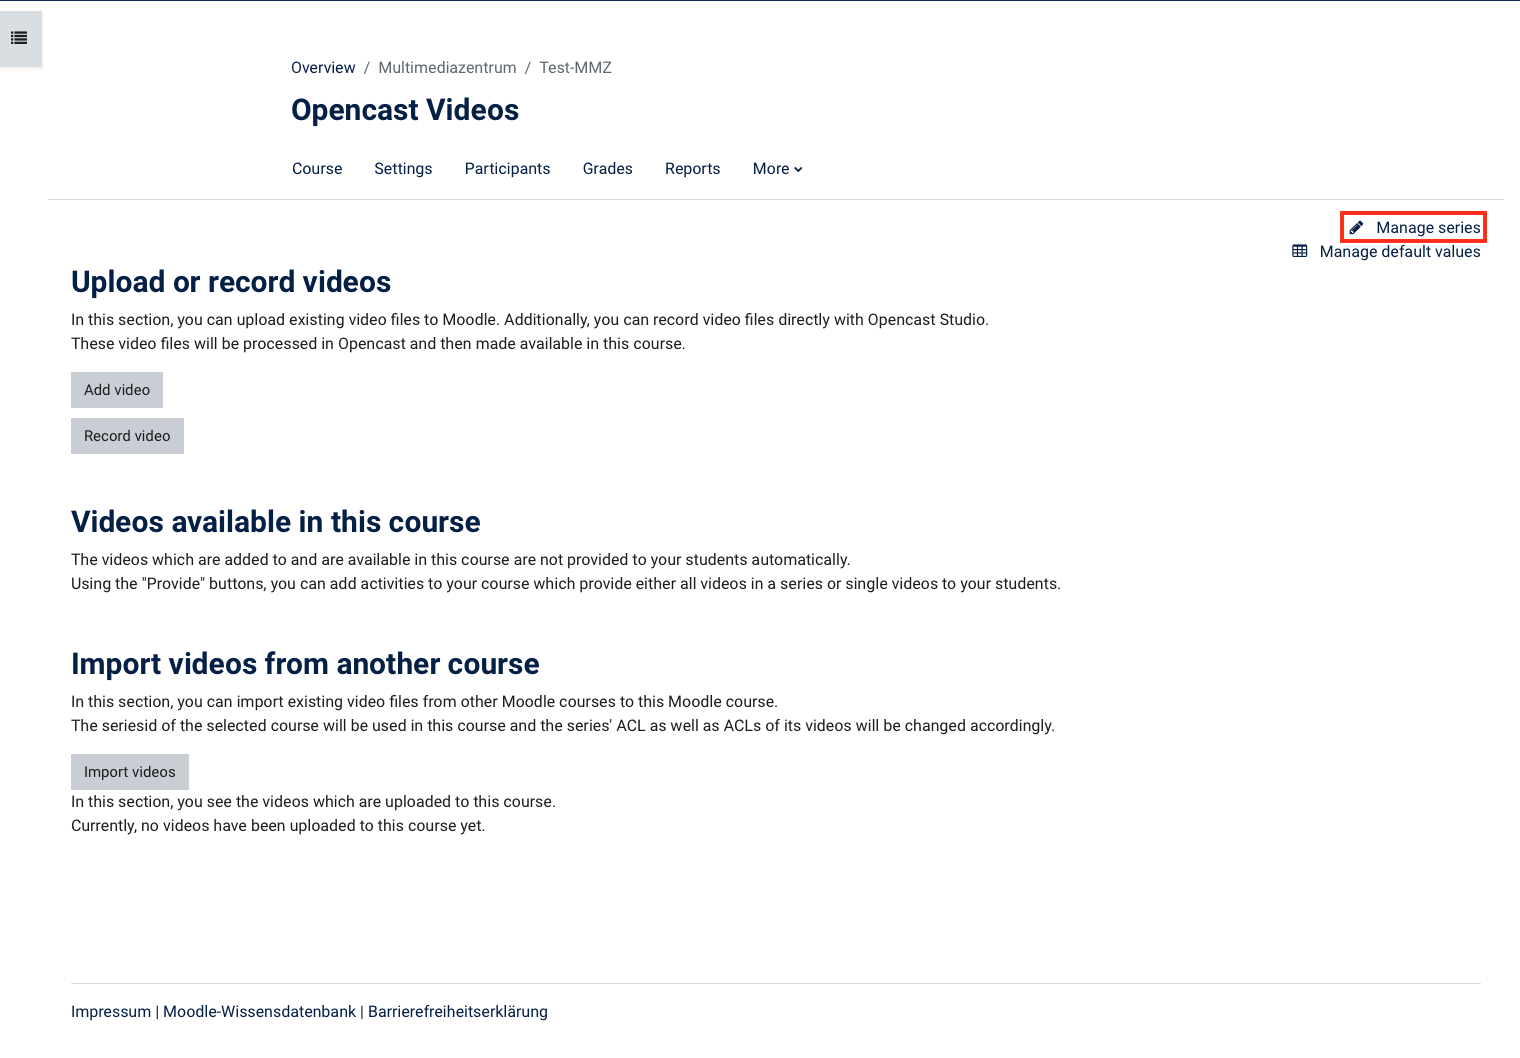
Auf der Übersichtsseite der Videos finden Sie oben rechts den Button Serien verwalten. Klicken Sie diesen bitte an.

Image Removed

Info
titleHinweis

Bei diesem Vorgehen werden die Videos nicht dupliziert und belegen so keinen zusätzlichen Speicherplatz.

Image Removed

Image Removed

Warnung

Beachten Sie, dass, wenn Sie Videos in einer Serie löschen, diese auch in der anderen Serie nicht mehr verfügbar sind.

Variante 3: Die Aktivität Opencast Video

Variante 3: Die Aktivität Opencast Video

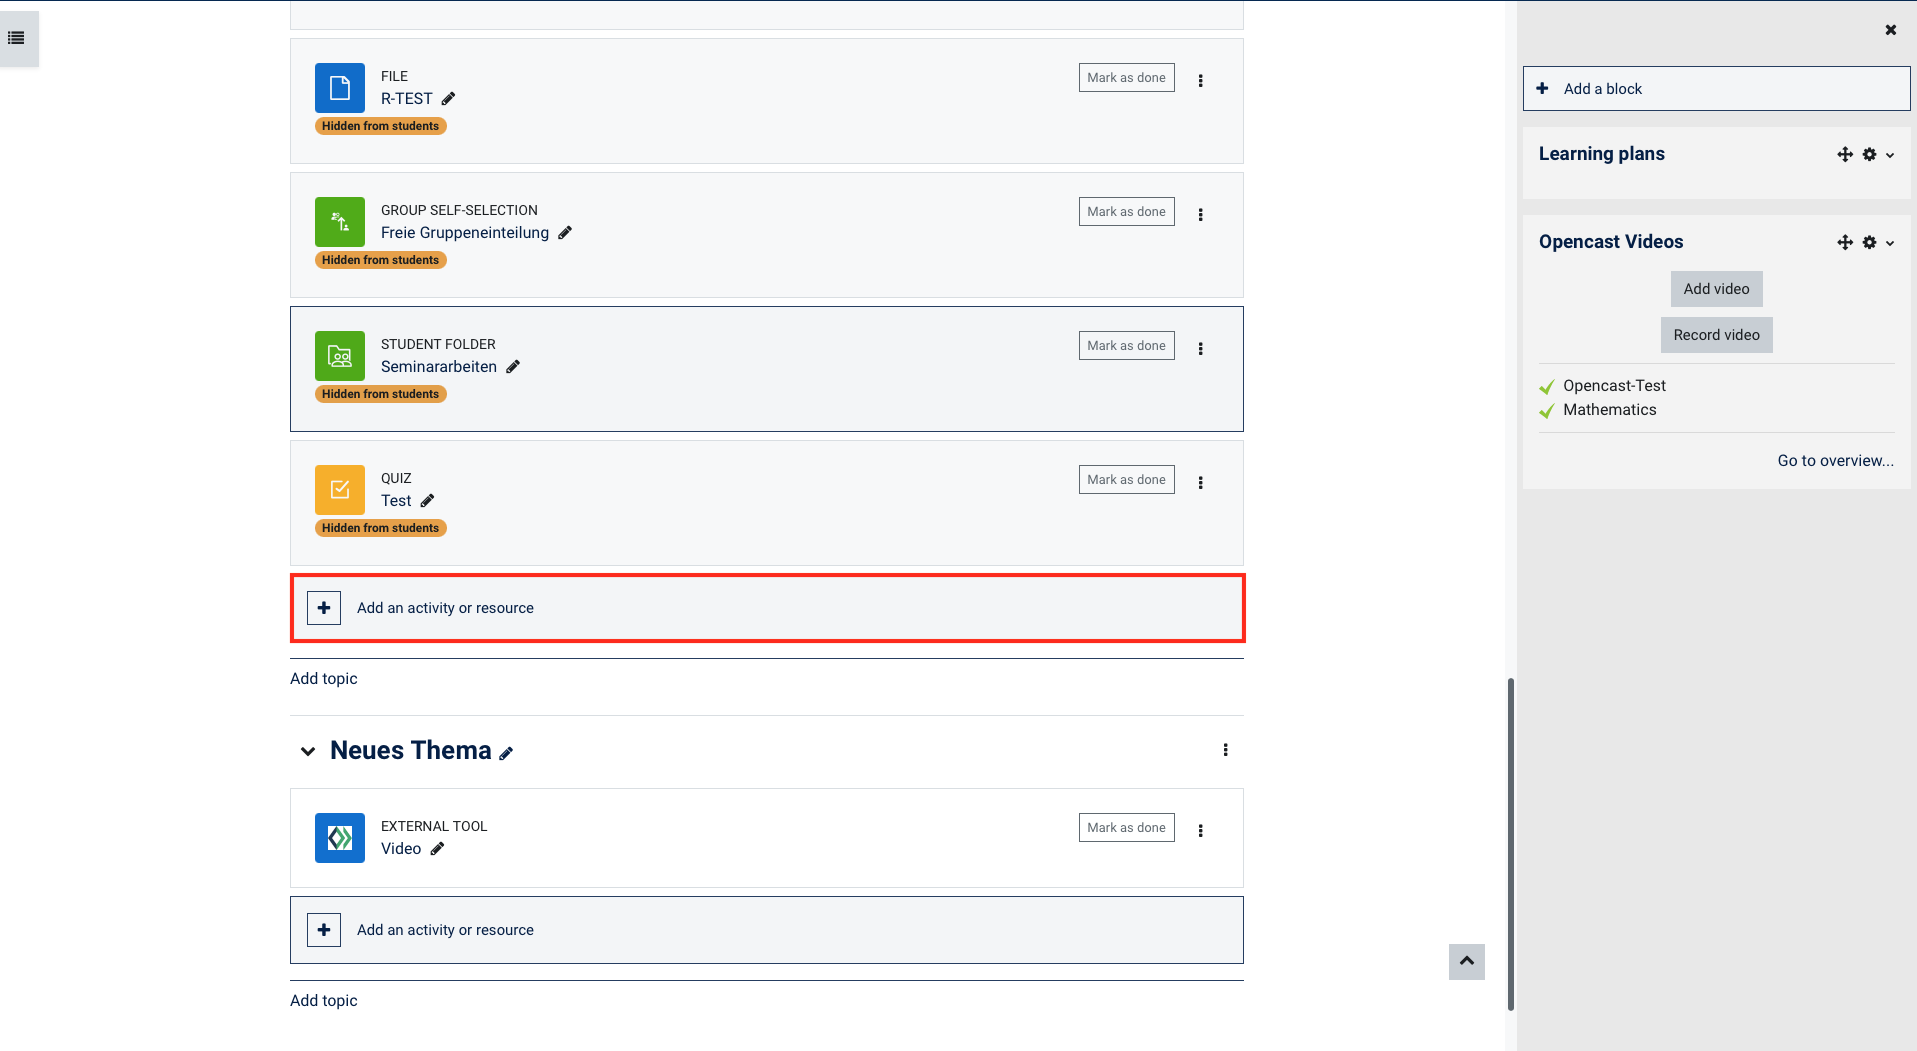
Aktivieren Sie den Bearbeitungsmodus Ihres Kurses und klicken Sie im Inhaltsbereich auf Aktivität oder Material anlegen.

Image Added

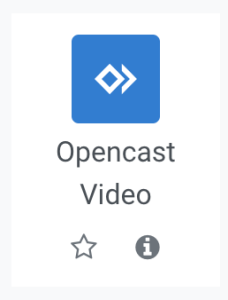
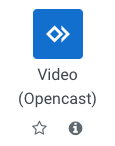
Im Fenster der verfügbaren Aktivitäten und Materialien wählen Sie die Option Opencast Video.

Image Added

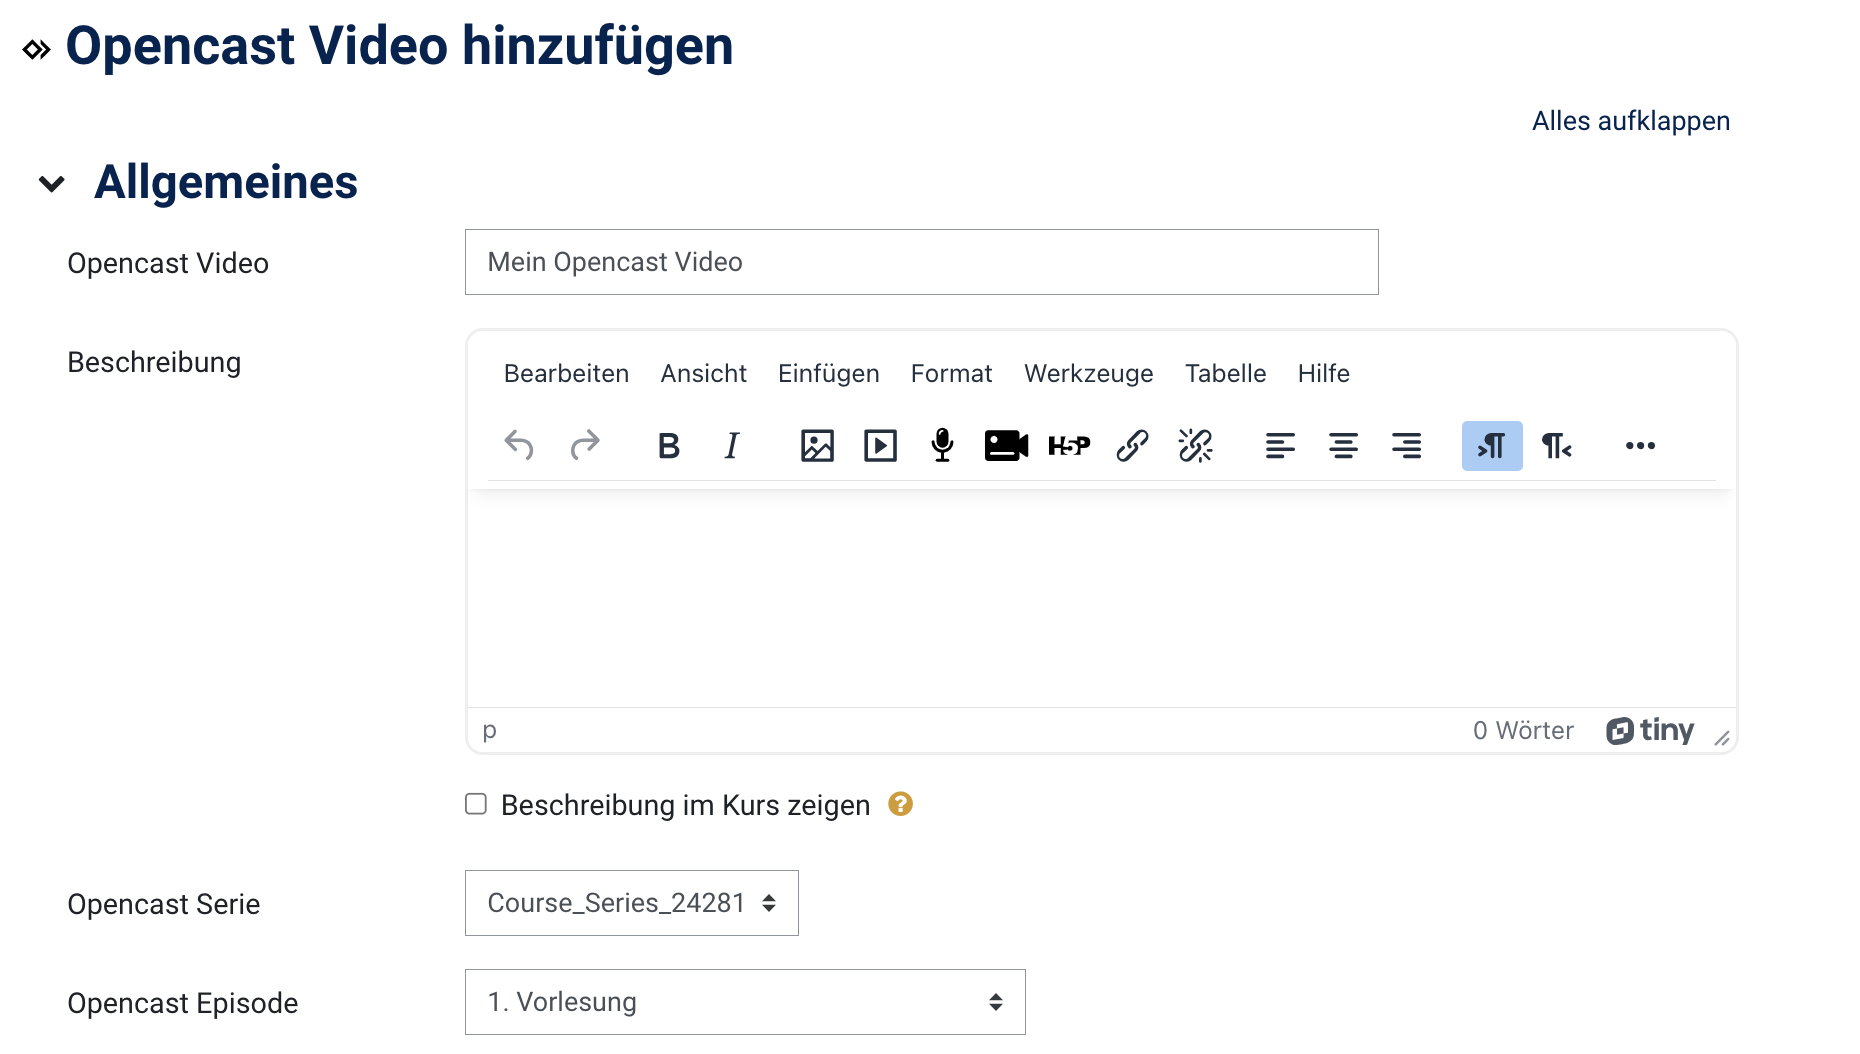
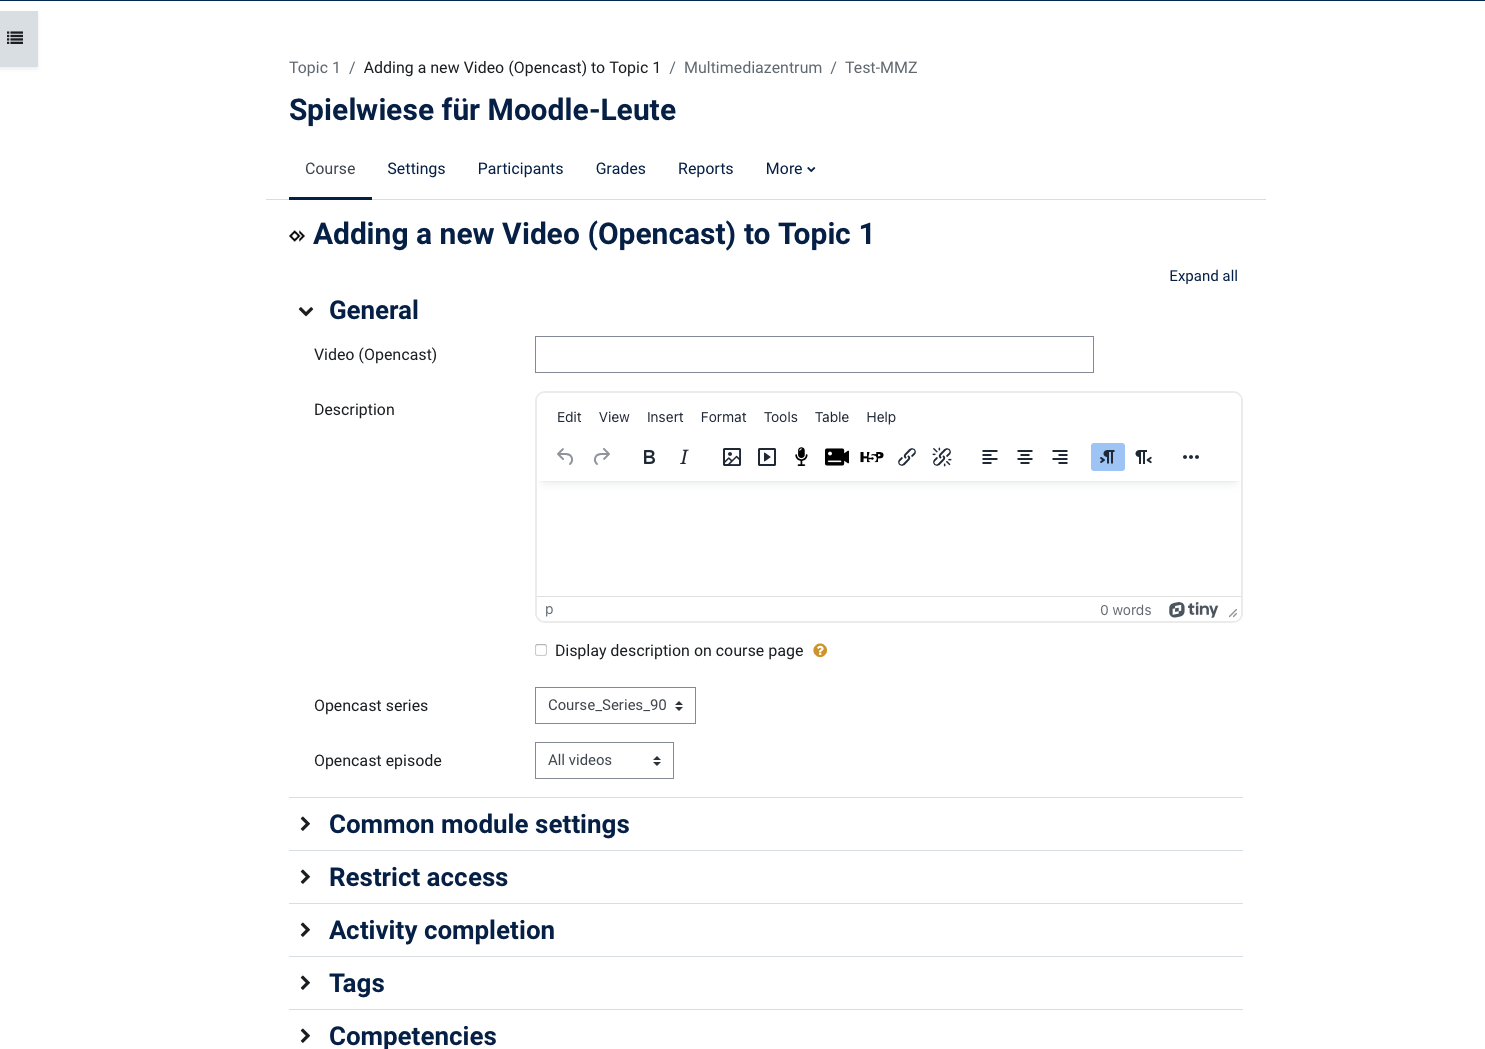
Auf der sich öffnenden Seite geben Sie nun einen Titel ein, können eine Beschreibung hinzufügen und legen im Dialog Opencast Episode fest, welches Video Sie einbinden wollen.

Nehmen Sie ggf. weitere Einstellungen auf dieser Seite vor und speichern Sie.

Image Added

Das ausgewählte Video erscheint nun als Opencast Video Aktivität in Ihrem Kursraum.

Image Added


Uploading two videos can be useful if an Opencast Studio upload has failed and you want to manually submit your saved videos.For this purpose, the corresponding dialog would then have to be used for your video image and the presentation.After completing the upload process, click save changes to complete the process. Opencast will now process the video in the background.
Image Removed

On the following page you can see the overview of your videos. Here you can control further actions - e.g. add another video or record a new video.

If you do not want to take any further actions here, click on your course on the left to return to it.
Image Removed

Your video will now appear in the Opencast Videos block.

Click on overview... to get to your video overview and to make changes if necessary - there are a few options available (e.g. visibility; delete).

Englisch


Info

In order to be able to embed videos with Opencast in your Moodle course, you first need the Opencast videos block, which you add to your course as follows:


Erweitern
titleAdd the block Opencast Videos to the course


To embed videos in your Moodle course with Opencast, you first need the Opencast Video block, which you can add to your course as follows:


  1. Switch to one of your courses in Moodle. Then click on activate editing in the upper right corner.

    Image Added

  2. In the left area - where your courses are listed - at the very bottom the button add block appears.

    Image Added

    Warnung

    If you don't see this button right away, scroll all the way down! If you have many courses, the list on the left may be very long, the button always appears at the bottom. So don't forget to scroll.


  3. Click on add block and select the Opencast Videos option in the dialog that opens to add this block to your page.

    Image Added

  4. The new block will now appear in the window at the top right.

    Image Added

  5. You are using the recording technology in one of the lecture halls and you would like these videos to be placed in your Moodle course? So that we can set this up for you, you have to set up a one-time connection to the Opencast servers with Moodle. This is done by creating a new series. In the Opencast block you go to overview ... and then to manage series. You can now create a new series.

    Alternatively, you can also record a short test sequence of a few seconds in your course via "Record video".

    Please provide the MMZ (mmz@uni-jena.de) with the course ID. This means that we have all the information we need about your course in the Opencast system and can link the videos from the lecture halls.

          Image AddedImage AddedImage Added


Erweitern
titleUpload a video manually (limit per video 5GB)

In Moodle you have the option of uploading an existing video in order to make it available for your course. To do this, follow these steps:


  1. Click add video to open the video upload dialog.

    Image Added

  2. Enter a meaningful title in the Metadata area and add (optional) additional metadata. To do this, click on show more ...
    You can enter further information in the extended dialog.

    Image Added

    In the Event Visibility section, set the initial visibility status of the video when uploading.
    Image Added

  3. There are two main sections under the upload file section - choose one option:

    (1)  Presenter video
    Use the presenter video if you have a video file with a recording of a speaker or a film.

    (2) Presentation video
    Use the presentation video if you have a video file with the recording of a slide presentation or a screencast.

    Image Added

    Info

    Uploading two videos can be useful if an Opencast Studio upload has failed and you want to manually submit your saved videos.For this purpose, the corresponding dialog would then have to be used for your video image and the presentation.


  4. After completing the upload process, click add video to complete the process. Opencast will now process the video in the background.

    Image Added

  5. On the following page you can see the overview of your videos. Here you can control further actions - e.g. add another video or record a new video.

    If you do not want to take any further actions here, click on your course on the left to return to it.

    Image Added

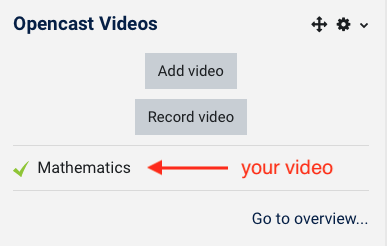
  6. Your video will now appear in the Opencast Videos block.

    Click on overview... to get to your video overview and to make changes if necessary - there are a few options available (e.g. visibility; delete).

    Warnung

    Please note that processing may take some time at peak times.


    Image Added


Erweitern
titleRecord a video

 In addition to the option of uploading an existing video, you can also record your own video directly via Moodle. To do this, follow these steps:


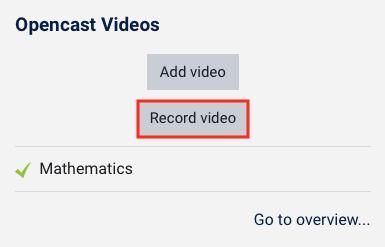
  1. Click record video to switch to the Opencast Studio user interface.

    Image Added

  2. The use of Opencast Studio is described in detail in the section Instructions for Using Opencast Studio.

    Image Added

    Image Added

    Info

    The advantage of recording a video directly from Moodle is that the video is automatically assigned to your course in the background and stored there.


    Warnung

    Please download the video file for your own backup before uploading it to Opencast Studio. This is the only way to add the video to your course afterwards with a manual upload (see upload video manually) in the event of a failed upload.


  3. After a successful upload, the video will also be processed in the background and then made available to your course.

Englisch
Info

In order to be able to embed videos with Opencast in your Moodle course, you first need the Opencast videos block, which you add to your course as follows:

To embed videos in your Moodle course with Opencast, you first need the Opencast Video block, which you can add to your course as follows:

Switch to one of your courses in Moodle. Then click on activate editing in the upper right corner.
Image Removed
In the left area - where your courses are listed - at the very bottom the button add block appears.
Image Removed
Erweitern
titleAdd the block Opencast Videos to the course
Warnung

If you don't see this button right away, scroll all the way down! If you have many courses, the list on the left may be very long, the button always appears at the bottom. So don't forget to scroll.

Click on add block and select the Opencast Videos option in the dialog that opens to add this block to your page.
Image Removed
The new block will now appear in the window at the top right.
Image Removed
You are using the recording technology in one of the lecture halls and you would like these videos to be placed in your Moodle course? So that we can set this up for you, you have to set up a one-time connection to the Opencast servers with Moodle. This is done by creating a new series. In the Opencast block you go to overview ... and then to create new series.
Alternatively, you can also record a short test sequence of a few seconds in your course via "Record video".
Please provide the MMZ (mmz@uni-jena.de) with the course ID. This means that we have all the information we need about your course in the Opencast system and can link the videos from the lecture halls.

Image RemovedImage Removed

Erweitern
titleUpload a video manually (limit per video 5GB)

In Moodle you have the option of uploading an existing video in order to make it available for your course. To do this, follow these steps:

  1. Click add video to open the video upload dialog.
    Image Removed
    Enter a meaningful title in the Metadata area and add (optional) additional metadata. To do this, click on show more ...
    You can enter further information in the extended dialog.
    Image Removed
    Image Removed

    There are two main sections under the upload file section - choose one option:

    (1)  Presenter video
    Use the presenter video if you have a video file with a recording of a speaker or a film.

    (2) Presentation video
    Use the presentation video if you have a video file with the recording of a slide presentation or a screencast.
    Image Removed
Info
Warnung

Please note that processing may take some time at peak times.

Image Removed
Image Removed Erweitern
titleRecord a video

 In addition to the option of uploading an existing video, you can also record your own video directly via Moodle. To do this, follow these steps:

Click record video to switch to the Opencast Studio user interface.
Image Removed
The use of Opencast Studio is described in detail in the section Instructions for Using Opencast Studio.
Image Removed
Image Removed
Info

The advantage of recording a video directly from Moodle is that the video is automatically assigned to your course in the background and stored there.

Warnung

Please download the video file for your own backup before uploading it to Opencast Studio. This is the only way to add the video to your course afterwards with a manual upload (see upload video manually) in the event of a failed upload.

After a successful upload, the video will also be processed in the background and then made available to your course.

Your video will now appear in the Opencast Videos block.

Click on overview... to get to your video overview and to make changes if necessary - there are a few options available (e.g. visibility; delete).

Image Removed
Image Removed Erweitern
titleRecord a video

 In addition to the option of uploading an existing video, you can also record your own video directly via Moodle. To do this, follow these steps:

Click record video to switch to the Opencast Studio user interface.
Image Removed
The use of Opencast Studio is described in detail in the section Instructions for Using Opencast Studio.
Image Removed
Image Removed
Info

The advantage of recording a video directly from Moodle is that the video is automatically assigned to your course in the background and stored there.

Warnung

Please download the video file for your own backup before uploading it to Opencast Studio. This is the only way to add the video to your course afterwards with a manual upload (see upload video manually) in the event of a failed upload.

After a successful upload, the video will also be processed in the background and then made available to your course.

Your video will now appear in the Opencast Videos block.

Click on overview... to get to your video overview and to make changes if necessary - there are a few options available (e.g. visibility; delete).

Image Removed
Image Removed Erweitern
titlePlace and embed videos in the course

The videos that you have added to your course - by uploading or recording - are not yet visible to your students. 

 In order for your students to see the videos, you need to embed or place them in your course. You have the following three options:

Erweitern
titleOption 1

Option 1

Click the post button to add a single video to a topic or course section.
Image Removed

In the following window you have the option of adapting the title of the video, adding a description or making further settings.

As soon as you have finished entering your data, click on one of the two blue buttons:

Add an activity and return to overview

or

Add an activity and return to course
Tipp

Enter details about the video and, if necessary, set certain requirements. For example, you could not post a video solution to a task until the participants met a certain condition.

Image Removed
The video will now appear as a link in your course. If you click on this, an external player will be opened to play the video.
Image Removed
Image Removed Erweitern
titleOption 2

Option 2

Integrate a complete course series into a topic or course section by clicking the add Opencast series activity to course button.
Image Removed
Tipp

If you would like to make videos available to your participants at a later point in time, please change the visibility. Videos that are noted with a crossed-out eye will not be shown to the participants in the series overview.

In the following window you have the option of adapting the title of the video, adding a description or making further settings.

As soon as you have finished entering your data, click on one of the two blue buttons:

Add an activity and return to overview

or

Add an activity and return to course

Image Removed
Tipp

Enter details about the video and, if necessary, set certain requirements. For example, you could not post a video solution to a task until the participants met a certain condition.

The video will now appear as a link in your course. If you click on it, a list of results opens with all available videos. Click on a video to start the video player.
Image Removed
Image Removed Erweitern
titleOption 3

Option 3


  1. Image Added

    Image Added


Erweitern
titleCreate transcription of uploaded videos

Create transcription of uploaded videos

If you want to add subtitles to your uploaded videos, follow these editing steps:

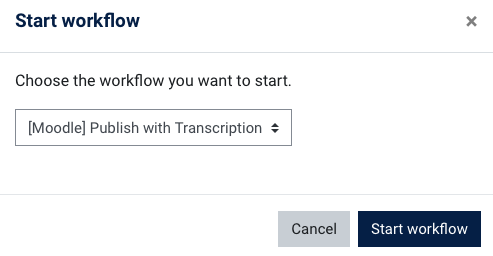
In the Opencast Videos block, open the overview of videos uploaded in the course. Select the video to be subtitled and click the arrow next to the cogwheel in the Actions column. In the menu that opens, select the option Start workflow.

Image Added

In the dialogue that opens, keep the current setting and click on Start workflow to initiate the creation of the subtitles.
Processing now takes a moment - you can see this from the clock in the Status column. After the processing of the video is complete, the subtitles for the video are available.

Image Added


Erweitern
titlePlace and embed videos in the course

The videos that you have added to your course - by uploading or recording - are not yet visible to your students. 

 In order for your students to see the videos, you need to embed or place them in your course. You have the following three options:


Erweitern
titleOption 1

Option 1 To provide a video 

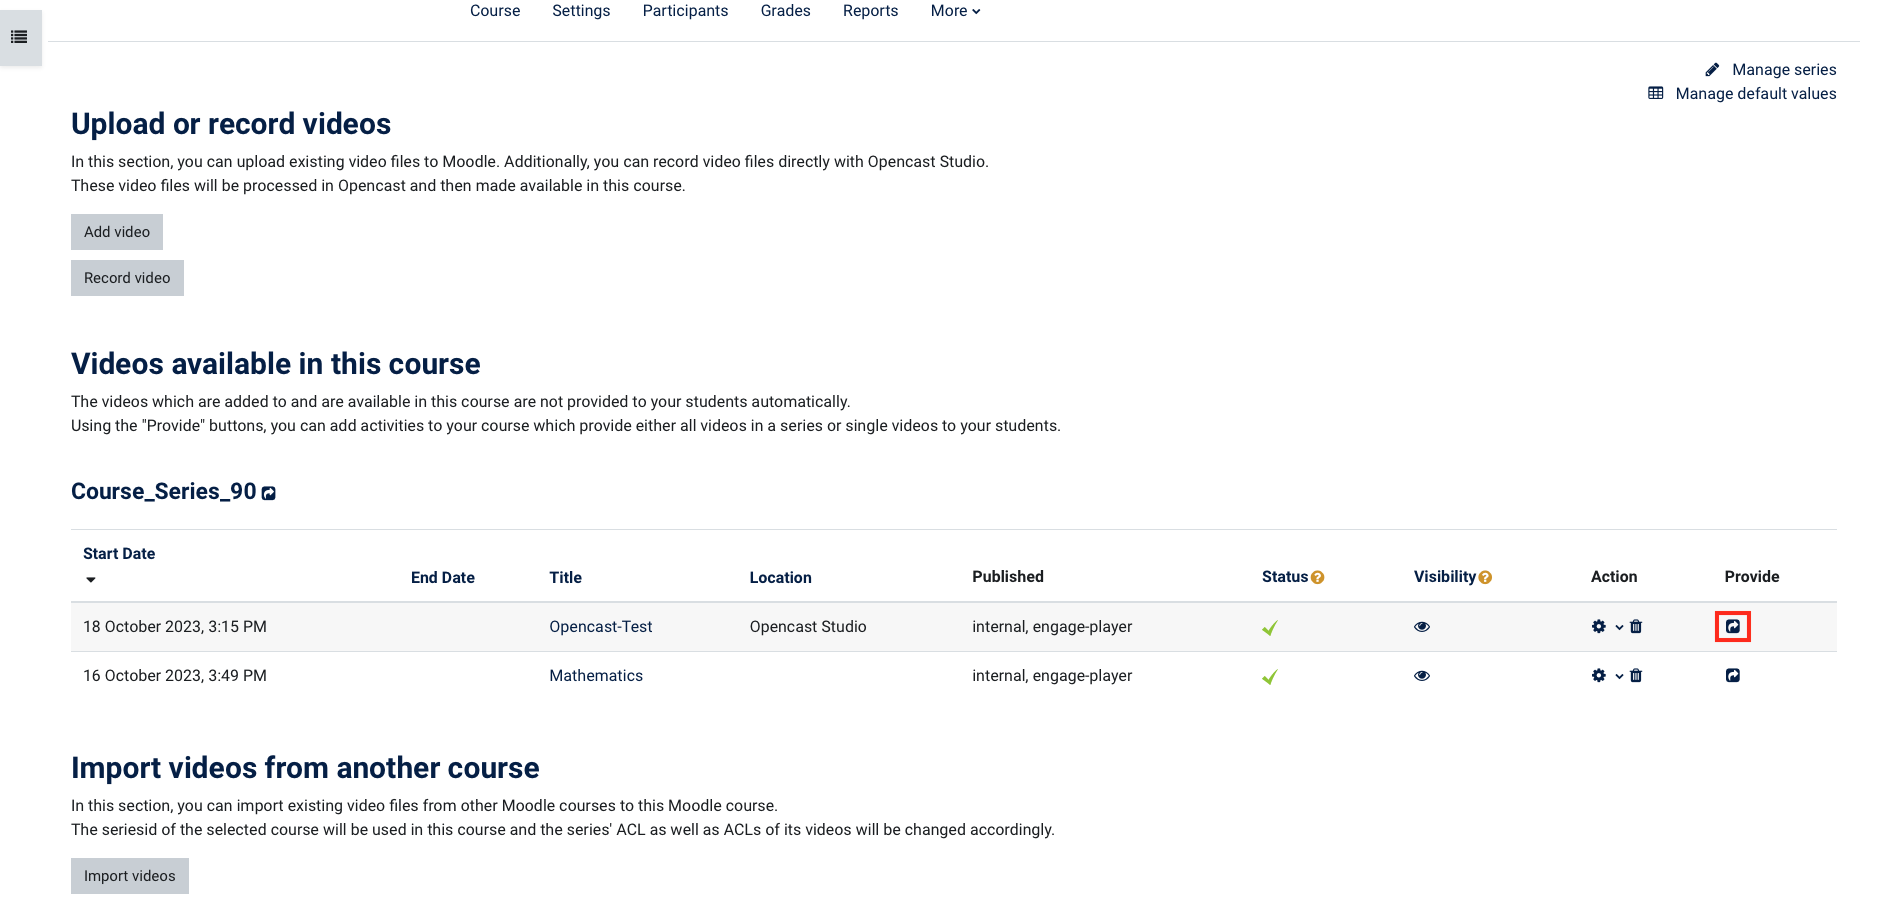
  1. Click the provide button to add a single video to a topic or course section.

    Image Added

  2. In the following window you have the option of adapting the title of the video, adding a description or making further settings.

    As soon as you have finished entering your data, click on one of the two blue buttons:

    Add an activity and return to overview

    or

    Add an activity and return to course

    Tipp

    Enter details about the video and, if necessary, set certain requirements. For example, you could not post a video solution to a task until the participants met a certain condition.


    Image Added

  3. The video will now appear as a link in your course. If you click on this, an external player will be opened to play the video.

    Image Added

    Image Added


Erweitern
titleOption 2

Option 2 Embed a video in the text field

  1. If you want to link to a video within a text section or description, use the activity Text field or Text page.
    To do this, click Create activity or resource in the topic or course section, select the option Add text and media area or page.

    Image Added

    Tipp

    If you would like to make videos available to your participants at a later point in time, please change the visibility. Videos that are noted with a crossed-out eye will not be shown to the participants in the series overview.


  2. In the following window you can edit the text field. 
    With a click on the button Multimedia you have the possibility to insert media in the text field.

    Image Added


  3. Select a file and add it to the desired position in the text.

       Image Added


  4. The video is then embedded directly in the text and can be played.

         Image Added


Erweitern
titleOption 3

Option 3 The Opencast Video activity

  1. Activate the editing mode of your course and click on Create activity or ressource in the content area. 

Image Added

2.  In the window of available activities and materials, select the option Opencast Video.

Image Added

3.  On the page that opens, you can now enter a title, add a description and specify which video you want to include in the Opencast Episode dialogue.
If necessary, make further settings on this page and save.

Image Added

4. The selected video will now appear as an Opencast video activity in your course room.

Image Added


Deutsch

Videos aus einem anderen Kurs wiederverwenden

Englisch

Reuse videos from another course

Deutsch
Info
iconfalse

Wenn Sie Videos aus einem anderen/vergangenen Kurs wiederverwenden wollen, stehen Ihnen folgende Möglichkeiten zur Verfügung:

Englisch
Info
iconfalse

If you want to reuse videos from another/past course, you have the following options:

Deutsch
Erweitern
titleEine Kurssicherung inkl. Opencast Videos erstellen

Eine Kurssicherung erstellen und den gesicherten Kurs in einem anderen Kurs wiederherstellen

Ab sofort können Sie bei der Erstellung einer Kurssicherung die Opencast Videos eines Kurses einschließen. Folgen Sie diesen Schritten, wenn Sie einen Kurs inklusive Videos sichern wollen:

Aktivieren Sie den Bearbeitungsmodus Ihres Moodle-Kursraumes.

Image Added

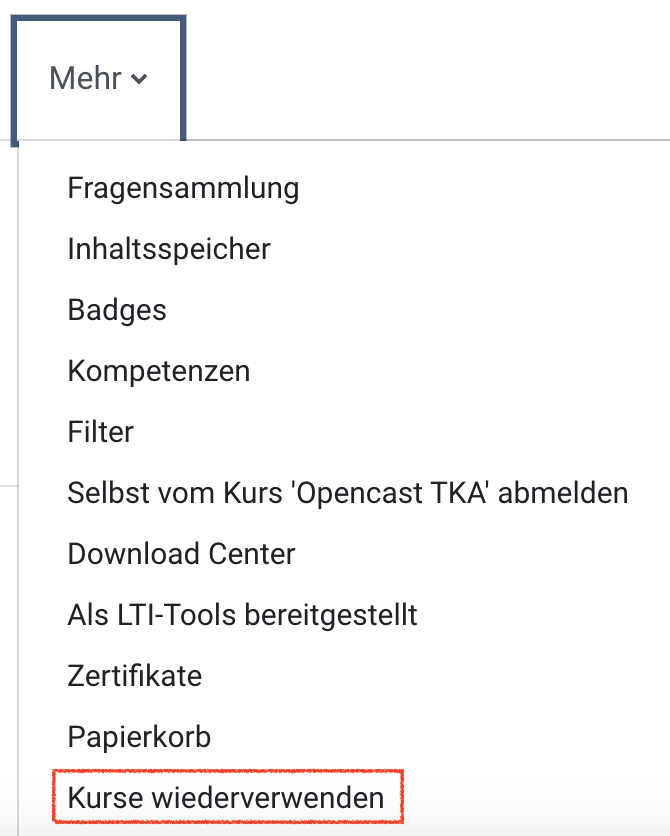
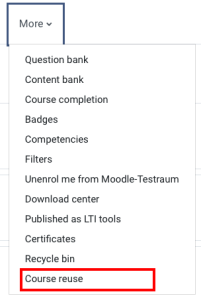
Nun wählen Sie in der horizontalen Navigation oben im Kurs Mehr/Kurse wiederverwenden.

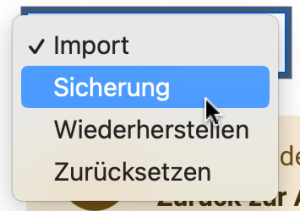
Auf der nächsten Seite finden Sie ein Dropdown-Menü oben links. Klicken Sie dieses an
und wählen Sie Sicherung.

Sie gelangen nun zu den Sicherungseinstellungen – hier können Sie durch Aktivieren oder
Deaktivieren der Checkboxen festlegen, welche Inhalte des Kurses Sie sichern wollen.


Image Added Image Added

Klicken Sie unten auf der ersten Seite auf Weiter, um auf die zweite Seite zu gelangen. Auf 
dieser ganzen unten aktivieren Sie die Checkbox Opencast Videos in diesem Kurs einbeziehen.

Klicken Sie erneut auf Weiter und auf der folgenden Seite auf Sicherung ausführen.

Die Kurssicherung wird erstellen. Sie können diese im Anschluss wie gewohnt über die Option Wiederherstellen in einen neuen Kurs importieren.

Image Added

Erweitern
titleEine Serie importieren


Eine Serie importieren


Blenden Sie im Zielkurs – also in dem Kurs, in dem die Videos neu erscheinen sollen – den Block Opencast Videos ein.

Klicken Sie unten rechts auf Weitere Videos… , um auf die Übersichtsseite der Videos für den Kurs zu gelangen.

Image Added

Auf der Übersichtsseite der Videos finden Sie oben rechts den Button Serien verwalten. Klicken Sie diesen bitte an.

Image Added

Auf der folgenden Seite klicken Sie nun auf Serie importieren. Auf diese Weise importieren Sie eine Serie aus einem anderen Moodle-Kursraum.


Info
titleHinweis

Bei diesem Vorgehen werden die Videos nicht dupliziert und belegen so keinen zusätzlichen Speicherplatz.


Image Added

In der sich öffnenden Dialogbox geben Sie nun die Serien-ID ein.

Die Serien-ID können Sie im alten Moodle-Kursraum auslesen, wenn Sie auch dort den Block Opencast Videos einblenden und in die Ansicht Serien verwalten gehen.

Wenn Sie die ID eingegeben haben, klicken Sie auf Import series, um den Import zu starten. Sobald dieser abgeschlossen ist, erscheint die Serie in der Liste.


Image Added

Wechseln Sie im Anschluss wieder zurück zur Video-Übersichtsseite – dort finden Sie die importierte Serie und können diese nun als Ganzes oder einzelne Videos in Ihren Moodle-Kursraum einbinden und zur Verfügung stellen.


Warnung

Beachten Sie, dass, wenn Sie Videos in einer Serie löschen, diese auch in der anderen Serie nicht mehr verfügbar sind.


Erweitern
titleVideos aus einem anderen Kurs importieren

Videos aus einem anderen Kurs importieren

 Ganz unten in der Übersicht der Opencast Videos in Ihrem Kurs finden Sie den Abschnitt Videos aus einem anderen Kurs importieren. Diesen nutzen Sie wie folgt:

Fügen Sie (wenn noch nicht geschehen), den Block Opencast Videos, siehe oben, zu Ihrem Kursraum hinzu.

Klicken Sie in diesem Block auf Weitere Videos … 

Image Added

Auf der Übersichtsseite der Videos finden Sie unten auf der Seite den Abschnitt Videos aus einem anderen Kurs importieren. Klicken Sie hier auf Videos importieren.

Auf der folgenden Seite wählen Sie einen Quellkurs aus (in dem sich die zu importierenden Videos befinden) – entweder aus der Liste der Vorschläge oder über die Suche. Klicken Sie dann auf Weiter.

Auf der folgenden Seite müssen Sie ggf. Ihre Suche bestätigen. Klicken Sie auch hier auf Weiter und auf der Seite danach dann auf Videos importieren und zurück zur Übersicht.

Sie gelangen zur Übersichtsseite und die Videos werden in den aktuellen Kurs importiert.

Image Added

Image Added


Click on Import series on the following page. This is how you import a series from another Moodle course room.

Englisch
Erweitern
titleCreate a course backup including Opencast videos

Create a course backup and restore the saved course in another course.

From now on you can include the Opencast videos of a course when creating a course backup. Follow these steps if you want to save a course including videos: 

Activate the editing mode of your Moodle course room.

Image Added

Now select More/Reuse Courses in the horizontal navigation at the top of the course.
On the next page you will find a drop-down menu at the top left. Click on this 
and select Backup.
You will now be taken to the backup settings - here you can determine by activating or 
deactivate the checkboxes to determine which contents of the course you want to save.

Image AddedImage Added

Click Next at the bottom of the first page to go to the second page. At 
this all the way down, select the Include Opencast videos in this course checkbox.
Click Next again and on the next page click Run Backup.
The course backup will be created. You can then import it into a new course as usual using the Restore option.

Image Added


Erweitern
titleImport a series

Import a series 

In the target course - i.e. in the course in which the videos are to appear - show the block Opencast Videos.
Click on More videos... at the bottom right to go to the overview page of videos for the course.

Image Added

On the overview page of the videos, you will find the Manage Series button at the top right. Please click on this button.

Image Added

On the following page, click on Import Series. This is how you import a series from another Moodle course room.

Hinweis

With this procedure, the videos are not duplicated and thus do not occupy any additional storage space.


Image Added

In the dialogue box that opens, enter the series ID.
You can read out the series ID in the old Moodle course room if you also show the Opencast Videos block there and go to the Manage Series view.
Once you have entered the ID, click Import series to start the import. Once this is complete, the series will appear in the list.


Image Added

Then switch back to the video overview page - there you will find the imported series and can now integrate it as a whole or individual videos into your Moodle course room and make them available.

Hinweis

Note that if you delete videos in one series, they will no longer be available in the other series.


If you want to link to a video within a section of text or a description, use the text field or text page activity.

 To do this, click on create activity or material in the topic or course section, select the option text field or text page.
Image Removed

In the following window you can edit the text field.

With a click on the insert or edit audio / video file button, you have the option of inserting media.
Image Removed
Select a file and add it to the desired position in the text.
Image Removed
The video is directly embedded into the text and can be played.
Image Removed
Erweitern
titleImport videos from another course

Import videos from another course 

At the bottom of the overview of Opencast videos in your course you will find the section Import videos from another course. Use this section as follows:

Add (if not already done) the block Opencast Videos, see above, to your course room.
In this block, click on go to overview...

Image Added

On the overview page of the videos, you will find the section Import videos from another course at the bottom of the page. Click Import Videos here.
On the following page, select a source course (where the videos to be imported are located) - either from the list of suggestions or via the search. Then click Next.
On the following page, you may need to confirm your search. Again, click Next and then, on the page after that, click Import videos and return to the overview.
You will be taken to the overview page and the videos will be imported into the current course.

Image Added

Image Added

Info

In the current plug-in version, unfortunately, no preview images appear in the selection of videos during configuration. However, the preview image will be displayed later in the course.

Erweitern
titleReuse existing videos

You can reuse existing videos (from another course or other semesters). However, it is not possible to copy videos using the sharing cart or the course restore function.

Instead, the videos must be re-imported into the course. Follow these steps:

Show the Opencast Videos block in the target course – i.e. in the course in which the videos should appear.

Click on More videos… , to get to the overview page for all videos of the course.

Image Removed

On the overview page of the videos you will find the Manage series button at the top right. Please click on this.

Image Removed

Info
titleHinweis

With this procedure, the videos are not duplicated and thus do not occupy any additional storage space.

Image Removed

In the dialog box that opens, enter the series ID.

You can read out the series ID in the old Moodle course room if you also show the Opencast Videos block there and go to the Manage series view.

Once you have entered the ID, click Import series to start the import. Once this is complete, the series will appear in the list.

Image Removed

Then switch back to the video overview page - there you will find the imported series and you can now integrate them as a whole or individual videos into your Moodle course room and make them available.

WarnungNote that if you delete videos in one series, they will no longer be available in the other series either.


Deutsch

Wie können Sie die Aufnahmen ansehen?


Englisch

How can I watch the recordings?


Deutsch


Info
iconfalse

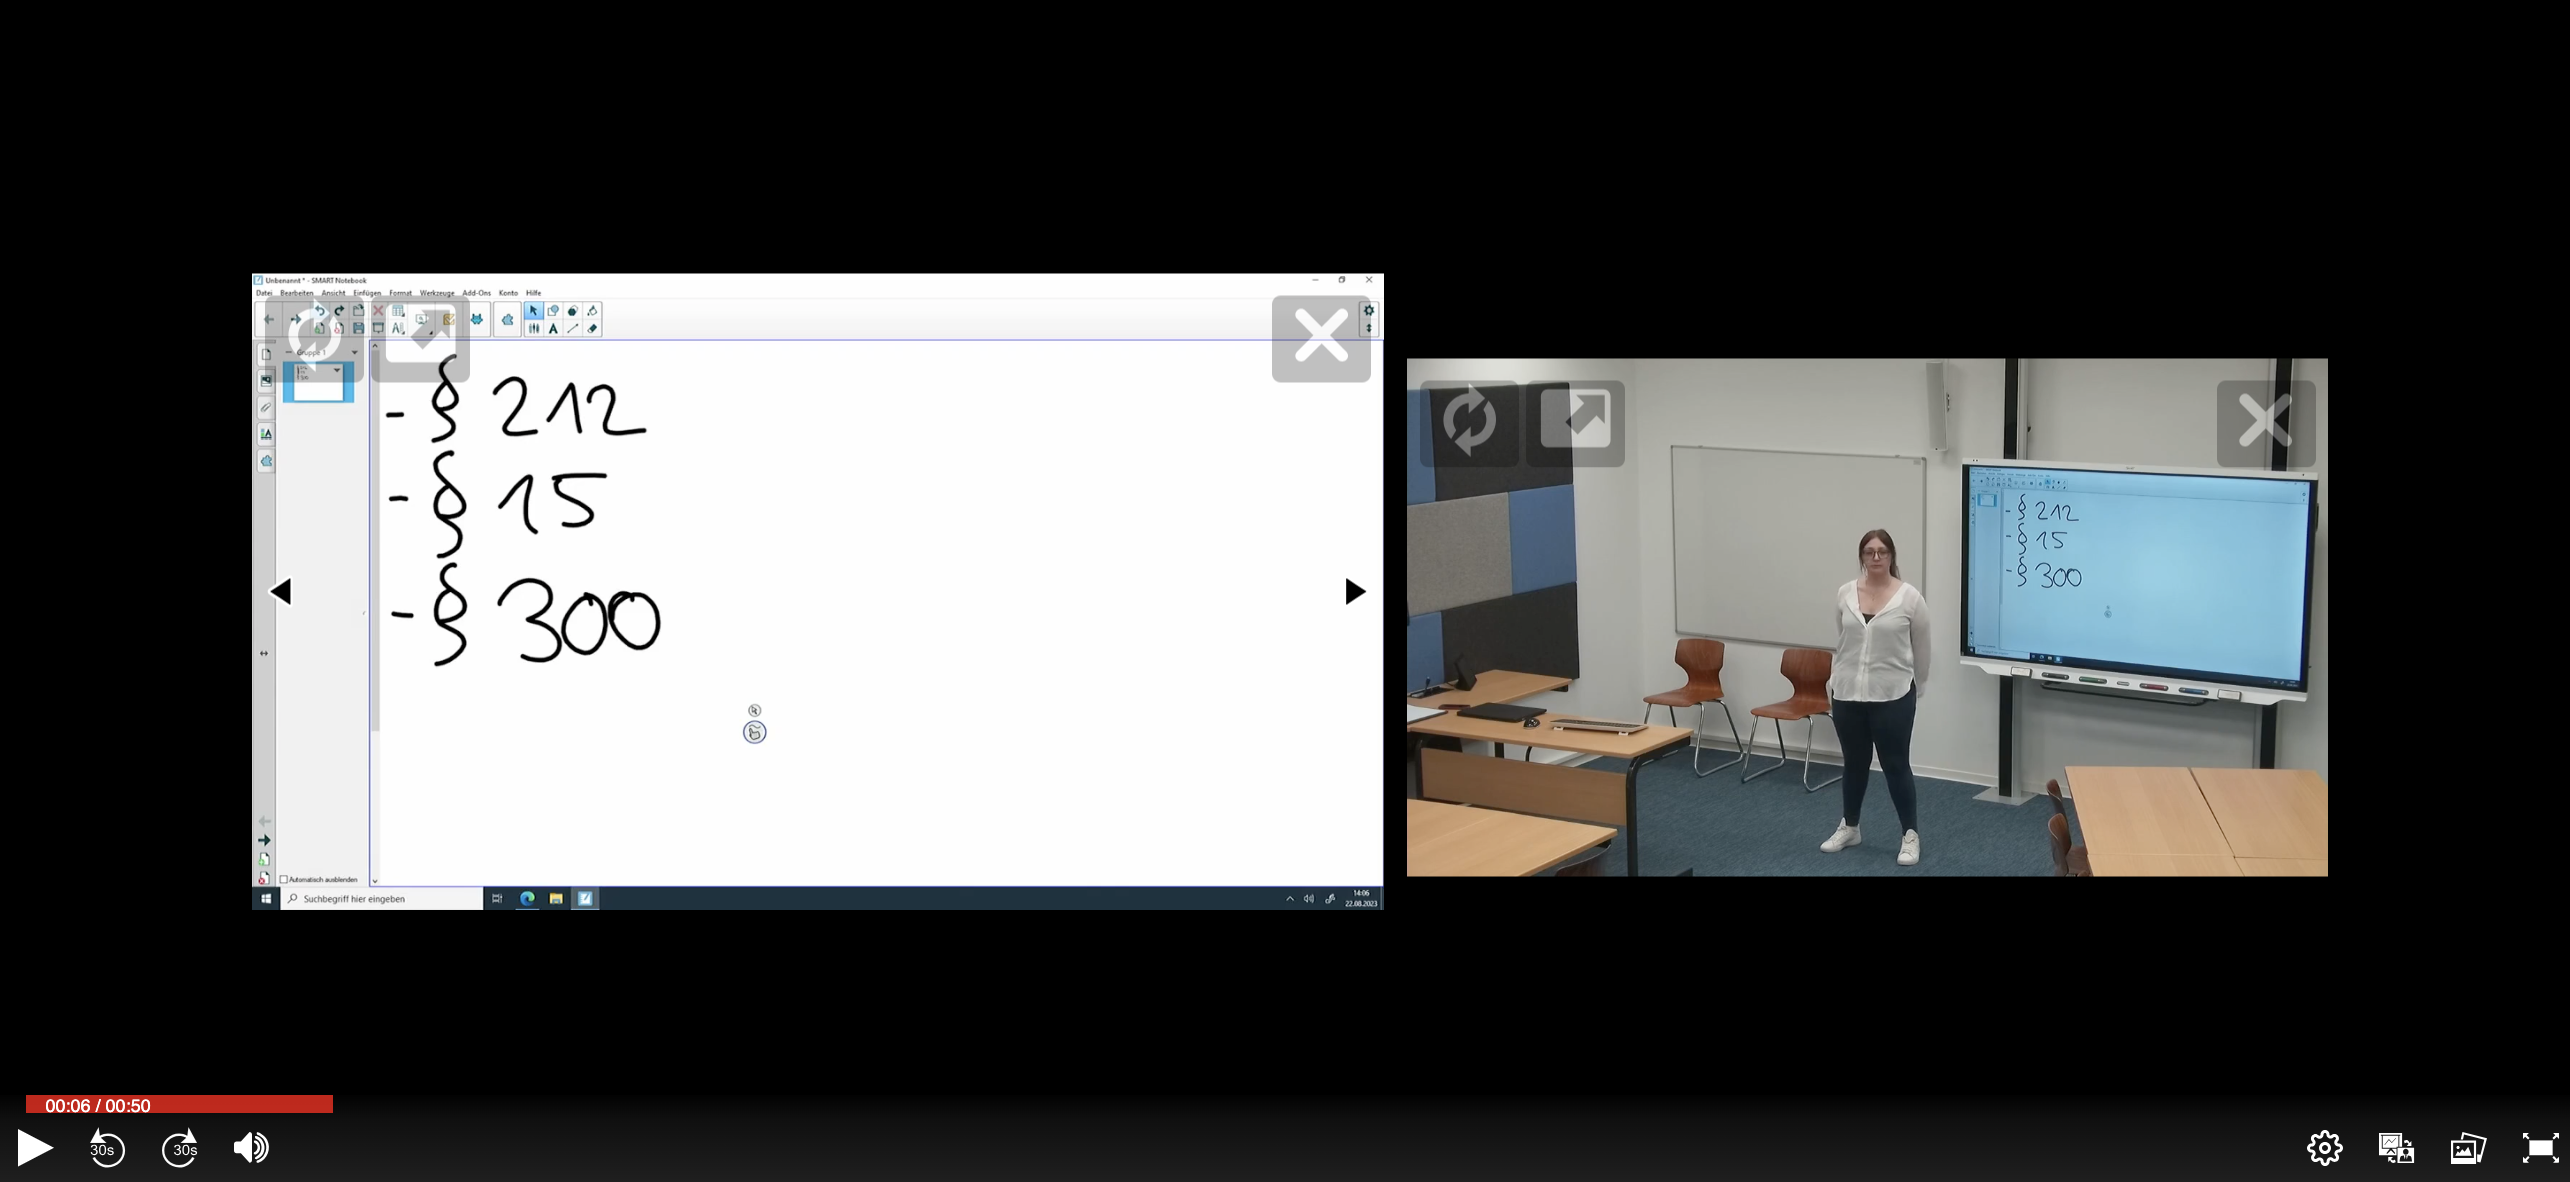
Um in den Moodle-Kursraum eingebettete Videos abzuspielen, nutzen Sie den Player, der im folgenden kurz beschrieben ist.


Erweitern
titleDer Player

Der Player

Klicken Sie in Ihrem Kurs auf das Video, um dessen Wiedergabe

in einem Videoplayer

im Videoplayer zu starten.

Oberfläche des VideoplayersImage Removed

Image Added

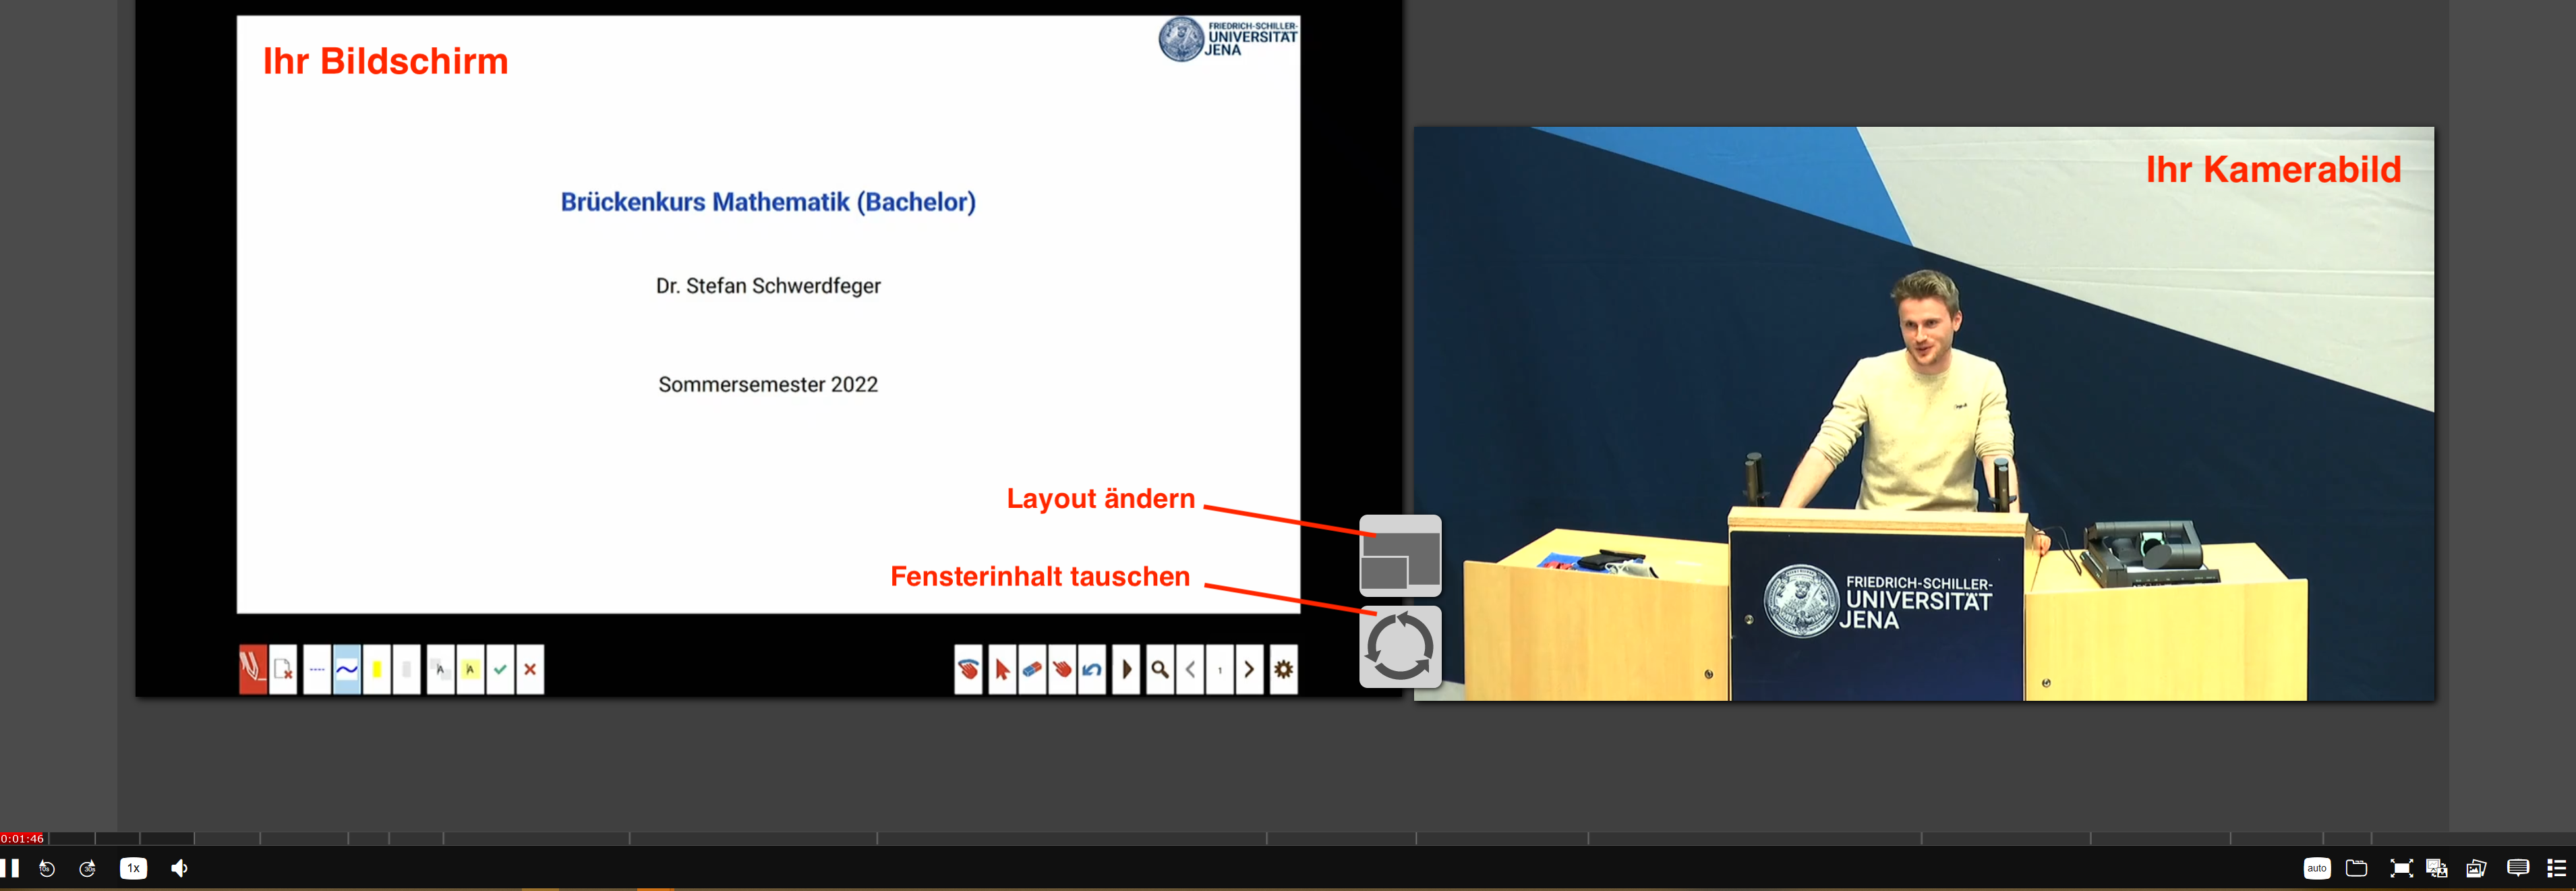
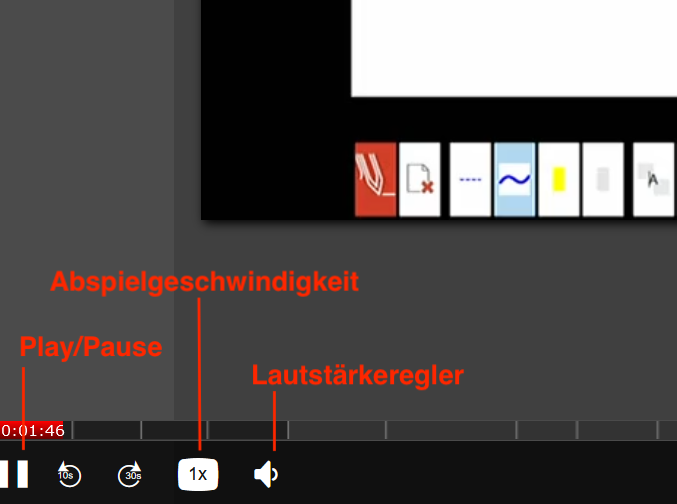
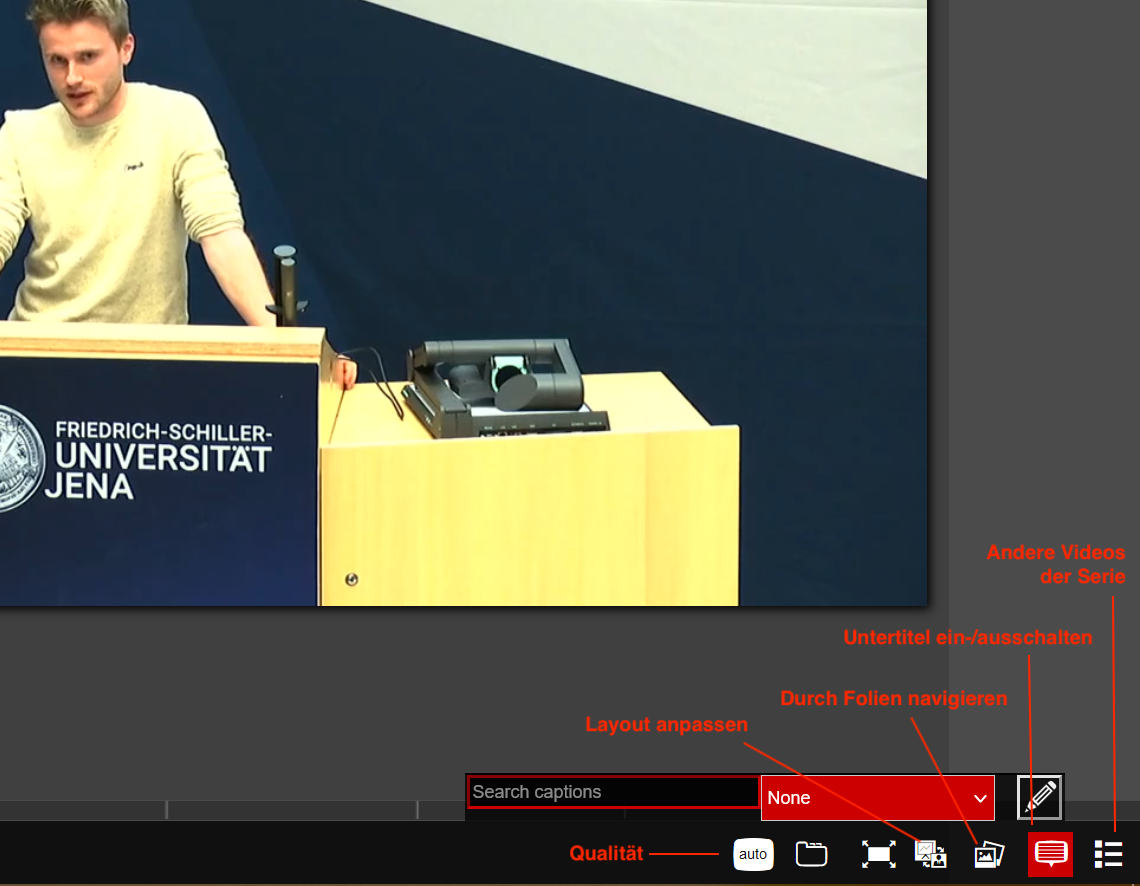
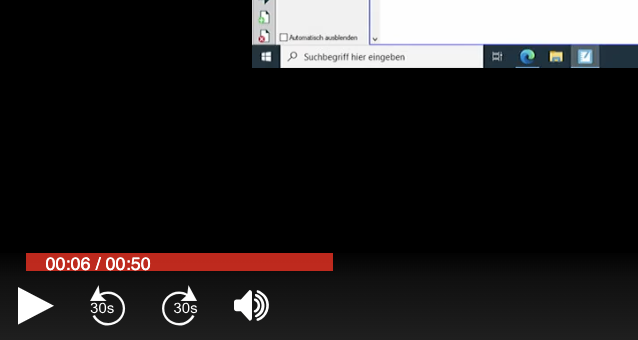
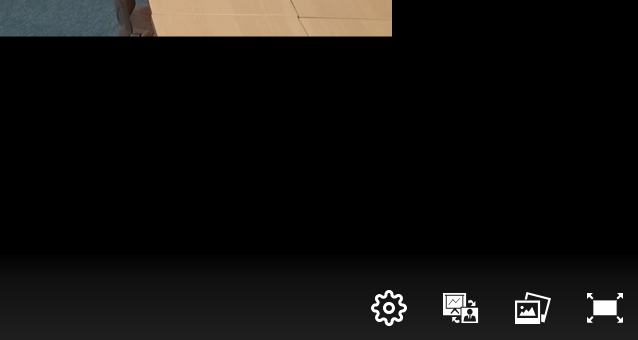
Ihnen stehen folgende Bedienelemente zur Verfügung

(von links nach rechts):

:

linke Seite

    • Play/Pause
10
    • 30 Sekunden zurückspulen
    • 30 Sekunden vorspulen
Abspielgeschwindigkeit anpassen
    • Lautstärkeregler
  • Videoqualität anpassen
  • Umschalten auf Vollbild oder Fensteransicht
  • Foliennavigation
  • Untertitel ein- /ausschalten
  • zugehörige Videos der Serie
  • Videoplayer Buttons links untenImage Removed

    Videoplayer Buttons rechtsImage Removed

    rechte Seite

      • Einstellungen: Wiedergabegeschwindigkeit; Tastenkürzel
      • Layout anpassen
      • Foliennavigation
      • Vollbildmodus

    Image Added

    Image Added


    Englisch


    Info
    iconfalse

    To play videos embedded in the Moodle course room, use the player that is briefly described below.


    Erweitern
    titlePlayer

    Player

    Click at the video in your course to start playing it in a video player.

    Oberfläche des VideoplayersImage Removed

    Image Added

    The following control elements are available (from left to right):

      • Play/pause
      • Rewind 10 seconds
      • Fast forward 30 seconds
      • Playback speed
      • Volume control
      • Video quality
      • Switch to full screen or window view
      • Slide navigation
      • Related videos of the series
    Videoplayer Buttons links untenImage Removed

    Image Added

    Videoplayer Buttons rechtsImage Removed

    Image Added


    Deutsch

    Anleitung zur Benutzung von Opencast Studio


    Englisch

    Instructions for using Opencast Studio


    Deutsch


    Info
    iconfalse

    Opencast Studio ist eine spezielle Nutzeroberfläche, die es jedem registrierten Nutzer ermöglicht, ohne zusätzliche Software Aufzeichnungen vom Desktop und/oder des Kamerabildes mit Ton direkt aus dem Webbrowser heraus aufzunehmen und zu publizieren. Ein Upload in die DBT ist an dieser Stelle nicht notwendig.

    Das so erstellte Video kann im Anschluss ohne Schnittsoftware direkt im Browser bearbeitet (trimmen und Pausen entfernen) und in verschiedenen Layouts publiziert werden.


    Erweitern
    titleStarten von Opencast Studio

    Opencast Studio starten

    Öffnen Sie in Moodle Ihren Kurs, fügen Sie den Block (falls noch nicht vorhanden) Opencast Videos hinzu (Anleitung siehe oben) und klicken Sie auf Video aufnehmen.

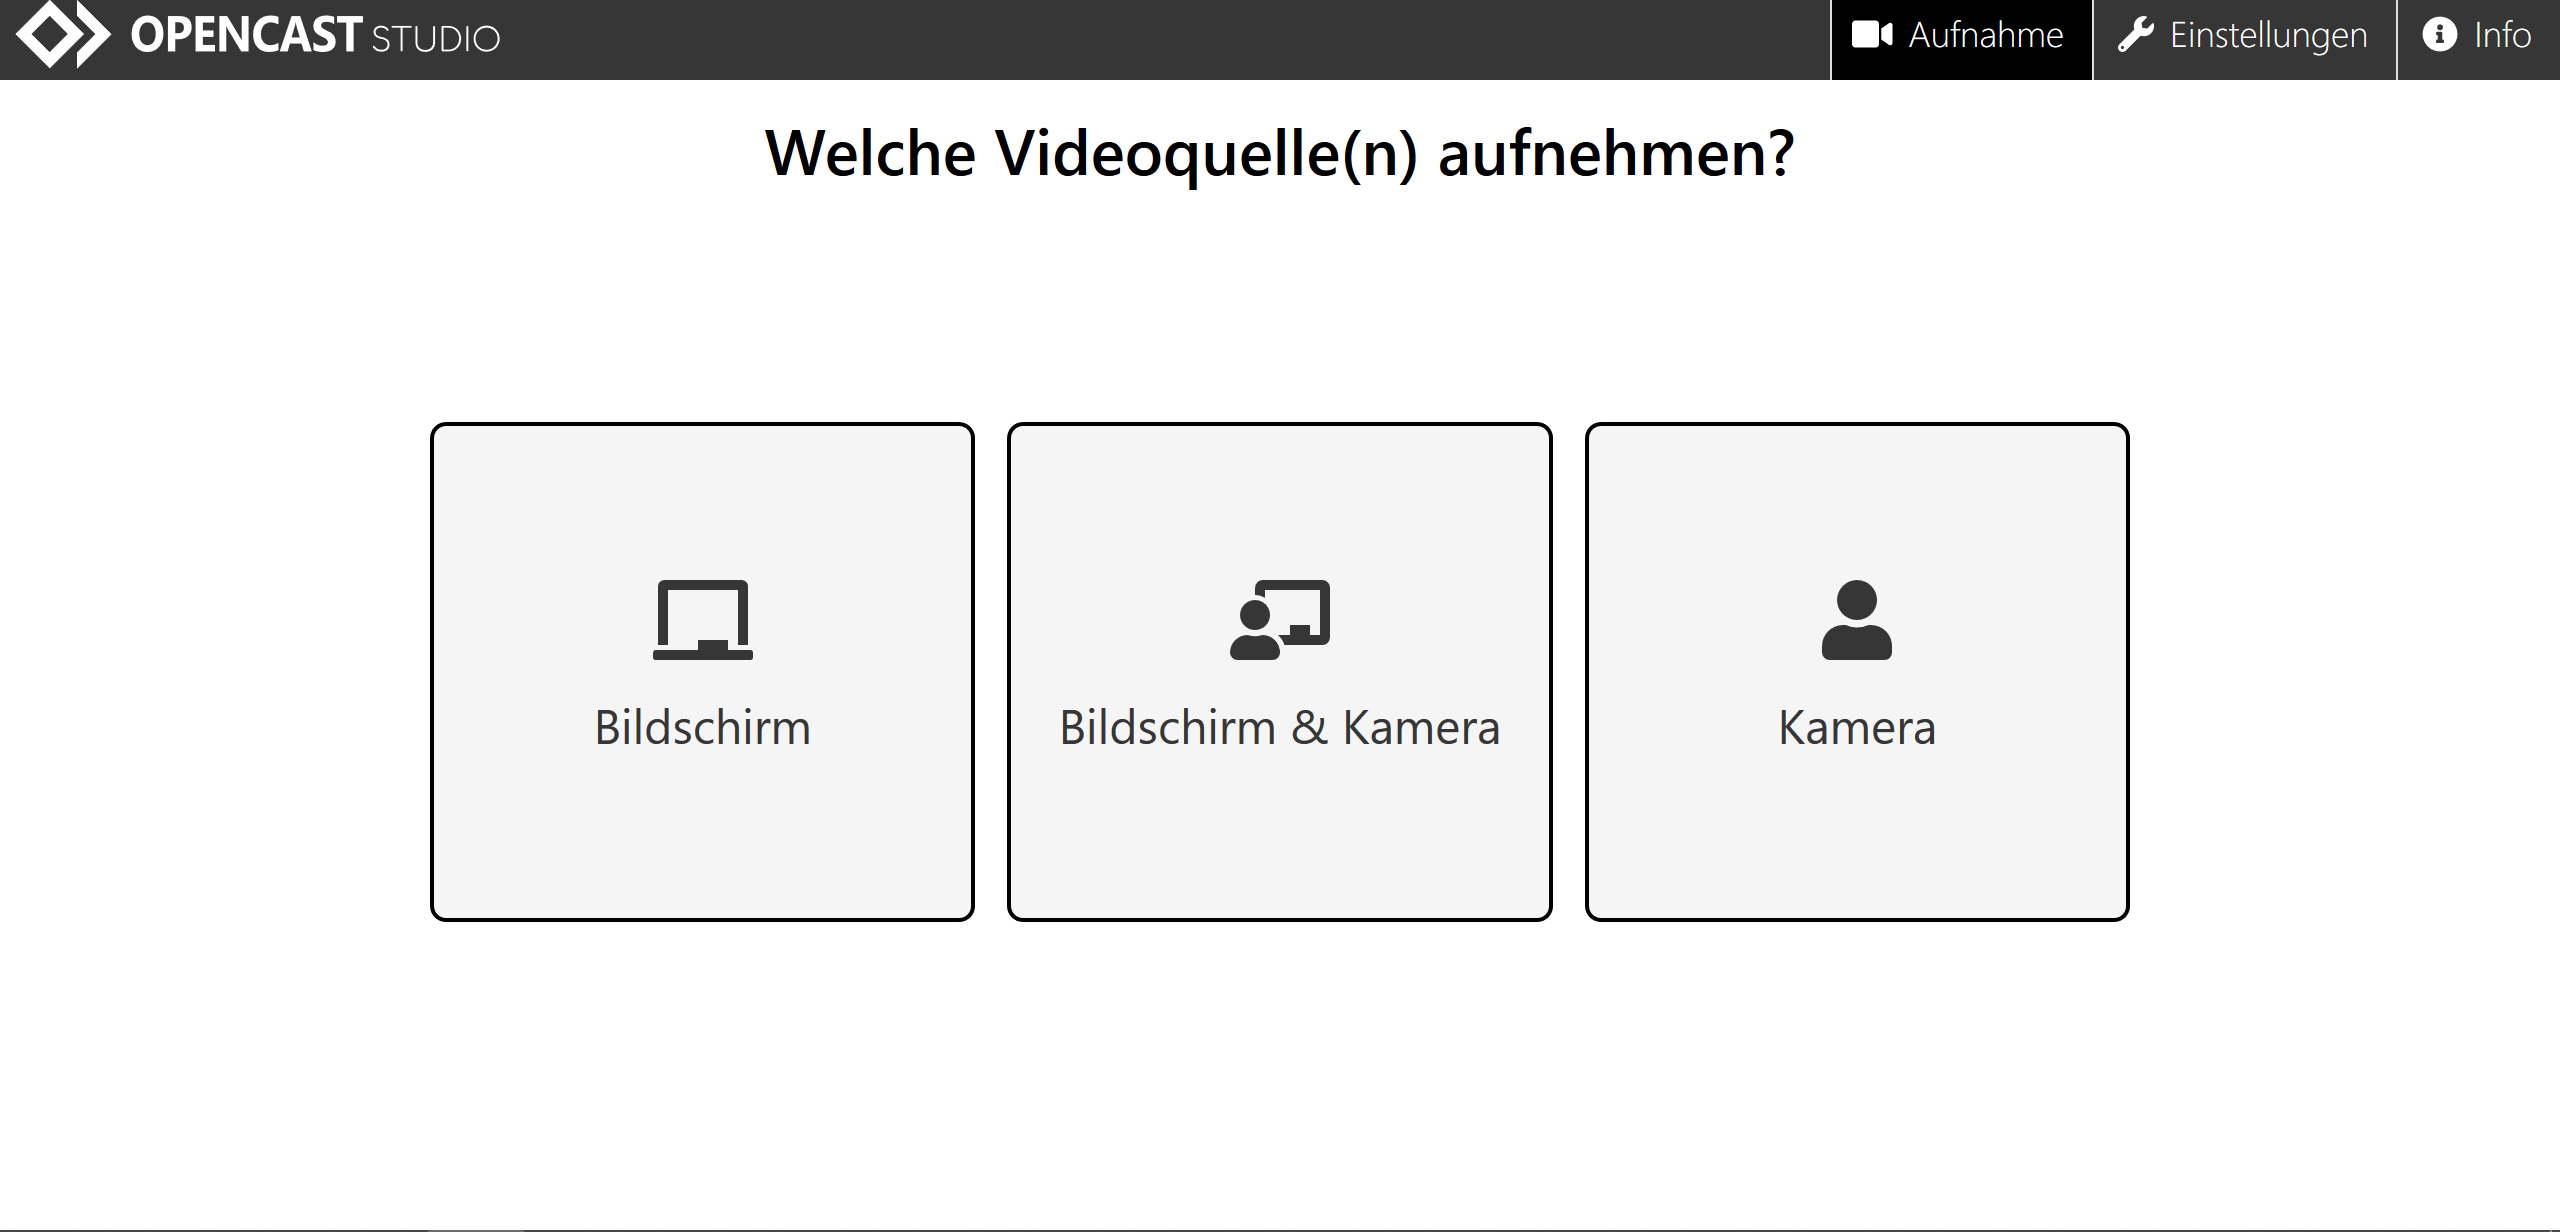
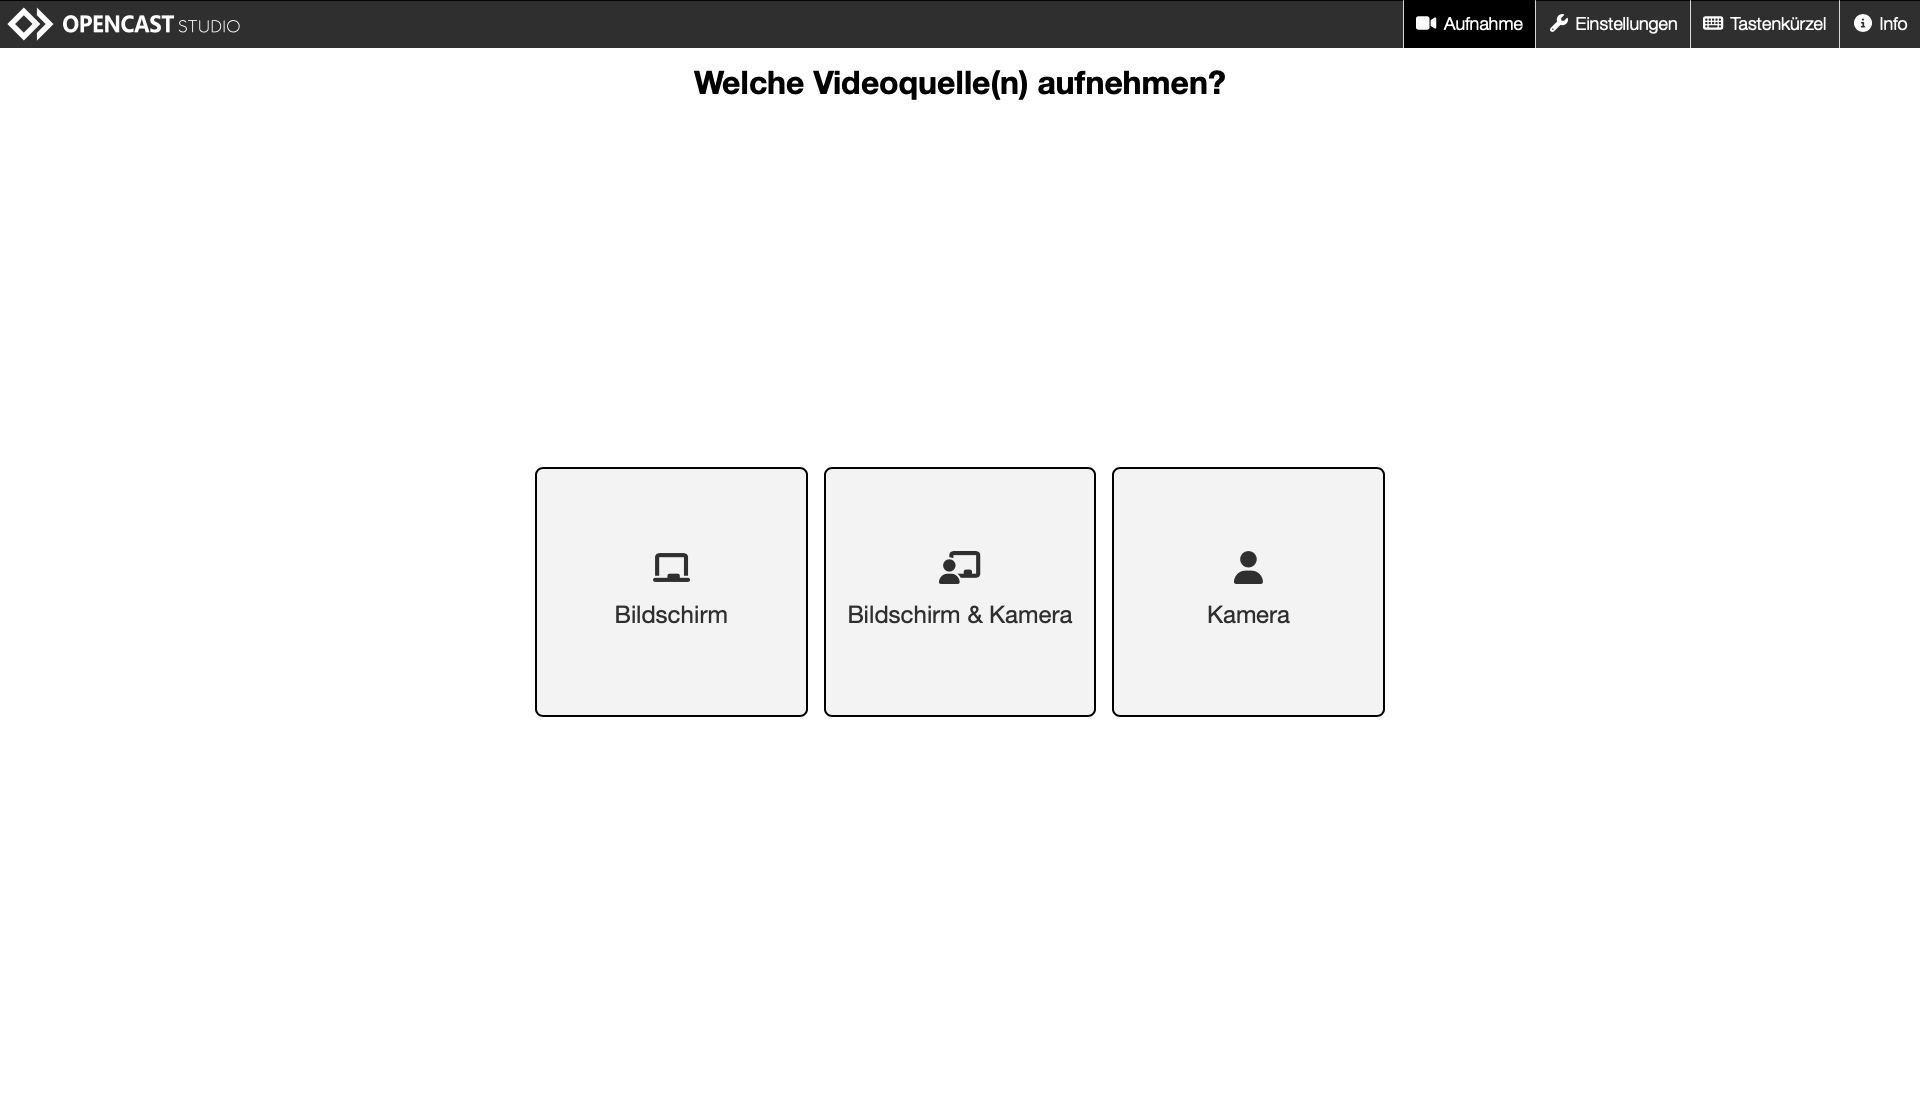
    Es öffnet sich Opencast Studio und Sie sehen diesen Einstiegsbildschirm. Hier wählen Sie aus, welche Videoquelle Sie aufnehmen möchten.

    Klicken Sie hier z.B auf Bildschirm, um die Anzeige Ihres Bildschirms aufzunehmen.


    Erweitern
    titleAuswahl des Mikrofons & Überprüfen der Funktion

    Mikrofon auswählen und Funktion überprüfen

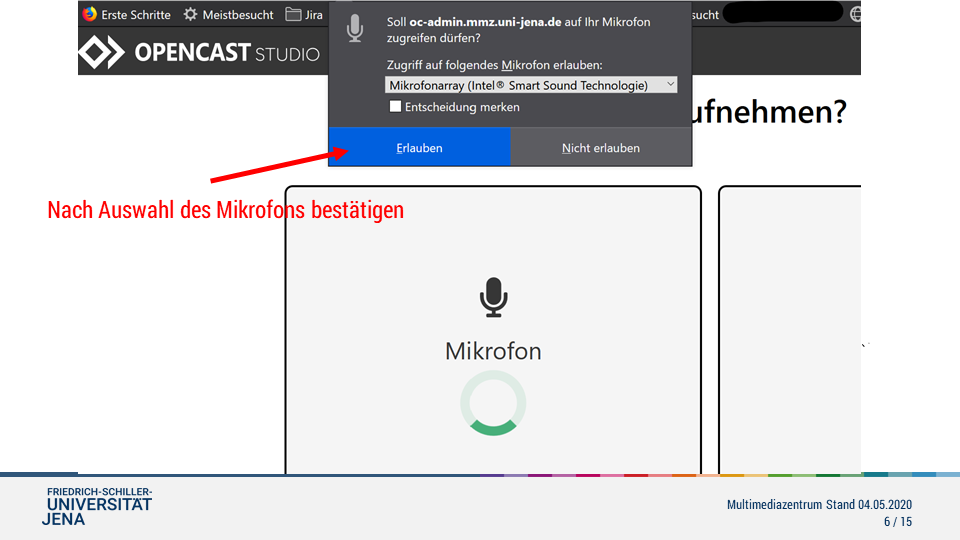
    Nachdem Sie die Bildquelle eingestellt haben, bestätigen Sie im nächsten Schritt die Auswahl des Mikrofons – sofern eines verwendet werden soll.

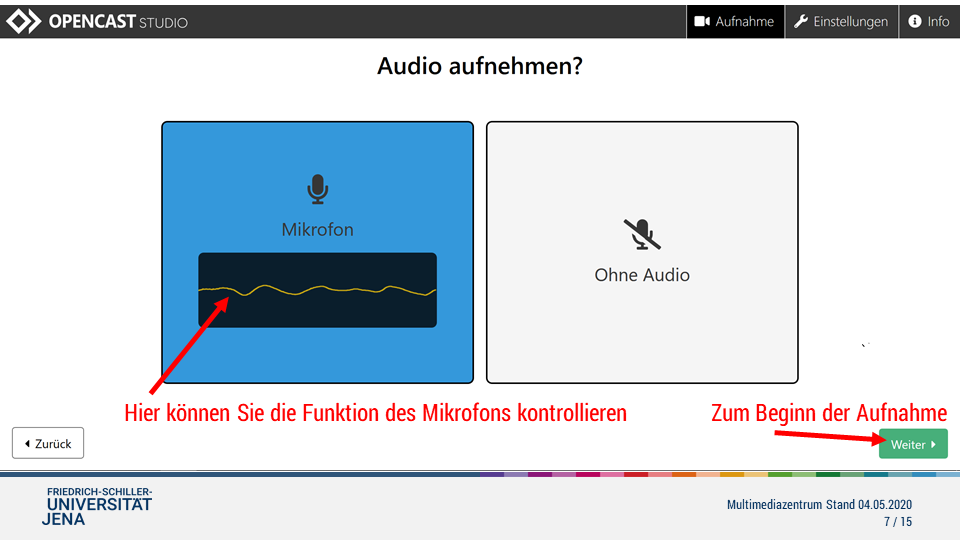
    Führen Sie einen kurzen Funktionstest durch, um sicherzustellen, dass die Audioaufnahme über das ausgewählte Mikrofon funktioniert. Klicken Sie im Anschluss unten rechts auf Weiter, um die Aufnahme im nächsten Schritt zu starten.


    Erweitern
    titleDie Aufnahme

    Die Aufnahme

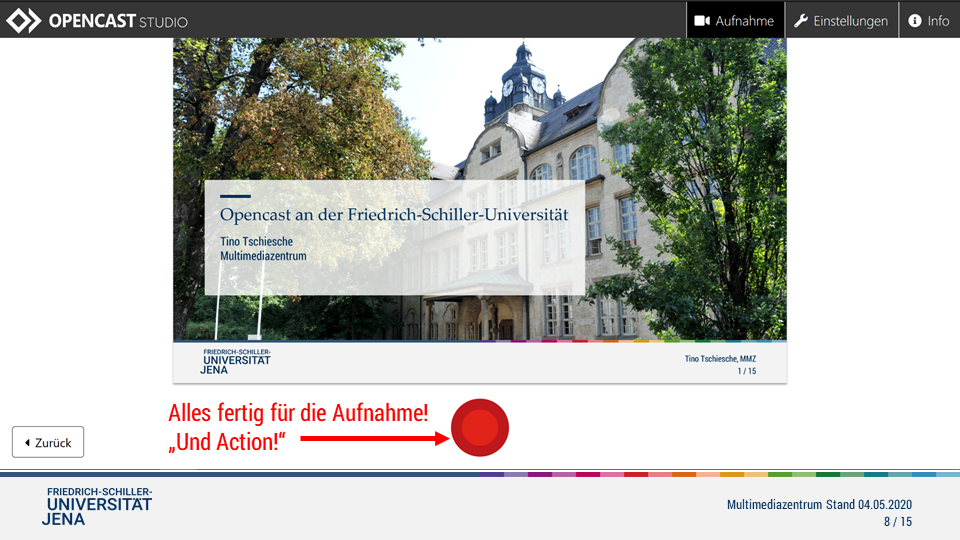
    Auf der folgenden Seite sehen Sie die ausgewählte Bildquelle. Klicken Sie nun auf den roten Aufnahme-Button unterhalb des Bildes, um die Aufnahme zu starten.

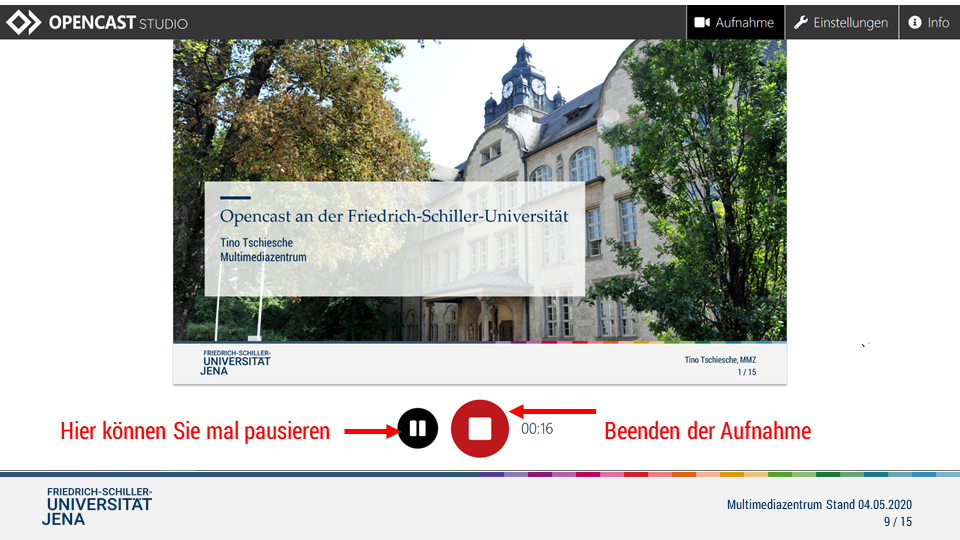
    Sobald die Aufnahme läuft, erscheinen unterhalb des Bildes zwei neue Buttons: Pause/Play (links) und Aufnahme beenden (rechts).


    Info

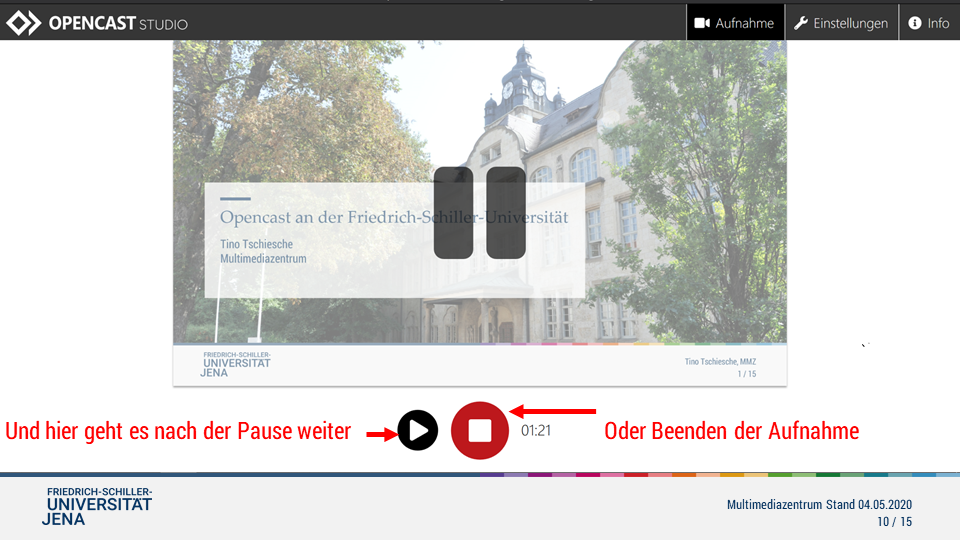
    Sie können die gestartete Aufnahme jederzeit pausieren. Klicken Sie dazu auf den Pause-Button. Um die Aufnahme wieder fortzusetzen, klicken Sie erneut auf den Pause-Button (der nun ein Play-Button ist).


    Erweitern
    titleÜberprüfen der Aufnahme | Speichern & Hochladen

    Die Aufnahme überprüfen

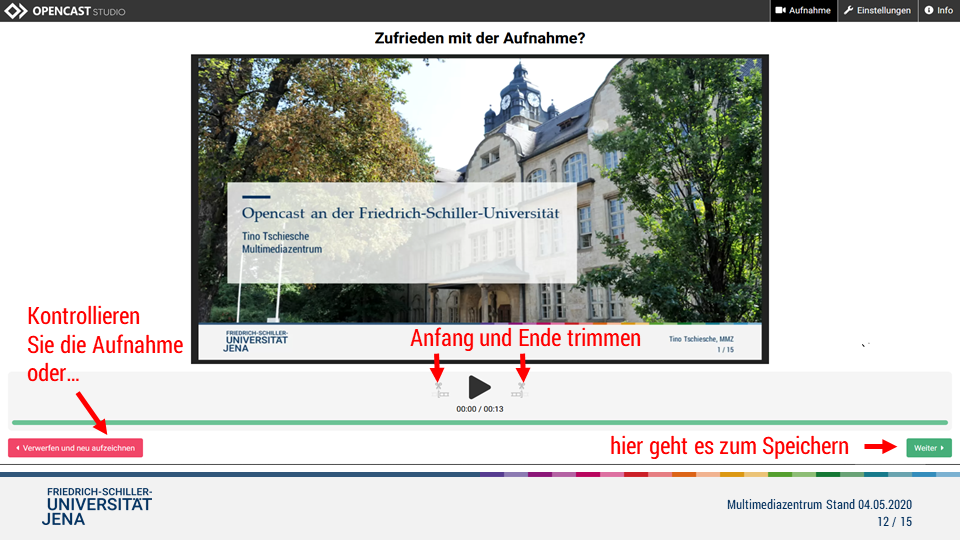
    Nachdem Sie auf Aufnahme beenden geklickt haben, können Sie:

    die Aufnahme kontrollieren: Klicken Sie dazu auf den Wiedergabe-Button innerhalb des Video-Fensters

      • Anfang und Ende trimmen
      • die Aufnahme verwerfen und neu aufzeichnen
      • die Aufnahme speichern: Klicken Sie dazu unten rechts auf Weiter

    Wenn Sie auf Weiter geklickt haben, um das Video zu speichern, erscheint dieser Bildschirm. Hier führen Sie bitte folgende Schritte durch:

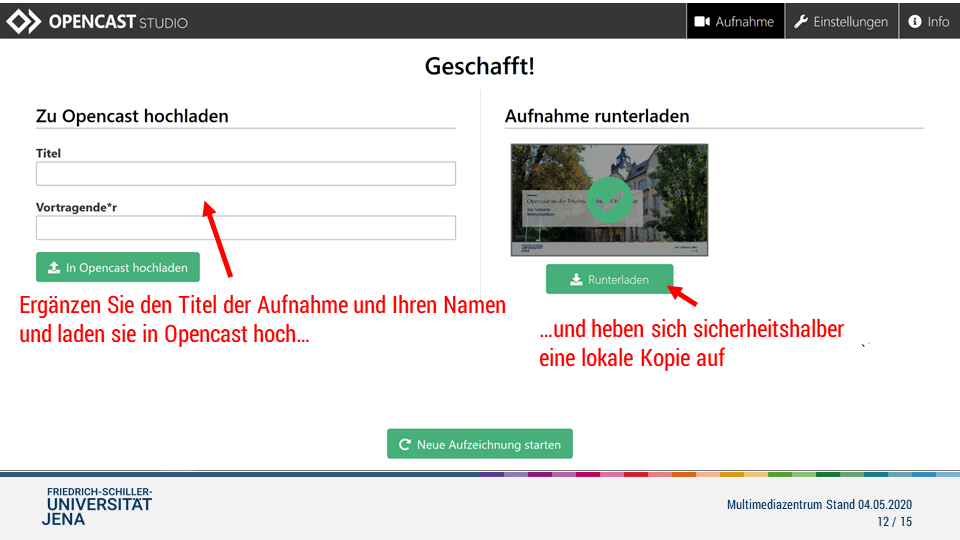
      1. Speichern Sie sich eine lokale Kopie Ihrer Aufnahme. Klicken Sie im Abschnitt Aufnahme runterladen auf den Button Runterladen.
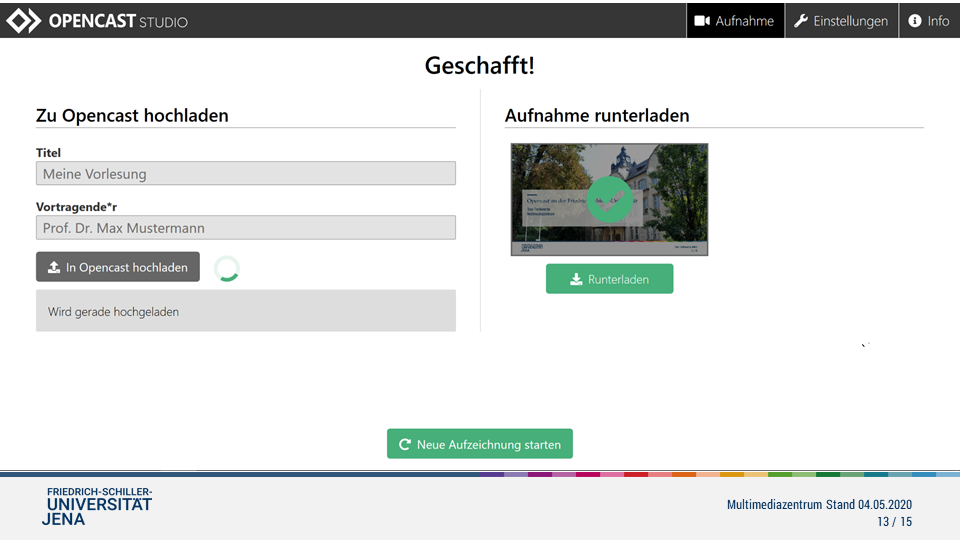
      2. Laden Sie das Video zu Opencast hoch. Vergeben Sie einen Videotitel und ergänzen Sie den oder die Vortragende*r und laden Sie das Video zu Opencast hoch, indem Sie auf den entsprechenden grünen Button links im Bild klicken.


    Erweitern
    titleBeenden von Opencast Studio

    Opencast Studio beenden

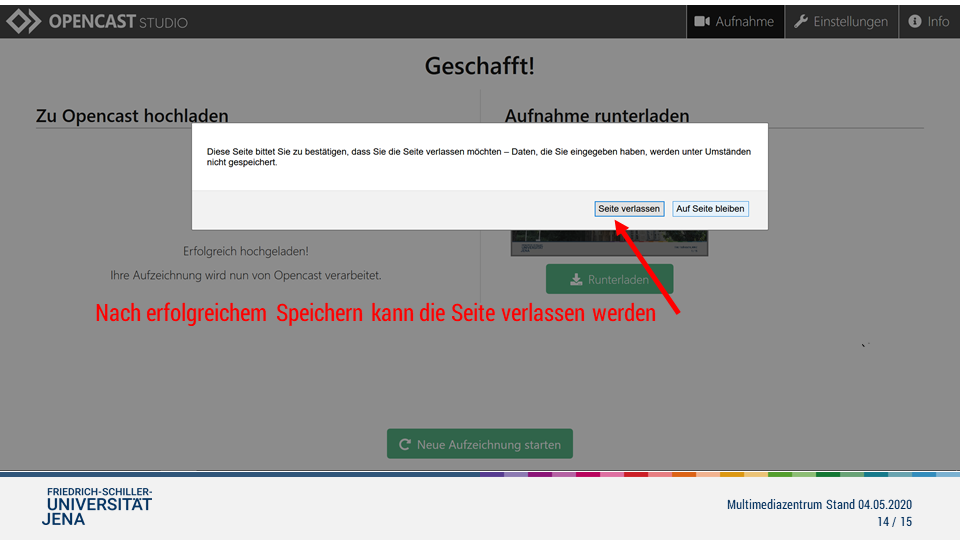
    Geschafft. Sie können Opencast Studio nun wieder verlassen. Klicken Sie dazu im sich öffnenden Dialog auf Seite verlassen.


    Englisch


    Info

    Opencast Studio is a special user interface that enables every registered user to record and publish recordings from the desktop and / or the camera image with sound directly from the web browser without additional software. An upload to the DBT is not necessary at this point.

    The video created in this way can then be edited (trimmed and pauses) directly in the browser without editing software and published in various layouts.


    Erweitern
    titleStart Opencast Studio

    Start Opencast Studio 

    Open your course in Moodle, add the block (if not already there) Opencast Videos (see instructions above) and click record video.

    Opencast Studio will open and you will see this entry screen. Here you select which video source you want to record.

    For example, click on screen to record the display of your screen.

    Image Removed


    Erweitern
    titleSelection and confirmation of the recording source & confirmation of screen sharingLaunch Opencast Studio

    In Moodle, open your course, add the block (if not already there) Opencast Videos (see above for instructions) and click Record Video.
    Opencast Studio will open and you will see this initial screen. Here you select which video source you want to record.
    For example, click on Screen to record the display of your screen.

    Image Added

    Selection and confirmation of the recording source and confirmation of screen sharing

    Below you can choose whether you want to record the entire screen or a specific window.
    Image Removed
    Now confirm the screen sharing by allowing access.
    Image Removed
    The screen is now selected and appears in the center of the screen.
    Image Removed


    Erweitern
    titleSelect the microphone & check the function

    Select the microphone and check the function

    1. After you have set the image source, confirm the selection of the microphone in the next step - if one is to be used.
      Image Removed
      Image Added

    2. Perform a brief functional test to ensure that audio recording is working with the selected microphone. Then click next at the bottom right to start the recording in the next step.
      Image Removed
      Image Added


    Erweitern
    titleThe recording

    The recording

    1. On the following page you can see the selected image source. Now click on the red record button below the picture to start recording.
      Image Removed
      Image Added

    2. As soon as the recording is running, two new buttons appear below the image: pause / play (left) and end recording (right).

      Info

      You can pause the recording at any time. To do this, click the pause button. To resume recording, click the pause button (which is now a play button) again.

      Image AddedImage Removed
      Image Removed
      Image Added


    Erweitern
    titleChecking the recording | save & upload

    Checking the recording 

    1. After clicking stop recording, you can:

      • check the recording: To do this, click the playback button in the video window
      • trim the beginning and the end
      • discard the recording and record again
      • save the recording: To do this, click next at the bottom right
        Image Removed
        Image Added

    2. If you clicked next to save the video, this screen will appear. Please carry out the following steps here:

      1. Save a local copy of your recording. In the download recording section, click the download button.
      2. Upload the video to Opencast. Assign a video title, add the lecturer and upload the video to Opencast by clicking on the green button on the left in the picture.
        Image Removed
        Image Added
        Image Removed
        Image Added


    Erweitern
    titleExit Opencast Studio

    Exit Opencast Studio

    Done. You can now exit Opencast Studio. To do this, click on leave page in the dialog that opens.

    Image RemovedImage Added


    Deutsch


    Panel
    borderColor#002f5d
    borderWidth2
    titleFAQs


    Stellen Sie vorher sicher, dass die Videos korrekt in den Kursraum geladen wurden, siehe Abschnitt Videos aus einem anderen Kurs wiederverwenden (importieren).
    Erweitern
    titleDie Studierenden können die von mir hochgeladenen Videos im Kursraum nicht abspielen.

    Die Studierenden können die von mir hochgeladenen Videos im Kursraum nicht abspielen.

    Wenn Sie als Lehrperson ein Video im Moodle-Kursraum bereitgestellt haben und es problemlos abspielen können, die Studierenden bei der Wiedergabe jedoch Probleme haben, empfehlen wir einen (oder mehrere) der folgenden Prüfschritte:

    1. die Seite des Moodle-Kursraumes neu laden
    2. neu einloggen
    3. Browser neu starten und erneut einloggen
    4. in den Inkognito-Modus des Browsers wechseln
    5. Browser wechseln
    6. den Moodle-Kursraum auf einem anderen Endgerät aufrufen
    7. Problem via Service-Desk-Ticket ans MMZ melden
    Hinweis
    iconfalse


    Erweitern
    titleWenn ich im Moodle-Kursraum eingebettete Vorlesungsvideos abspielen möchte, erscheint eine Fehlermeldung (No such HLS Stream).

    Wenn ich im Moodle-Kursraum eingebettete Vorlesungsvideos abspielen möchte, erscheint eine Fehlermeldung (No such HLS Stream).

    Das liegt daran, dass bestimmte Virenschutzprogramm die Wiedergabe dieser Videos unterbinden.

    Als verursachende Programme sind uns bisher ESET NOD 32 und Kaspersky bekannt. 

    Der Fehler äußert sich meistens mit der Meldung No such HLS Stream.

    In diesem Fall empfehlen wir den Webschutz temporär zu deaktivieren oder generell den Virenschutz gegen Sophos auszutauschen. Dieser Dienst wird von der Uni Jena kostenlos bereitgestellt.

    Sie finden den Download Link und alle Hinweise dazu unter: https://www.uni-jena.de/virenschutz 


    Erweitern
    titleIch möchte meine Videos (zur Bearbeitung) herunterladen

    Ich möchte meine Videos (zur Bearbeitung) herunterladen.

    Wenn Sie als Lehrperson ein Video herunterladen wollen (um es beispielsweise extern zu bearbeiten), folgen Sie diesen Schritten:

    1. Legen Sie im Moodle-Kursraum einen neuen Abschnitt an und verbergen Sie diesen über das Menü rechts.


    2. Fügen Sie die Aktivität Externes Tool hinzu.

    3. Vergeben Sie einen Namen.
    4. Wählen Sie im Menü Vorkonfiguriertes Tool die Option Opencast Serie aus.
    5. Tragen Sie unter Mehr anzeigen... bei Angepasste Parameter die Serien ID der gewünschten Video-Serie nach folgendem Schema ein:
      series=<ID>
      download=true


    Hinweis

    Die Serien-ID finden

    Öffnen Sie die Übersicht der Opencast Videos und klicken Sie oben rechts auf Serie bearbeiten, um die Serien-ID einzublenden.


    Wenn Sie alles richtig gemacht haben, sieht das Ergebnis in etwa so aus: 


    Klicken Sie rechts auf der Icon, um ein Video herunterzuladen – es stehen Ihnen verschiedene Auflösungen zur Verfügung.


    Englisch


    Panel
    borderColor#002f5d
    borderWidth2
    titleFAQs


    Erweitern
    titleStudents cannot play the videos I have uploaded.

    Students cannot play the videos I have uploaded.

    If you as a teacher have provided a video in the Moodle course room and can play it back without any problems, but the students have problems playing it, we recommend one (or more) of the following test steps:

    1. Reload the page of the Moodle course room
    2. Log in again
    3. Restart the browser and log in again
    4. Switch to the incognito mode of the browser
    5. Switch browser
    6. Open the Moodle course room on another device
    7. Report the problem to the MMZ via the service desk ticket
    note
    iconfalse

    Make sure beforehand that the videos have been loaded correctly into the course room, see section Reusing (importing) videos from another course.


    Erweitern
    titleIf I want to play embedded lecture videos in the Moodle course room, an error message appears (No such HLS Stream).

    If I want to play embedded lecture videos in the Moodle course room, an error message appears (No such HLS Stream).

    This is because certain antivirus programs prevent these videos from playing.

    So far, we are aware of ESET NOD 32 and Kaspersky as the causative programs.

    The error usually manifests itself with the message No such HLS Stream.

    In this case, we recommend temporarily deactivating the web protection or generally replacing the virus protection with Sophos. This service is provided free of charge by the University of Jena.

    You can find the download link and all the relevant information at: https://www.uni-jena.de/virenschutz


    Erweitern
    titleI want to download my videos (for editing)

    I want to download my videos (for editing).

    If you, as a teacher, want to download a video (e.g. to edit it externally), follow these steps:

    1. Add a new section in your Moodle course room und hide this via the dialogmenue on the right.
      Image Removed
      Image Added

    2. Add the activity External Tool.

    3. Enter a name.
    4. Choose the option Opencast series.
    5. Add under Show more the following
      series=<ID>
      download=true
      Aktivität Externes ToolImage Removed

    6. Image Added


    Hinweis

    Find the series ID

    Open the Opencast videos overview and click on Edit series, to show the ID.

    Opencast Videos ÜbersichtImage Removed Image Removed Image AddedImage Added


    If you did everything correctly, the result will look something like this:

    Image RemovedImage Added


    Click on the icon on the right to download a video - different resolutions are available for you.


    Deutsch


    Panel
    borderColor#d0d1d4
    borderStylesolid

    Titel: "Videos in Moodle"

    Stand: 1116.10.20222023


    Englisch


    Panel
    borderColor#d0d1d4
    borderStylesolid

    Title: "Videos in moodle"

    Date: 1116.10.20222023